
 As we mentioned earlier this week, the annual trek to Havasu is drawing closer for many in the PWC family.
On Tuesday, we gave a rundown of tips for long-haul trailer tips, and a few must-haves in terms of gear, equipment and safety supplies.
Today, we’ll delve a little deeper into the topic of transportation – for both ski and rider, to Havasu or any other extended PWC trip.
Before we delve into a few options for creating a DIY toy hauler, however, we’ll give a quick overview of new IJSBA announcements regarding World Finals.
In the latest official release from IJSBA, Executive Director Scott Frazier announced yesterday that the annual Youth Development Program will return to World Finals this year. Kids 8-17, who are competing in World Finals, will get some pre race on the water coaching by the very best staff in the business, Frazier stated, adding check in would begin at 5:30 a.m. on Sunday, Oct. 5. More details will on the program will be released soon, he said, and advised that those wanting to be involved should email Tanya Kennedy at Worx Racing, [email protected].
Frazier also noted, earlier this week, that the Amateur Ski Lites class has been moved from Tuesday, October 7, to Wednesday, October 8. He noted that, as of now, the World Finals schedule remains tentative, and disruptions such as weather incidents could cause changes to be made during the event. The schedule will become more definitive as the start of the event gets closer. Anyone with comments or questions regarding the World Finals schedule should email [email protected].
It was also noted that 1025 SBT World Finals VIP Pit And Group Pit reservations will open on September 10. “As with all years, IJSBA is enacting policies, procedures, and opportunities intending to make the World Finals pit environment more efficient, more fair, and, hopefully, more enjoyable. IJSBA usually sells out and some VIP opportunities require orders are placed well in advance.” You can read the full release regarding these reservations at the end of this WCJ article, or visit IJSBA’s website.
With World Finals announcements out of the way, let’s look at doing some toy hauling and road tripping!
Toy Haulers, which are basically recreational vehicles that combine living quarters with a built-in rear garage and a loading ramp to transport your PWC (or ATVs, motorcycles Kayaks, etc. are certainly a handy option for those who travel often with their PWC. Built on heavy-duty frames for durability and available as travel trailers, fifth wheels, or motorhomes, toy haulers provide the major advantage of combining secure, weather-protected vehicle transport with comfortable on-site living quarters. This eliminates the need for separate trailers, hotels, and the stress of securing valuable gear at each competition.
As appealing as that sounds, toy haulers can set you back anywhere from $25,000 to $50,000.
However, if you’re handy and have time on your handy hands, it is possible to convert most ordinary enclosed trailers into a custom toy hauler, and there are several different approaches, with options fitting a wide range of budgets.
One factor that must be a key consideration — whether you go with a lower-budget “makeshift” DIY toy hauler, or are planning on going all out to fully modify an existing trailer into a full-fledged toy hauler — is the strength and durability of the trailer flooring in the area that will hold your PWC.
One of your first steps should be to check your trailer’s gross vehicle weight rating (GVWR) and axle rating to ensure it can handle the weight of your PWC, plus additional allowances for added weight for any upgrades such as beds, benches, tables or work stations. Remember that PWCs weigh ~500–1,000 lbs (plus the weight of the trailer or dolly). A 7×14 or 7×16 box trailer with at least a 3,500–5,200 lb axle is usually the minimum.
You will also want to measure the length, width, and interior height of the trailer to plan layout. If you have purchased a used or older enclosed cargo trailer for this project, be sure to inspect the floor for rot, rust, or weakness, and reinforce the floor if needed.
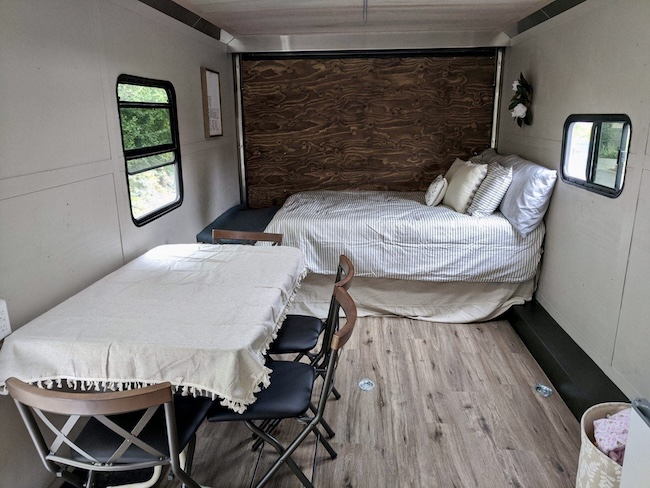
Next, using your measurements, sketch out a plan for your toy hauler’s layout, including the garage area (usually the back half or third of the trailer) and living space towards the front of the trailer.
Be sure to consider whether you will incorporate utilities such as electrical (plan on wire for 12V DC (lights, fans, USB outlets) and possibly 120V AC from shore power, solar power, a battery bank or generator; water (fresh/grey water tanks, sink, and possibly a small shower/toilet); and climate control (a roof vent with fan is essential, especially for a PWC-related hauler); a small A/C or heater can be added if you’ll camp in extreme weather.
Next, regardless of whether you are building on a budget, or going all out, you will need to decide on flooring (consider marine-grade plywood, vinyl, or coin rubber flooring for durability and easy cleanup), tie-downs (install recessed D-rings) and a ramp. With the amount of moisture you will be dealing with on a regular basis, adding marine vinyl floor with a drain and plug in the floor is a wise step, as is adding side vents or a roof vent fan to keep moisture down.
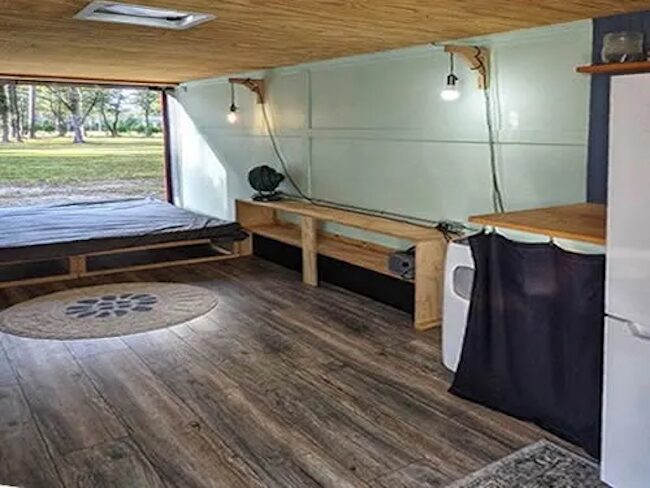
For interior finishing, insulation is not a “must have,” but can make a significant difference in the comfort and convenience of your new toy hauler.
For a more thorough job, you can use rigid foam board or spray foam in walls/ceiling, the cover with wall/ceiling cladding such as plywood, beadboard, or lightweight paneling.
 For a less intensive project, or for a temporary solution for a makeshift trailer that will only be used for one or two trips, you can add bubble wrap to the walls and ceiling for some insulation, and hang painters canvas drop cloths to cover the bubble wrap. Be sure to seal any gaps with foil tape.
Furniture can be as simple as a fold-out camp cot and a folding chair, or you can build in a fold-down bed, benches and table. A compact galley (camp stove, cooler, storage bins) can mount to one wall.
For storage, you can add overhead cabinets, under-bed storage or wall-mounted racks for a full build-out, or simply use stackable plastic totes with locking lids, Hanging tool organizers hung from trailer walls or rails, collapsible crates or canvas bins, soft-sided tool bags or gear organizers, and bungie nets and Velcro straps for vertical storage.
Additional supplies and equipment to consider:
Fire extinguisher, CO/smoke detector, ventilation.
An awning or pop-out side walls.
LED lights inside and outside.
Portable battery power station (like a Jackery or Bluetti)
Battery-powered fans or LED lights
Camping toilet + privacy tent
Foldable chairs & table
Portable propane stove (use outside only)
Cooler or 12V fridge
Water jug with spout
Collapsible sink
Camp shower
There are also several online resources with more detailed instructions, and even layouts and plans for utility trailer conversions, available on YouTube and through a general web search.