
 If you’ve owned a Yamaha powered by the TR-1 engine for more than five minutes, there’s a decent chance you’ve had that moment.
You check the oil.
It looks high.
You panic.
You drain some out.
Then you check it again later… and now it’s low.
Welcome to one of the most misunderstood maintenance steps in modern Yamaha ownership.
The TR-1 engine is rock-solid, but its oil level and oil change procedure is very specific, and skipping steps—or checking it cold—can leave riders chasing a problem that doesn’t actually exist. That confusion is exactly why GreenHulk Performance Store recently reposted Yamaha’s official TR-1 oil level and oil change procedures as a reminder to do it by the book.
If you’ve ever questioned your dipstick reading, here’s the problem—and the solution.
 The Problem: Cold Checks, Short Warm-Ups, and Overthinking It
Unlike older engines where a quick glance at the dipstick told the whole story, the TR-1 requires:
-
A fully warmed engine
-
The ski sitting perfectly level
-
A very specific check-and-recheck process
Check it cold, rush the warm-up, or don’t seat the dipstick properly, and you’ll get a false reading. That’s how perfectly healthy engines end up overfilled—or dangerously underfilled—by well-meaning owners.
The Solution: Do the Oil Check the Way Yamaha Intended
GreenHulk’s reminder walks riders straight through Yamaha’s official procedure, starting with one critical step many people skip:
If the engine is running on land, hook up a garden hose. Always.
From there, the process is all about patience and consistency.
TR-1 Engine Oil Level Check (The Right Way)
-
Place the watercraft on a level, horizontal surface
-
Start the engine and let it idle for at least 6 minutes
-
If temps are 68°F (20°C) or lower, add another 5 minutes
-
-
Shut the engine off
-
Remove the oil filler cap, wipe the dipstick clean, and reinstall it fully
-
Remove it again and confirm the oil level is between the min and max marks
If it’s low, add oil.
If it’s high, extract oil with an oil changer.
No guessing. No shortcuts.
 Oil Changes: Simple, Clean, and Extracted
TR-1 oil changes are designed to be done with an oil extraction system, not by pulling drain plugs. GreenHulk’s post reinforces that process step-by-step, including warming the engine first, removing the filler cap, disconnecting the extraction hose, and pulling the oil cleanly from the system.
Yamaha recommends Yamalube 4W or an equivalent 4-stroke oil, with API ratings SG through SL, and viscosities ranging from 10W-30 to 20W-50, depending on conditions.
Oil capacity matters here too:
-
3.2 L (3.38 US qt) without a filter change
-
3.4 L (3.59 US qt) with a new filter
Overfilling is just as problematic as running low, so measured pours matter.
Oil Filter Tip Worth Remembering
One standout tip GreenHulk highlighted:
Before removing the oil filter, punch a small hole in the top of the filter and let it drain internally for a few minutes. It’s a simple move that minimizes mess and keeps oil out of places it doesn’t belong.
Just don’t use power tools—metal shavings and engines don’t mix.
The TR-1 isn’t fragile—but it is precise. Following the correct oil procedure eliminates guesswork, protects the engine, and saves riders from chasing phantom problems caused by improper checks.
The Right Tools Make This a 20-Minute Job, Not an Afternoon
One thing GreenHulk’s reminder quietly reinforces is that the TR-1 oil system is designed to be serviced with the right tools—not improvised ones.
An oil extractor isn’t just a convenience here; it’s the correct way to remove oil from the TR-1 without introducing mess or risk. The same goes for a proper oil filter wrench, which lets the filter break free cleanly and evenly instead of being crushed or overtightened during removal.
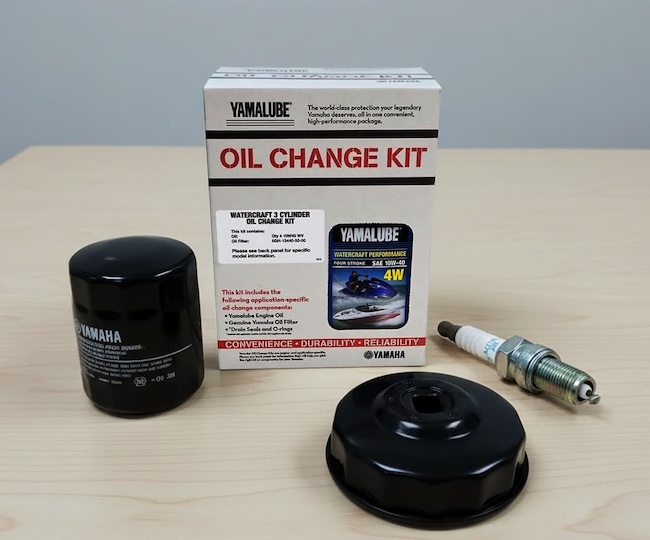
GreenHulk Performance Store stocks the Yamalube Watercraft Oil Change Kit (with four quarts Yamalube 4W 10W-40 Oil, one Yamaha 5GH oil filter, and drain seals and O rings) as well as the oil extractor and Yamaha-specific filter wrench that match this procedure exactly, which takes a lot of the guesswork out—especially for riders doing their first TR-1 oil service. When the process depends on measured quantities, clean extraction, and accurate rechecks, using tools built for the job helps ensure the oil level ends up where Yamaha intended it to be.
It’s not about doing anything fancy—it’s about doing it once, doing it clean, and not having to revisit it a second time because the reading didn’t make sense.
Below, you’ll find the full GreenHulk-posted Yamaha TR-1 oil level and oil change procedures, exactly as shared.
(Full GreenHulk post follows below)