

Some would come to understand that the reveal of Sea-Doo’s Fish Pro for 2019 sent ripples through the personal watercraft industry. The modular design of Sea-Doo’s new LinQ system integrated into a removable engine access panel, as well as the universality of the wiring harness allowed a standard then-155 horsepower GTX to be wholly outfitted with a trove of accessories creating the angling-inspired machine.
This of course, sent several current Sea-Doo owners into a tizzy; “could these accessories and add-ons be retrofitted to fit my machine?” Thankfully, yes was the answer. Earlier this year, The Watercraft Journal revealed how to (somewhat) easily install the larger 18.5-gallon fuel cell from the Fish Pro in a 2018 RXT-X 300 with very little in the way of cutting or even turning wrenches. Equally, another major accessory is just as transferable: the GPS.

The Fish Pro made waves with the addition of its Garmin ECHOMAP Plus 62cv Fish Finder, and as soon as people saw it they wanted it for their other ST3-based Sea-Doos. We turned to Adam Buckler from the Carolina Ski Riders in South Carolina, who recently made the upgrade to his RXT-X (as well as a RXT 230) to provide The Watercraft Journal a quick tutorial on how to install the factory mount, wiring and install the GPS on any ST3 hulled Sea-Doo (including the RXT, RXT-X, GTX and the Wake Pro).
Adam explains, “The kit I purchased was from Ryan’s Mobile Marine in Little River South Carolina. He has assembled these kits ready to ship for purchase. They run about $160 each. The kit consists of the mount, bolts, and harness. You will have to purchase a separate pig tail for the power supply if you have factory audio to not have to splice into factory wiring. The pigtail is approximately $25. This is a simple installation that takes about 1 hour.”
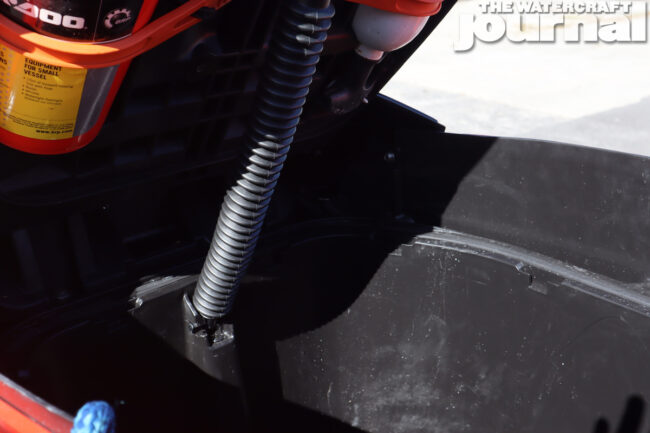
Above: The first step is to open the front storage compartment and remove the two 8mm bolts on the left and right side inside the storage bin.

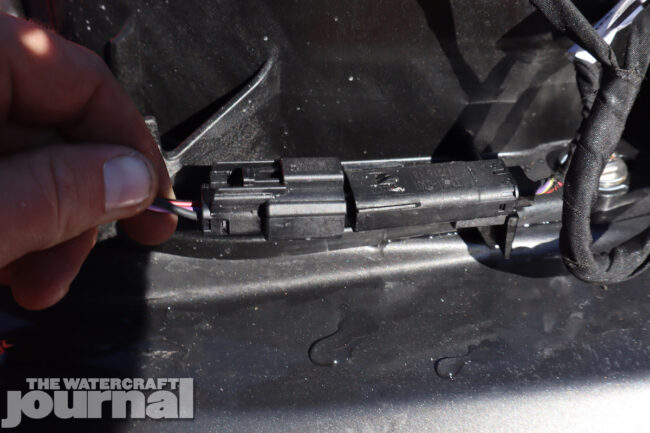
Above left: You then slide the front cover forward and remove. Above right: You will then see the factory wiring that you will run the supplied harness to.

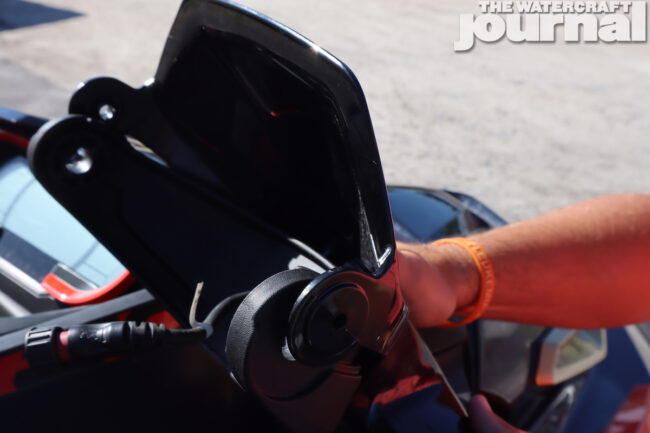
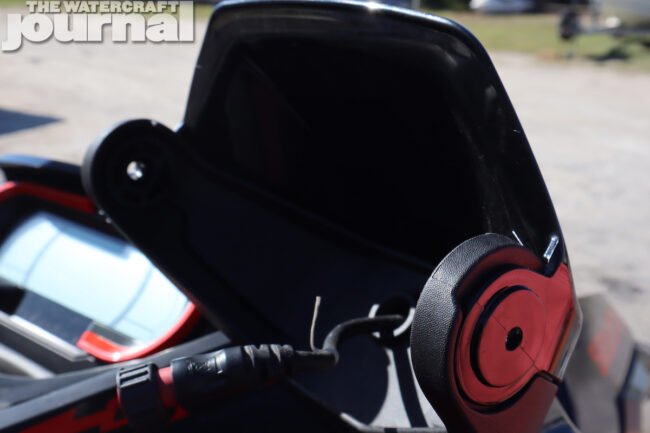
Above: The second step is to remove the mirror glass from the throttle side of the ski. It is held on with adhesive and you have to pry it off with a small screwdriver or a flat scraper, it will most likely break but will not need it.


Above left: Once the mirror glass is removed. You need to remove the black gloss cover that sits on top of the mirror mount. Above center: This is done by removing a 8mm bolt on the bottom side of the mirror. Above right: The plastic cover is also held in by retaining clips so you will need to slide the cover toward the front of the ski to remove.

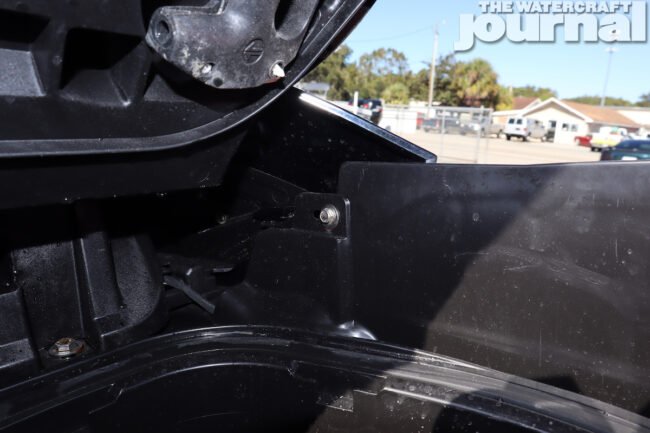
Above: The third step is to install the mount that will hold the GPS unit by installing the supplied two 10mm bolts supplied in the kit on the top of the mount.


Above: Now that you have the mount in place you need to install the harness through the mount and into the factory wiring of the ski under the front panel you removed earlier.
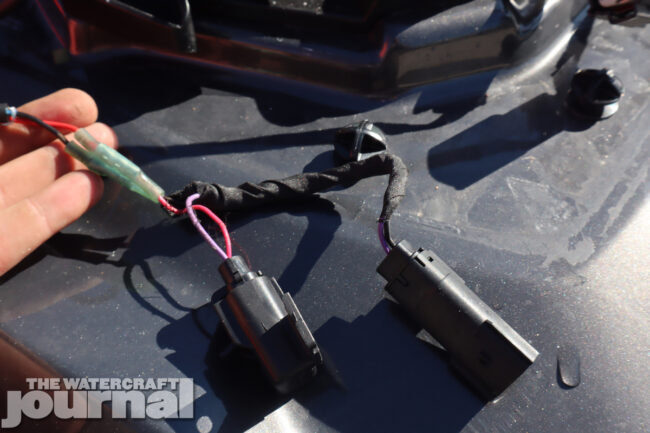
Above: You can use the supplied end with the harness if you chose to go with the 6″ screen Garmin offered with the Fish Pro. If you want to switch to the 7″ touchscreen model as Adam did you have to splice the new 2-wire connector to the end of the Garmin harness; be sure to run the wire as shown then splice it together or the plug will not fit through where you have to feed it.
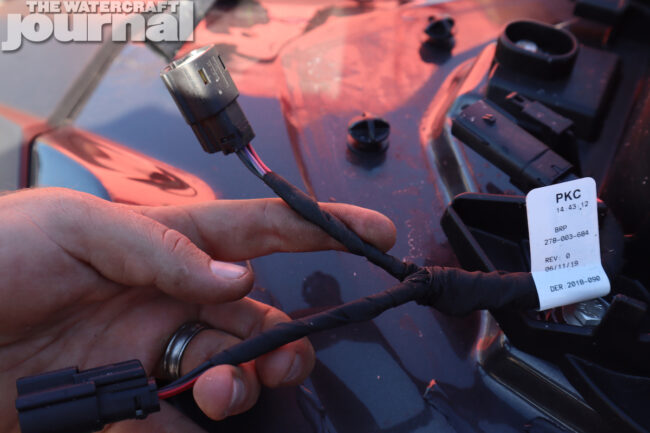

Above left: If you have the BRP audio system installed you will need the pigtail power supply. Above center: If you have the BRP audio system you will need to unplug the harness that comes from the speaker on the left side of the ski or the iBR handle side and plug the splitter in. Above right: You will then plug the Garmin harness into one end and the factory speaker harness into the other end of the splitter and tuck back away with the rest of the factory wiring.

Above: If you DO NOT have the factory BRP audio system you will not need the splitter. You will have that same plug in the same location but it will be empty. You simply plug the Garmin harness into that.
Above left: The last step is to install the gloss black cover that goes over the mount. You start by sliding the retaining clips into the installed mounts. The cover then clips into place on the top over the mount you installed. Above right: You then install the one 8mm bolt on the bottom of the mount that you removed earlier to secure the gloss black cover.


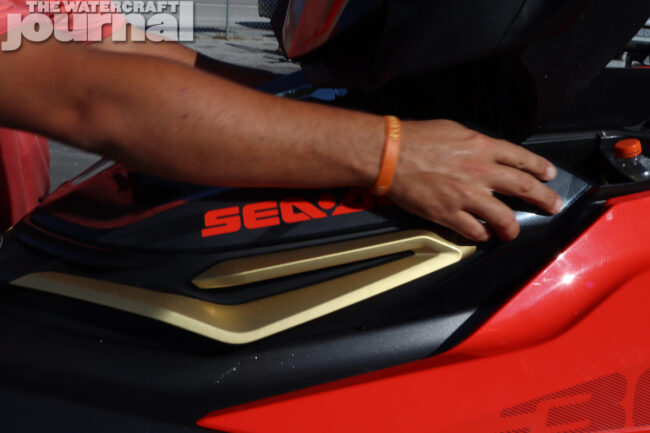
Above: You are now ready to install the Garmin you purchased. You use the supplied mount with the Garmin unit and secure via mounts from both sides and screwing the harness you installed into the Garmin holder.
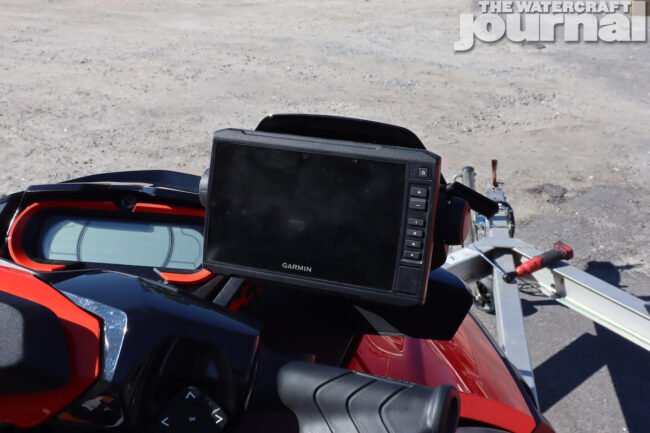
Above left: You now snap the Garmin unit into place and begin mapping your next adventure. Above right: You can now reinstall your front panel by sliding back into place and reinstalling the two 8mm bolts to secure front panel.


Great article! I have found the black cover in the Sea Doo catalog but cant find the mount P/N…. That would be great to have.
Hi Anthony. I’m looking for the same thing. Do you have the P/N for the cover and mount? I can’t find it.
I found them. Is that what I’d need to install a GPS? I’m looking to install a Humminbird instead of Garmin. Last item
https://www.sea-doo.com/us/en/shop/essentials/parts-iframe.html
20 269502357 Echosounder Support $27.99 USD
70 269502375 Deep Black, Echosounder Deflector $43.99 USD
Very helpful article. What 7″ GPS model was used during the install? Did the mount require any modification to fit the 7″ touch screen? Thanks
Garmin ECHOMAP Plus 62cv Fish Finder
Good article, would appreciate to know what 7″ Garmin model with touchscreen that fit the factory mount? Thanks!
Garmin ECHOMAP Plus 62cv Fish Finder
Is this 7″ model the garmin echomap uhd 75sv? That’s the only 7″ touchscreen model I could find
Hey I just ordered the GPS unit for my rxtx after reading this article! Once installed can I still use the factory cover for my ski? Will the unit fit under it or do I need the fish pro cover (I know it’s longer idk if that works either). I ordered the unit and the accessory harness is anything else needed?
Thanks for the information on the newer machines Kevin. I have a 2011 RXT X and a Garmin Echomap 62CV that I would like to mount. Do you have any guidance on how to mount the Garmin to an older machine?
Nothing better than what is already published here in previous articles.
Hello Kevin – Great article… I just bought all components needed to mount it to my new 2020 RXTX 300. I am going with the Garmin ECHOMAP Plus 72cv – 7 “ Screen and I have a question about the step where I would need to “splice the new 2-wire connector to the end of the Garmin harness; be sure to run the wire as shown then splice it together or the plug will not fit through where you have to feed it…“
Which cables are the one shown in the picture? Is that the Garmin power supply End? Do I need to cut the original Garmin connector in order to connect to the Sea Doo Harness provided? I am a bit confuse since in the picture I still see two connectors on one cable vs just one end with one connector.
Thanks again for the great article…I look forward to assemble mine…
Everything follows the factory schematic, which you can find at RIVA Racing or Greenhulk PWC Performance store – as well as all of the parts and part numbers.
Hello Kevin – Thanks for the article. I own a 2020 RXTX 300 and just ordered all the parts after reading your article. I decided to order the Garmin Echomap Plus 72cv – 7” Screen. I would like to ask a clarifying question:
On the step where Adam states the need for the 7” Screen “to splice the new 2-wire connector to the end of the Garmin harness; be sure to run the wire as shown then splice it together or the plug will not fit through where you have to feed it.” What end is the one that need to be cut and splice? I am a bit confuse with the picture. I cannot discern with harness and connectors are shown to understan the splice instruction? Is it the end of the Garmin Harness? Or the end of Sea Doo Harness/Splitter?
Thanks for the clarification.
Hell Kevin – I received my new echoMAP Plus 72cv yesterday and completed the installation into my 2020 Sea Doo RXT X 300 following these instructions. Thanks again for the great article, very helpful!
Angel Ruiz
I already have the factory depth finder on my rxt x can I fit the transducer for this too?
Yes, with the right wire loom extension.
You have to remove you dept finder and only use the Garmin depth from the transducer. They cant work together read the BRP instructions. I have wire both in but with a voltage change over circuit when the Garmin is on it turns of the SeaDoo depth sensor.
Does this kit get rid of the side mirror?
Yes. Just like the Fish Pro.
I’m looking for the same cover to replace the right rear view mirror and the GPS holder. Do you have the P/N for the cover and mount? I can’t find it.
Is that what I’d need to install a GPS? I’m looking to install a Humminbird instead of Garmin.
Does somebody know if it would work?
Last item
https://www.sea-doo.com/us/en/shop/essentials/parts-iframe.html
20 269502357 Echosounder Support $27.99 USD
70 269502375 Deep Black, Echosounder Deflector $43.99 USD
Hello I just wanted to ask how the 7 inch garmin at 9.8 inches wide Vs the 6 inch Garmin at 8.6 inches wide.
How well did that work out with the factory echosounder support?
Kevin I noticed that you made reference on 2 questions to the 6inch when asked about size and fit.
My super spiderman logic tells me that only the 6 inch will fit into the factory mount.
But I dont have all the parts in my hand yet.
Any one care to elaborate on installing the 7 inch 1.2inch wider unit in the factory mount?
thanks
BJ
G’day all, fellow seadoo lover from Australia. Loved the article and installed a Echomaps 75sv to my gtx230 was wondering how you have mounted your transducer in hull ?
Cheers jim
Hi Jim, Queensland RXP x 300 owner here. Did you have any luck mounting the Garmin Echomaps transducer in your hull ? Thanks Jeff