
Bummer, you’ve dinged your Sea-Doo’s hull. Fortunately, the damage isn’t severe enough to require a replacement part or even a trip to the shop if you have the tools. Repairing a polytec hull can be a DIY project if you care to tackle it.
This is where plastic welding comes in, which simply means to create a bond between two compatible polymers. This is done in two major stages, which are heating and cooling. Before going full on into the repair, make sure you have all of the required tools and other materials needed to properly patch the Sea-Doo polytec hull.
List of items needed:
- Leister Triac ST Hot Air Plastic Welding Tool
- 5mm (1/2”) 15-degree Tubular Nozzle
- PP + GF 30% 8-9mm (1/3”) Flat or Triangle shaped Plastic Welding Rods
- Flaw Repair Coating for Plastic Parts
- Belt Sander and Band 40 to 150 grit bands
- Plastic or Wood Type Rotary Tool and Burr Bit Set
- Rotary Wire Brush Crimped 2” Coarse or Medium
- Infrared Thermometer
- Sheet Metal Strips
- Degreaser
Now that all of your tools are in place, it’s time to begin the repair.
- Begin with surface preparation. Using the degreaser and a shop towel; clean the area both inside and out.
- Heat welding gun to 300 degrees F.
- Sand the repair area on the inside surface ONLY.
- Weld directly on the polytec hull to avoid delamination.
- Groove the crack from the inside surface about 1/3 of the wall thickness and extend the groove an inch past the crack in the hull.
- Remove all excess material from in and around the groove
- Cut the end of the rod at an angle and start with a clean tip.
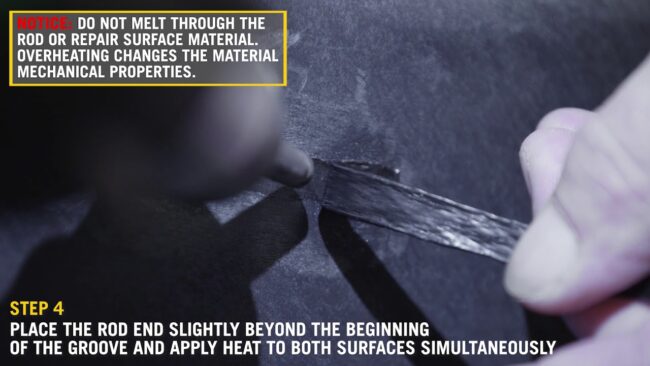
- Place the rod end a little beyond the beginning of the groove and apply heat to both surfaces simultaneously, being careful not to melt through the rod or repair surface material.
- Press the rod into the groove to fill it and continue filling by adding layers and allow each layer to cool before adding the next one. Each layer should overlap the edges of the previous one.
- Sand the weld to remove excess material.
- Inside surface only: Continue until the welding the joint covers 3X the groove width on each side of the crack and is the same thickness as the wall itself.
- Repeat steps on outside.
- The finished repair should be a flush surface.
This Sea-Doo how-to video provides hands on instruction by presenting the hull repair process from start to finish. For even more detailed information, check out the Polytec Hull Repair Guide.
The more you know might just help you get back on the water sooner!