First, we’re not going to dare to summarize a very detailed and thorough report by financial publishing monolith Forbes but we will comment on what maaaybe Polaris’ re-entry into boating. Recently, Polaris, the $5.4 billion (sales) maker of snowmobiles, off-road vehicles and motorcycles, agreed to buy the country’s largest pontoon boat maker, Boat Holdings, for $805 million in an all-cash transaction (expected to close in the third quarter), and will, according to Forbes, “round out Polaris’s portfolio of power-sports products and, it hopes, give it opportunities for cross-selling.”
“Most of our competitors have water products. We’re kind of late to the party,” Polaris CEO Scott Wine told Forbes. While Forbes notes that Yamaha, Kawasaki and others that compete with Medina, Minnesota-based Polaris in these existing markets, Kawasaki does not offer boats or outboards; strictly JetSkis. Yamaha, conversely, is the industry leader in jet boat sales, and wields the second-largest marketshare in PWC sales. BRP, Polaris’ biggest competitor on this scale, builds both Side-by-Sides, snowmobiles, outboard engines and PWC.
According to Forbes, “the U.S. market for new powerboats is $8 billion, and pontoon boats are the largest and fastest growing segment of the industry with an 11% compound annual growth rate since 2010. There’s strong overlap between the different types of powersports with some 30% of Polaris’s existing customers owning a boat. (…) Boat Holdings, which manufactures its boats in Indiana, has been growing faster than the industry, and has been at the forefront of the shift to high-featured, high-performance luxury boats, according to Polaris. Even without custom finishes, these boats are pricey: A 25-foot Bennington R Series fastback pontoon boat can run $60,000 or more.”
If Polaris’ acquisition of Boat Holdings earns dividends in a reasonable timeframe, the brand maker may seek to explore re-entry into the personal watercraft market – particularly as the PWC industry is experiencing double-digit growth over the last two years.
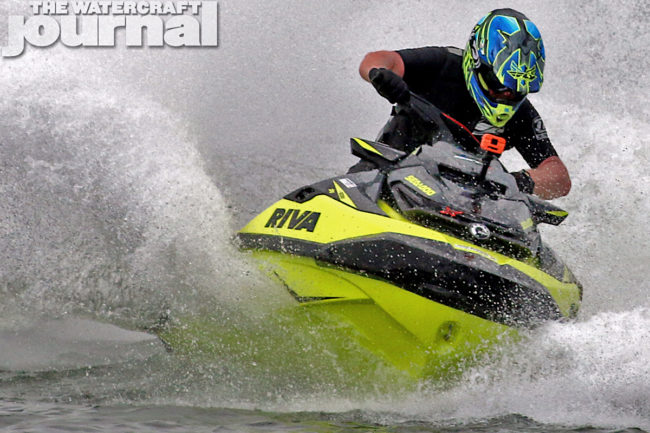
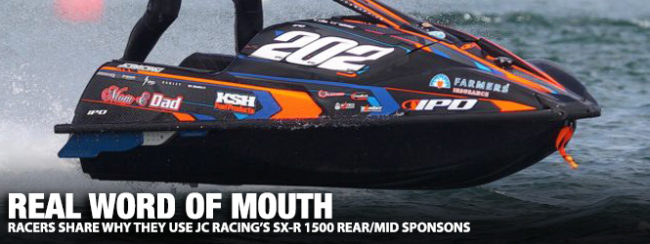
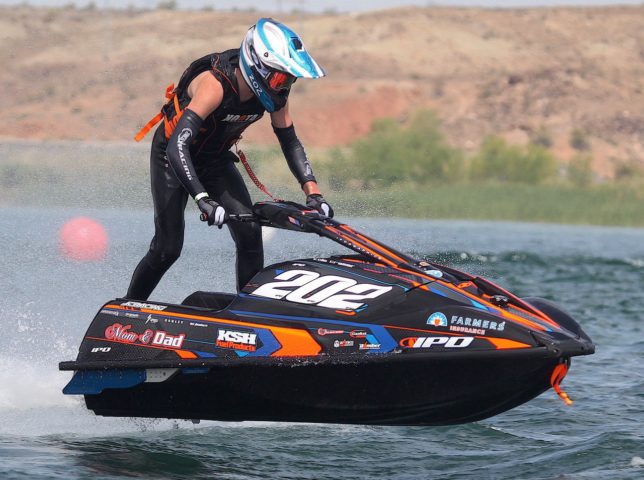
For those into standup ski racing, the introduction of the new Kawasaki JetSki SX-R 1500 was a windfall. The long, contoured hull borrowed heavily from Kawasaki’s storied history of both standup ski handling and rough water runabout balance. Heavier than any other ski before it, the new SX-R could aptly split through chop, absorbing impacts that would best lesser riders. Of course, toting a 160-horsepower 1.5L 4-stroke beneath the hood added greatly to the SX-R’s immediate appeal. No longer plagued by the rattle and smoke of a 2-stroke, the clean-running electronically fuel injected Kawasaki fired up smoothly and ripped with brutal grunt.
With that, aftermarket tuners have quickly adopted the new ski as the tool to use; quickly testing and developing performance products to unearth and magnify the ski’s cornering capability, balance and ability to track true without any unforeseen bucking, searching or wobble. One such company is JC Racing. Helmed by Jason Carlton, JC Racing has taken Carlton’s experience as a developer of high tech components for satellites and the Mars rover (literally) and applied it to producing top tier jet ski components. The latest (and arguably one of the most successful) products in JC Racing’s catalog is the Rear/Mid Sponsons.
Literally the first of its kind, JC Racing incorporated the rear sponson that “includes a backing plate base sponson for added stability at high speeds with a mid sponson for unbeatable grip throughout the corner.” The result is a sponson that offers the best of both worlds; a stable ride, yet allows for hairpin cornering when prompted. And accordingly, the JC Racing Rear/Mid Sponson can be configured to be race legal per the IJSBA rulebook. According to Carlton, “These sponsons will provide both the average recreational rider and the world class professional the confidence they are seeking to push this new 1500 to its limits while creating the desired comfortable and predictable ride.”
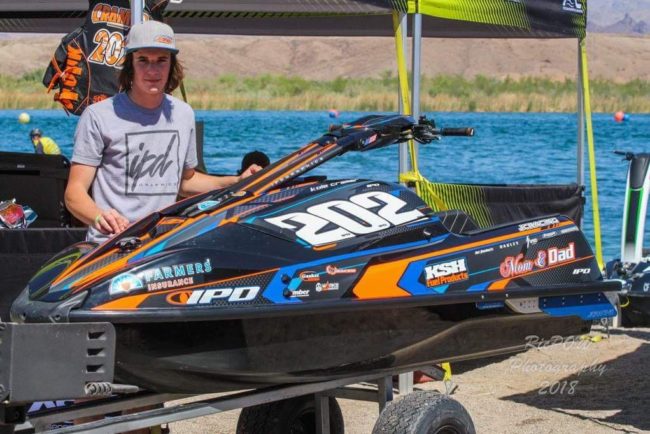
We spoke to three SX-R riders who are currently using the JC Racing Mid/Rear Sponson; Jeremy Poper, a veteran racer with over 30 years experience; Kole Cramer, a Junior Ski class racer; and Frank Gurnari, a standup ski enthusiast who has never set foot on a race course in his life:
The Watercraft Journal: Kole, tell us a little about yourself.
Kole Cramer: I live in Lake Havasu City, Arizona. I started riding when I was 4 on Lake Powell on a 750 SX, and have been racing since 2014.
WCJ: So what classes do you race currently?
KC: I race Pro-Am Ski Lites in IJSBA (GP4 JetJam), and Pro Ski GP/Open in IJSBA (GP1 JetJam).
WCJ: How do you like the JC Racing sponsons on your SX-R?
KC: I like the JC Racing 1500 sponsons the best because it is the best one out there. I think that it is very nice how well it fits up there in the bond flange to let no water up there so it does not lay over and stay over in any type of water condition. It also includes the mid sponson, which is nice for the wide open sweepers and you can go and snap a corner any time you want.
The Watercraft Journal: Frank, you’re a little different than these two guys. Tell us about yourself.
Frank Gurnari: I’m Frank Gurnari. I’m 39 years old and from Harvey’s Lake, PA. I’ve been riding stand-up jet skis for 27 years but I’ve never raced. I’m a “recreational warrior.”
WCJ: Ha! Great! And what did you like about the JC Racing sponsons?
FG: What first piqued my interested with the JC Racing sponsons was the rear-mid combo, and once I found out about the multi-mounting points of the rear blades and the billet aluminum construction, I was sold.
WCJ: What was your impression when you put them on?
FG: Upon receiving the sponsons, I was instantly impressed with the design, build, packaging of the hardware and detailed instruction provided. With the design of these sponsons, they are a tight fit, but with some light persuasion they will click into place.
The first ride with the JC Racing sponsons I knew I had made the right choice. The combination of the stock ride plate and sponsons made my ski handle as I had hoped. Stable high speed straights and high speed cornering that makes me feel like I’m pulling G-forces straight out of the space program.
The chine walk that plagued the new SX-R for me has been totally eliminated, along with the feeling of being held down in the corners. With the multiple mounting locations for the rear blades, these sponsons will fit all riding styles.
The stock SX-R, although buoyant, was never as stable as it was billed to be. I tried a few other set-ups from the other company’s offering handling parts, which helped, but I still wasn’t satisfied. I recommend anyone looking to improve the handling of their Kawasaki SX-R 1500, look no further than JC Racing’s mid/rear sponson combo. Give that SX-R the GP handling it deserves!
The Watercraft Journal: Jeremy, you’ve got quite a bit more time under your belt as a racer. Can you tell us a little bit about yourself?
Jeremy Poper: I’m from Albuquerque, NM, and I have been riding skis for 30 years, [pretty much] spending weekends at the lake since my childhood. I have been racing competitively for 17 years. I race in Expert Vet Ski, Pro-Am Ski Stock, Pro-Am Ski Open. Rick Kantola at Peak Power Sports has worked on my skis and sponsored me through my racing career. With his help I learned that testing is key to making your setup the best it can be for your personal riding style. Everyone is different and every setup will be different from rider to rider.
WCJ: Right! And what have you found works best for you and your particular riding style?
JP: I have tested 4 different sets of sponsons on the new SX-R 1500. I was somewhat happy with the sponsons I was first running but really thought they could be better. After meeting Jason with JC Racing at World Finals, I had a chance to check out their new design and I was very interested in trying them out. Jason met me in Lake Havasu the day before the Mark Hahn Memorial to test his latest version of the JC Racing sponsons. Typically it takes a bit when you switch handling components on your ski to get a feel for them.
Surprisingly, the first lap I did with the new sponsons on I felt right at home and they had the extra holding edge I was looking for. The other major benefit was it stabilized the ski more, and it took out the “Kawasaki lean” as I call it where the ski goes from chine to chine in a straight away. I would recommend anyone to try the JC Racing sponsons. With the adjustability of the backing plates, you can customize them to your riding style.
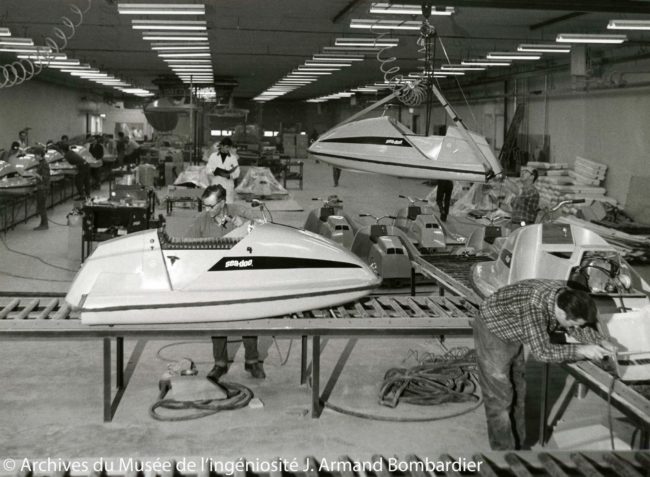
The world’s most popular personal watercraft brand turns 50 years old this year, and because of which, we’re giving you a quick glimpse at Sea-Doo’s original machines thanks to the Bombardier family and some vintage video footage. Above is a snapshot from half a century ago as the first Sea-Doo watercraft were in progress. Unlike the top-of-the-line facility in northern Mexico, the original Sea-Doo were assembled at the Roski factory in Roxton Falls, Quebec. According to the original Facebook post, this limited bombardier subsidiary was specialized in fiberglass.
Today’s modern Sea-Doo have come a long way, particularly in the power department. Current Sea-Doo push an impressive 300-horsepower from a supercharged-and-intercooled 1,630cc 3-cylinder, while the original Sea-Doo came with a Rotax engine displacing 320cc, an aluminum 2-stroke, air-cooled, single-cylinder. In all, horsepower output was a paltry 18 @ 6,000rpm. A shadow of today’s 68-70mph top speeds, the 1968 watercraft could reach a maximum speed of 40 km/h (or 25-30mph). Of course, the Sea-Doo was also the first watercraft equipped with a jet engine to be marketed, making it quite unique for its time, hailing a retail price of $995.
And if you liked the above factoids and snapshot, make sure to watch this vintage news reel on the machine in action:
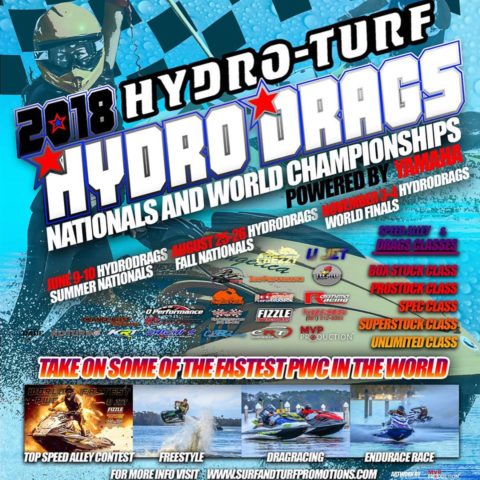
Being the pilot of the fastest personal watercraft in the world does come with some perks for sure, but with it also comes no shortage of challengers. The team at UJet understand that completely, and as such are putting up a cold $1,000 cash for whoever can break their record of 127 miles-per-hour. That’s right, 127mph on a PWC.
And thankfully, if you think you have what it takes to topple the champ, you won’t have to wait long because this weekend is the Hydro-Turf HydroDrags Summer Nationals Powered by Yamaha, in Talvares, Florida.
With a handful of classes available for entry, nearly every take, model and modification has a proper place. Moreover, the Surf & Turf Promotions event will also be hosting a freestyle session and endurance race in addition to the top speed alley and heads up drag racing. It’s some of the most exciting events in PWC racing today, so seriously, if you can make it, you gotta go.
The original post read (edited for grammar, punctuation and syntax):
In only 3 days come and be a part of the hottest PWC drag racing in the world. Watch the world’s fastest PWC’s compete to maintain their spot among the fastest and quickest, from bone-stock PWC’s to fully-custom builds. The IJSBA 2018 Hydro-Turf HydroDrags Nationals and World Championships Powered by Yamaha will be held at Wooton Park West, 100E Ruby Street, Tavares, FL. Come and be a part of it! Everyone is invited.
2018 HydroDrags Schedule
HydroDrags Summer Nationals, Tavares FL – June 9-10
HydroDrags Fall Nationals, Tavares FL – August 25-26
(TBA) Lakeland, FL – September 29-30
HydroDrags World Finals, Tavares FL – November 3-4
Former star competitor with the Ozza jet ski team, Sommai “Yong” Wongwiboonkit, 47, was once a third-place finisher in the Bangkok Jet Ski competition in 2011. Today, Sommai was arrested in Nonthaburi accused of leading a gang responsible for stealing pickup trucks and SUVs and selling them in neighboring countries.
Crime Suppression Division (CSD) officers apprehended Sommai on Saturday under an arrest warrant issued after a vehicle theft in Nakhon Pathom on April 29, according to a report by The Bangkok Post. Wicharn Onsomkit had his Toyota Fortuner stolen and immediately alerted police, who “radioed local officers to monitor the vehicle’s GPS tracking system. The Fortuner was found abandoned not long afterward. The license plates had been changed, but a shoulder bag and a mobile phone were found inside the vehicle.”
“A subsequent investigation led to the arrest of Mr Sommai in Nonthaburi. Seized from his house in Bang Bua Thong were 31 items including numerous license plates and car registration books, three vehicles suspected of having been stolen, and two 9mm pistols,” continues the article. “Investigators said the gang allegedly headed by Mr Sommai focused on stealing Toyota Hilux Vigo and Fortuner vehicles that were in a high demand and could fetch high prices in neighboring countries. They say the gang was responsible for numerous thefts dating back to 2012, mostly in Phetchabun, Loei and Prachuap Khiri Khan provinces.” Sommai was wanted on 11 arrest warrants in all.
A blog written by Kimber Shaye begins with she and her husband musing about how cool it would be to know the depth of the open water when riding their 2016 Yamaha VX Deluxe WaveRunner. It was all fun and games until they ran aground in a lagoon, which was typically 2-3 feet deep. Thus the hunt for a depth finder began.
Following weeks of research, they settled on the Raymarine Dragonfly 4 Pro. It is the perfect size for PWC and has all the bells and whistles. The included mount isn’t suitable, so an aftermarket RAM Mount Marine Electronics attachment is recommended by self taught marine mechanic, Nick (the bloggers brother).
He picked up more than 10 years worth of knowledge through owning competitive bass boats and outfitting them with fish finders and transducers. Naturally, Nick helps install the depth finder; a job that takes time and patience. It also requires drilling a few small holes in your machine.
The team decides an in hull mount method is best for installing the transducer. As for routing the small cables, they wanted the least invasive method possible so they utilized going through the existing steering column. By doing so, they were able to avoid drilling into the WaveRunner’s hull. Once the wires were routed and everything was good to go, it was time to attach the mount for the Dragonfly Pro.
The mount has a small base, making it easy to find a good position on the WaveRunner and is built to withstand rough waters and vibrations of smaller watercraft. Installation only required drilling two holes, which had no impact on the water tight areas due to the WaveRunners’ design. Once the job was complete, the WaveRunner was put back together and the couple took it out the next day and they didn’t run aground.
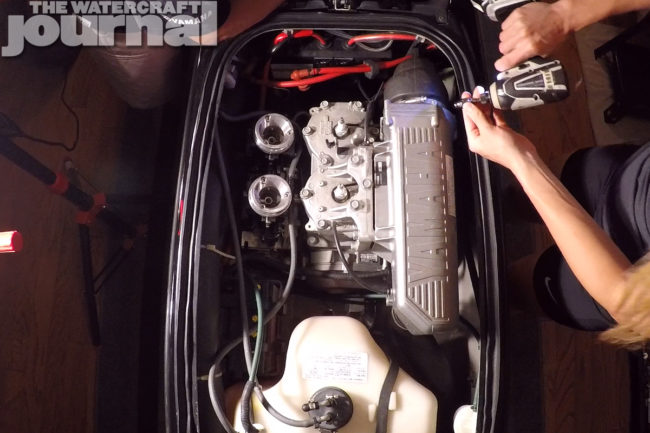
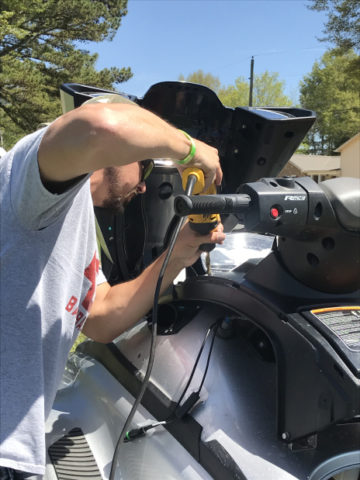
The 701cc Yamaha SuperJet has been an icon in the stand up jet ski world for nearly three decades, and over that time period many modifications have been perfected. Let’s face it, most of us at some point in our jet ski riding careers want to go faster. If you are looking for a reliable, OEM option for you inner speed-freak the Yamaha 64x 760cc top end kit is a great option to consider. Not only is it Stock class legal in Pro Watercross and Lites class legal in IJSBA, it can provide an extra boost in the upper power band and top speed on your freeride or recreational lake SuperJet.
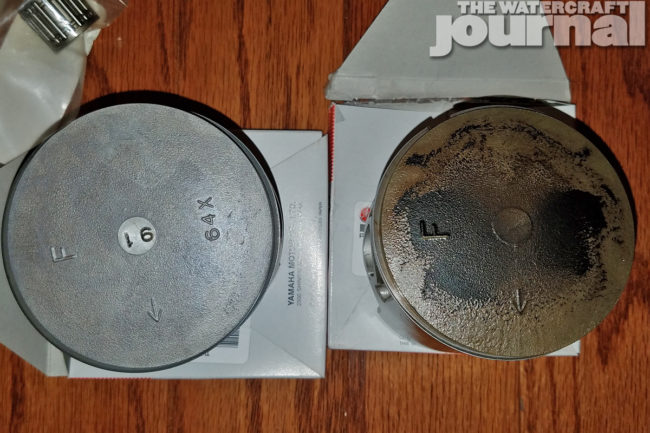
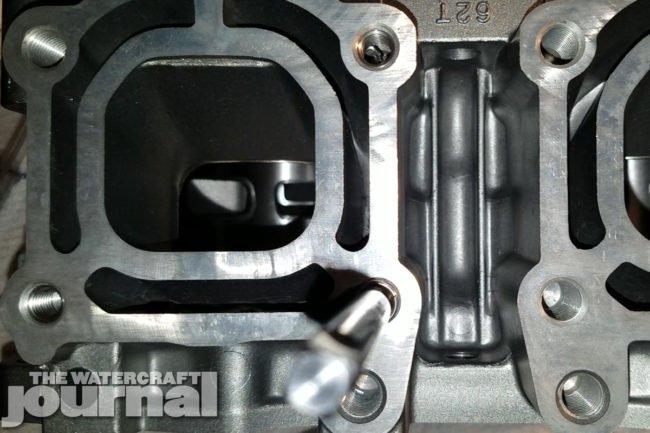
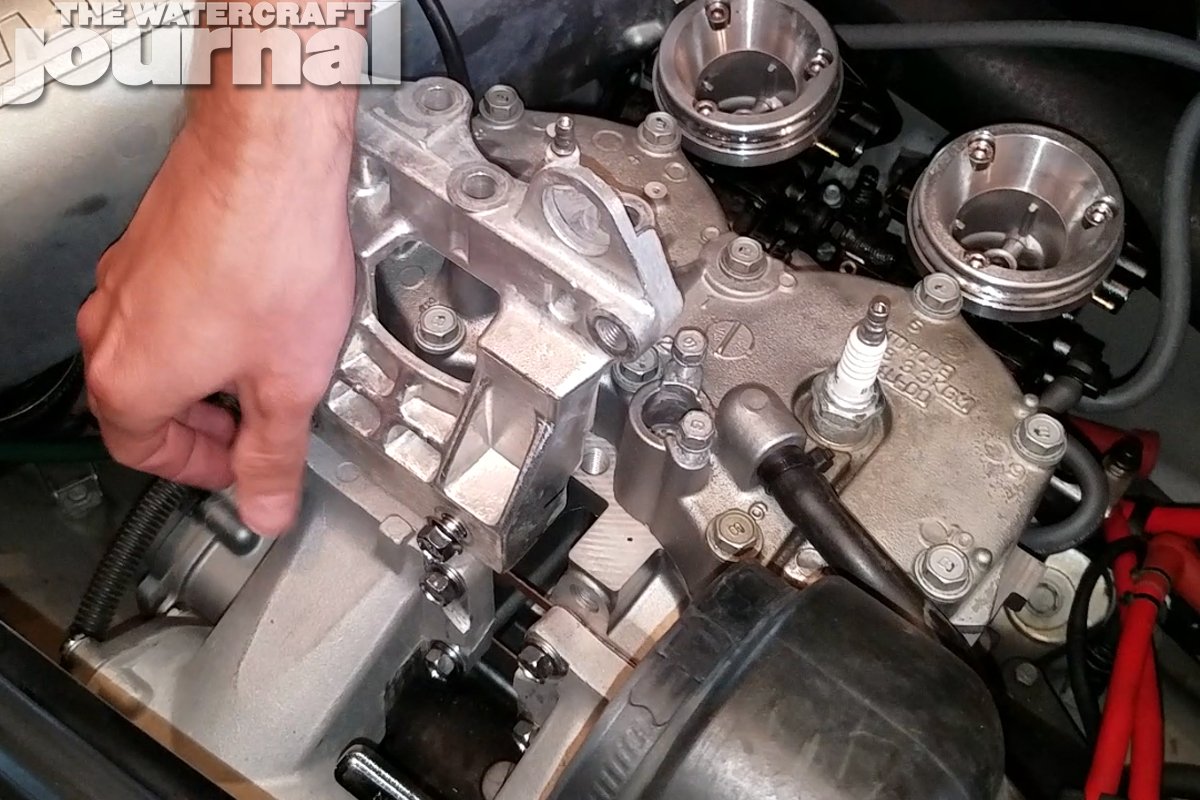
Depending on your budget you can source a used 64x cylinder from a number of Yamaha watercraft including the WaveBlaster 2, GP760, Venture 760, Raider 760, and XL760 or you can purchase all parts new from Yamaha. Since my build was prompted by adhering to race-legal requirements I went with freshly manufactured new Yamaha cylinder and pistons. This ensured nothing in the engine had been modified by a previous owner. The 64x 760cc cylinder drops right on to the modern 62T SuperJet bottom end cases with no modification except a small notch in the stock exhaust bracket I will illustrate later in the article. The 760cc top end differs from the stock 701cc by having a larger bore size and higher port timing. Stock crank shaft stroke is retained, hence being able to drop straight on to the OEM cases. The 701 head can also be retained, with the only difference being a 760cc head gasket taking the larger bore size into account.
Above left: Begin disassembly by removing accessories and exhaust to reach the cylinder bolts. Above right: Once the six cylinder bolts are removed, the cylinder and manifold can be removed as a unit. Take care to remove the water line on the bottom of the manifold.
Above: Remove the old pistons and gasket. Clean off any gasket residue before beginning piston and cylinder install.
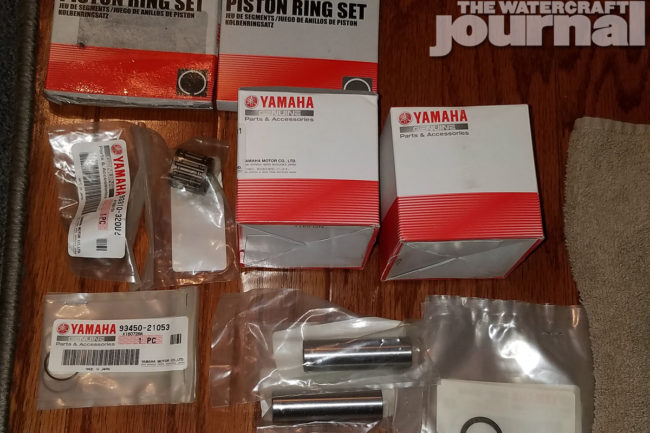
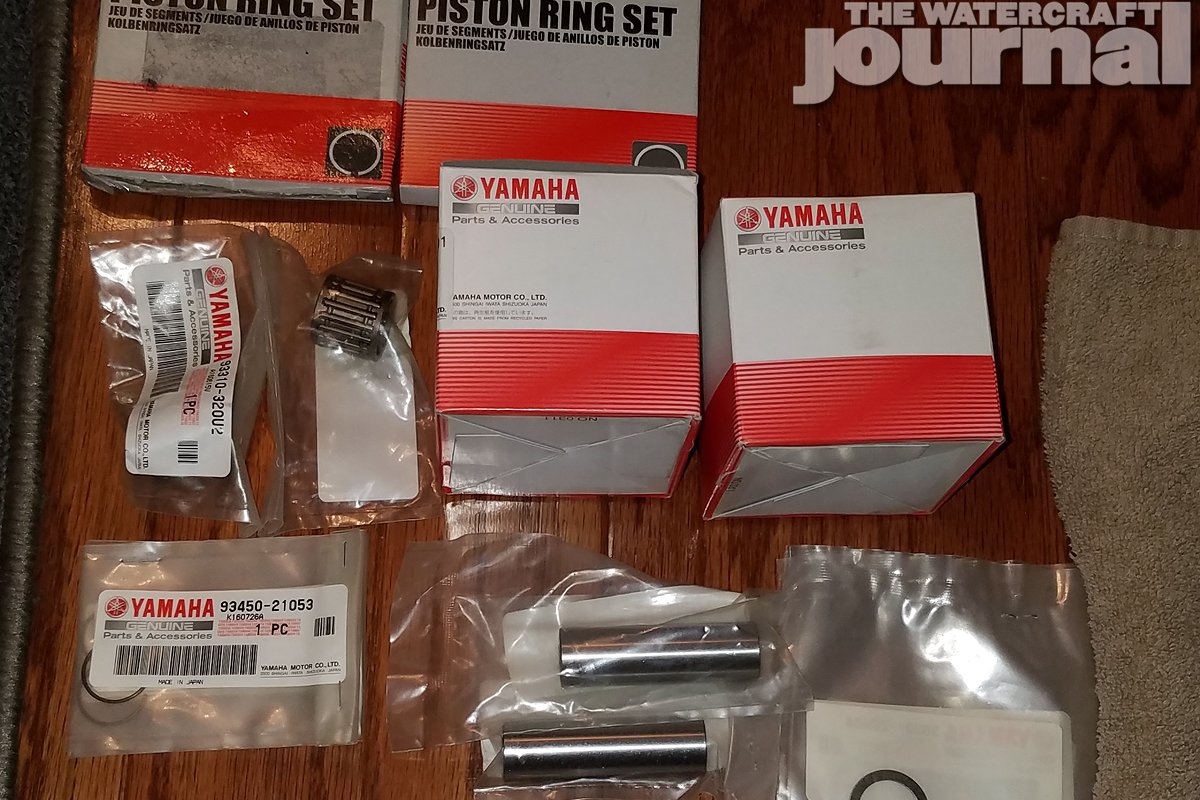
Parts needed
(1) 64x Cylinder
(2) 84mm pistons
(2) Piston ring kits
(2) Wrist pins
(2) Roller bearings
(4) Wrist pin clips
(4) Wrist pin washers
(1) 760cc Head gasket
(1) Base gasket
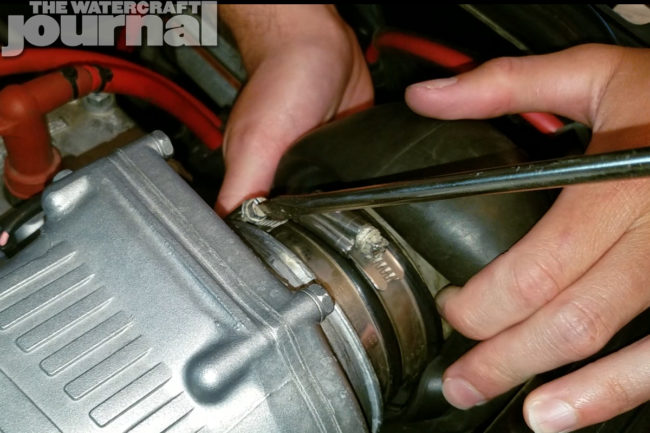
Peripheral Disassembly Disconnect the battery so no switch can accidentally be hit and trigger moving parts. Remove the spark plug boots and place to the side, remove the temp sensor from the head, disconnect all water lines that will restrict removing the cylinder and exhaust from the ski. Loosen the worm clamp on the outer rubber exhaust boot, peel back to expose the two inner worm clamps. Loosen the front one to allow the expansion chamber or “breadbox” part of the exhaust to separate from the U shaped tube.
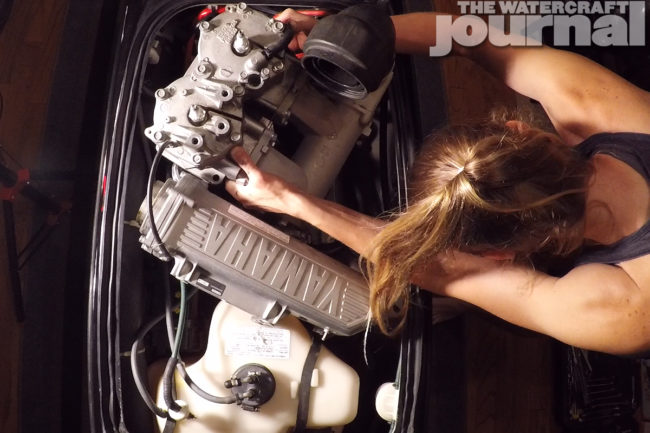
Remove the three bolts holding the breadbox to the exhaust bracket mounted to the head. Loosen the worm clamp on the small rubber exhaust tube on the front of the breadbox to allow it to be rotated out of the way. You can also fully remove the breadbox if you wish, I chose to just rotate it. To limit the amount of wrenching I needed to do within the limited space of the hull I removed the cylinder and exhaust as one unit. Be mindful of cylinder bolt sizes, the front and rear most bolts on the exhaust side are longer than the remaining four.
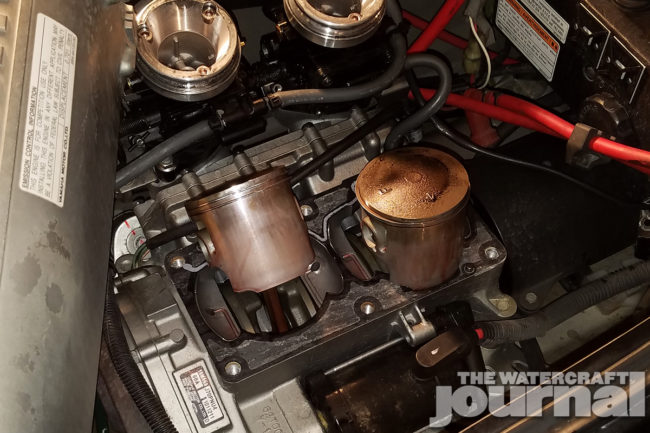
Above left: Place towels around the rods to keep small parts from falling into the crankcase. Pop out the circlip using a pointed tool such as a pick or small screwdriver. Wear eye protection in case the circlip springs out. Above right: Note the two cylinder alignment dowels should remain with the crankcase. Do not allow them to fall into the crankcase.
Above: Replace all piston-related parts with new ones. Cheap insurance knowing your top end will be fresh.
Cylinder Removal
Once all bolts are loose and removed you can start to separate the cylinder from the cases. Depending on the age of your engine, corrosion, heat cycles, etc. you may need to apply a few sharp taps to shock the cylinder loose. Careful not to drop the two alignment dowels (one on the front intake side and the other on the rear exhaust side) into the bottom end if they stick in the bottom of the cylinder rather than the cases. Pull upward slowly, taking care to not let the pistons bind and flop out of the cylinder. Once the cylinder and exhaust is removed from the hull you can take off the exhaust and head if you will be reusing the OEM parts, I chose to use an electric impact driver to speed up the process.
Piston Removal
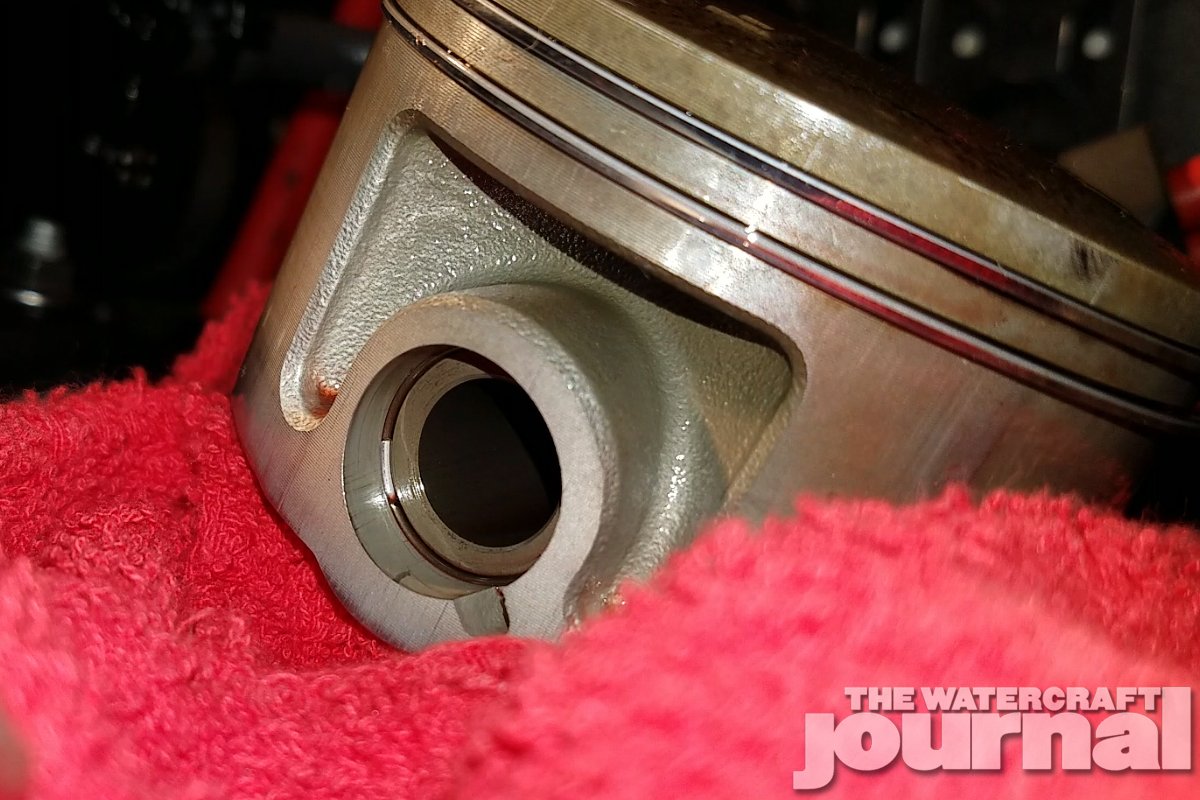
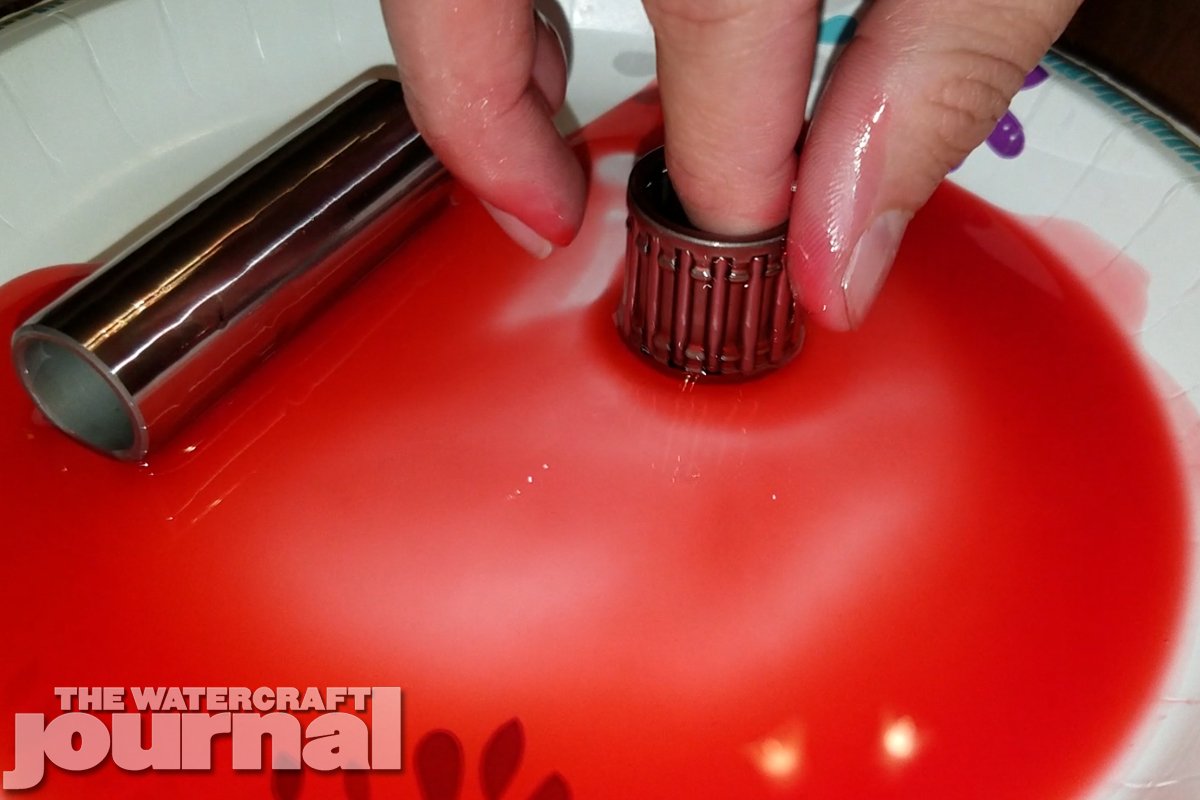
Now for the fun part of removing the springy piston circlip without sending the circlip into orbit the dimension where missing socks go. Cover the bottom end around the crank rods so no small parts can drop down. I started with the rear piston, rear circlip. Once removed, press the wrist pin backwards and out, taking care to not let the two wrist pin bearing washers drop. Remove the piston and roller bearing from the rod. Repeat the process for the front piston.
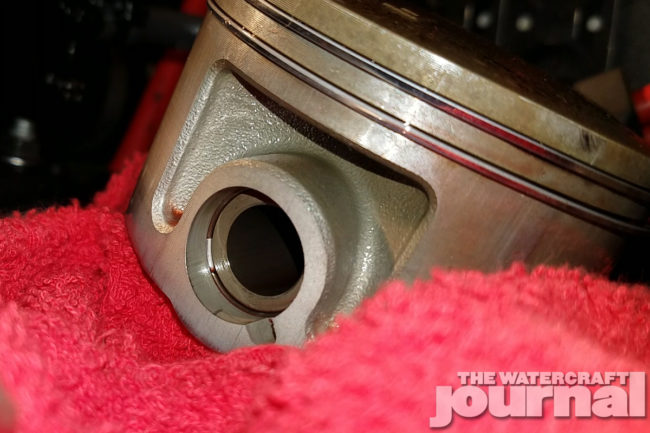
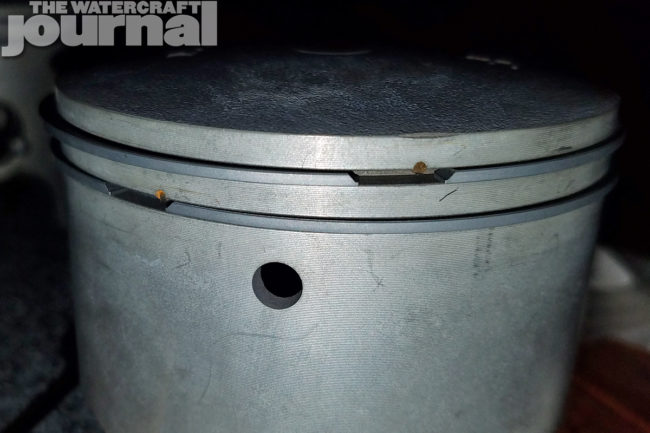
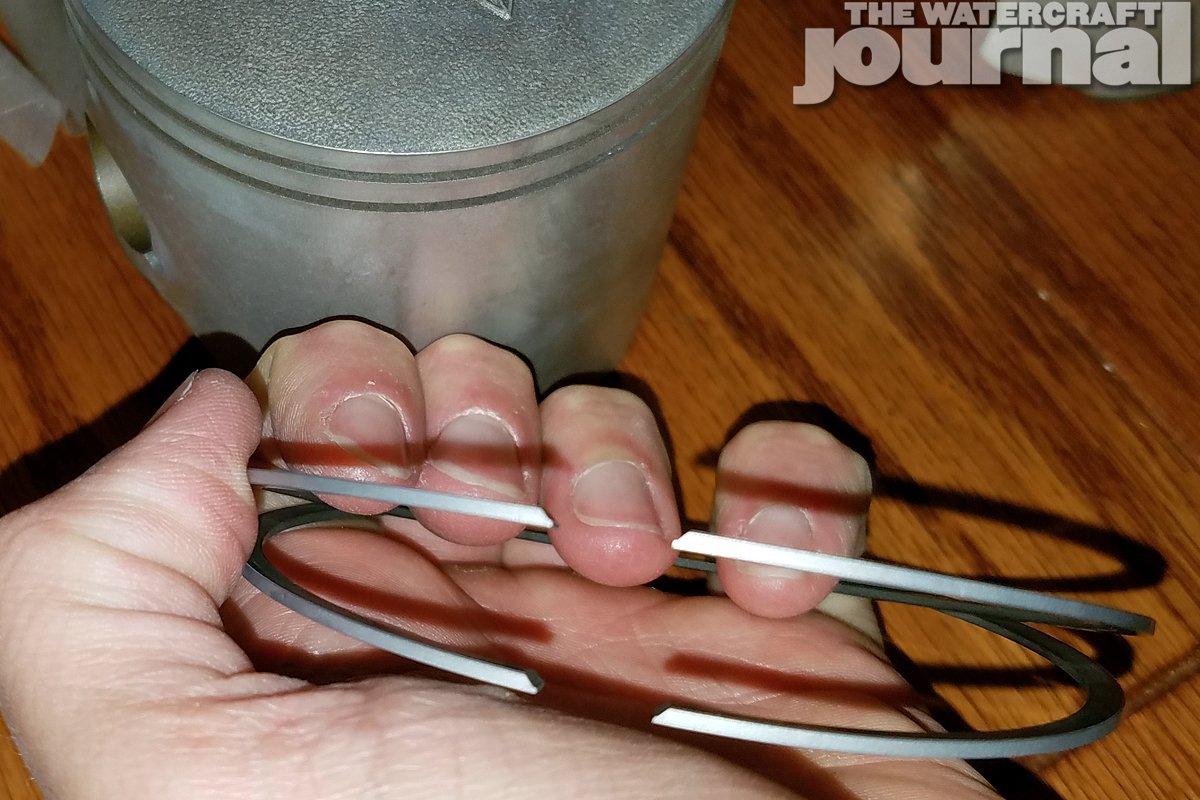
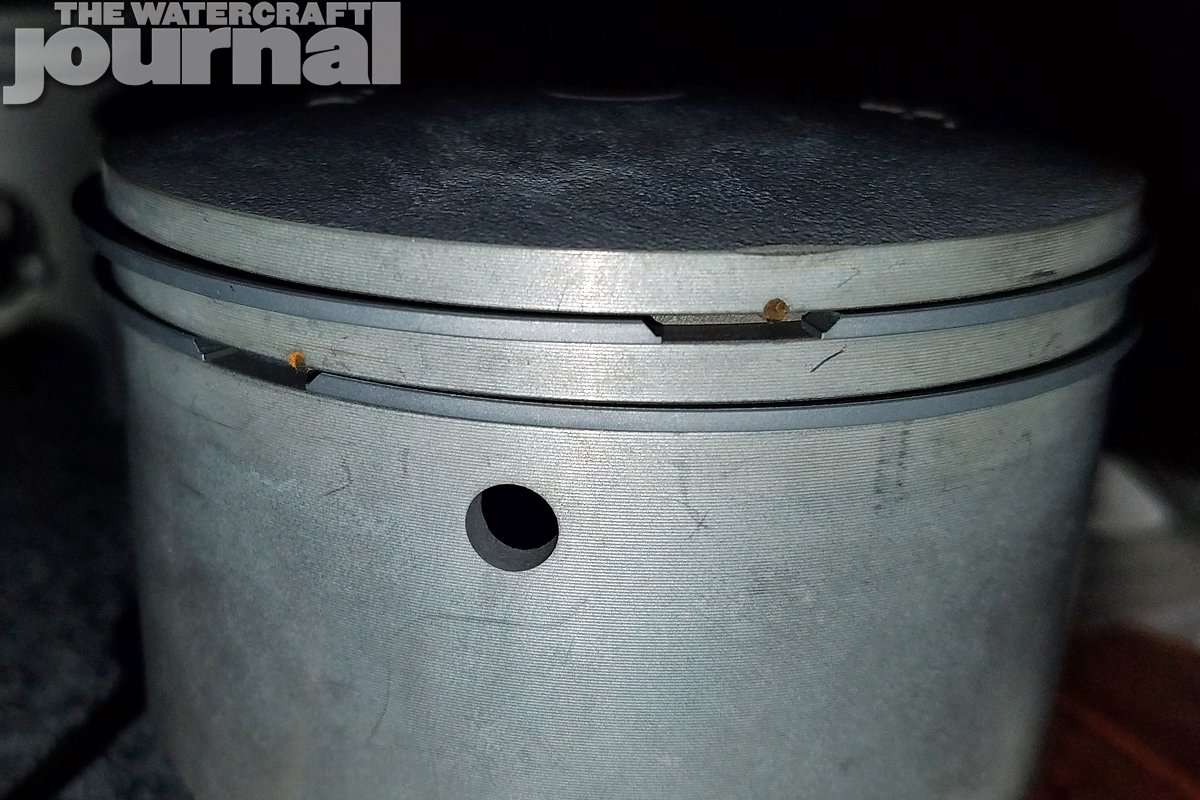
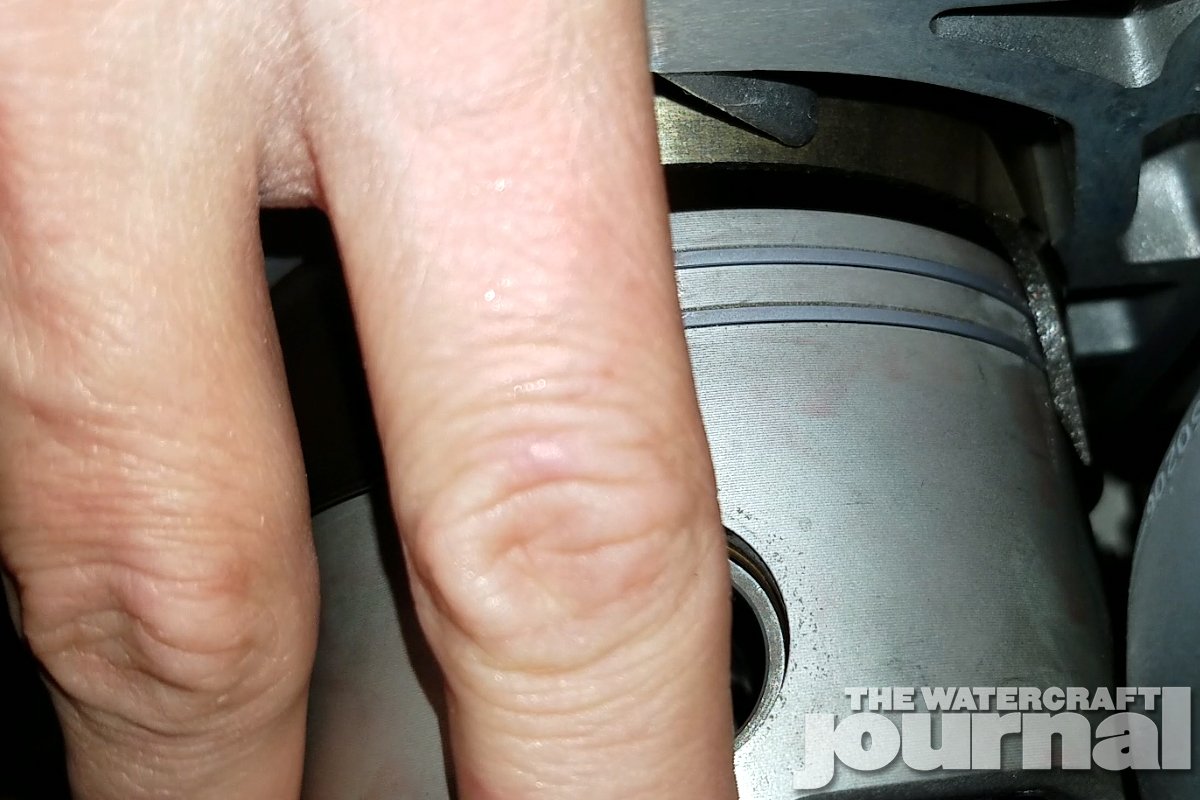
Above left: Note the angle of the piston rings. Above right: Note the ring limiters on the piston. Install the rings with the opening falling in this area to prevent ring binding.
Surface Preparation This is my least favorite stage of any engine work – prepping the mating surfaces. Remove all gaskets, taking care to document their orientation. All excess material and debris has to be removed from A: the engine case to cylinder mating surface, B: Exhaust manifold where it will mate to the new cylinder, and C: head that will mate to the top of the cylinder. Fortunately I went with a new OEM cylinder so I only needed to wipe the light oil off instead of scrape away old gasket material. When cleaning do not use heavy abrasives that could gouge and create divots in the relatively soft aluminum. These surfaces have to seal against engine combustion so flatness and cleanliness are key.
Piston Install
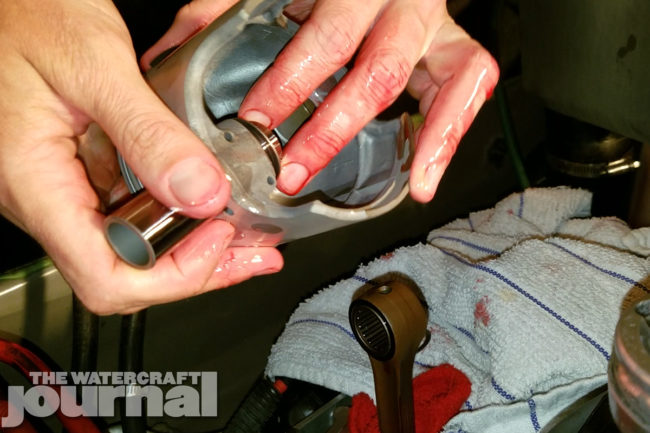
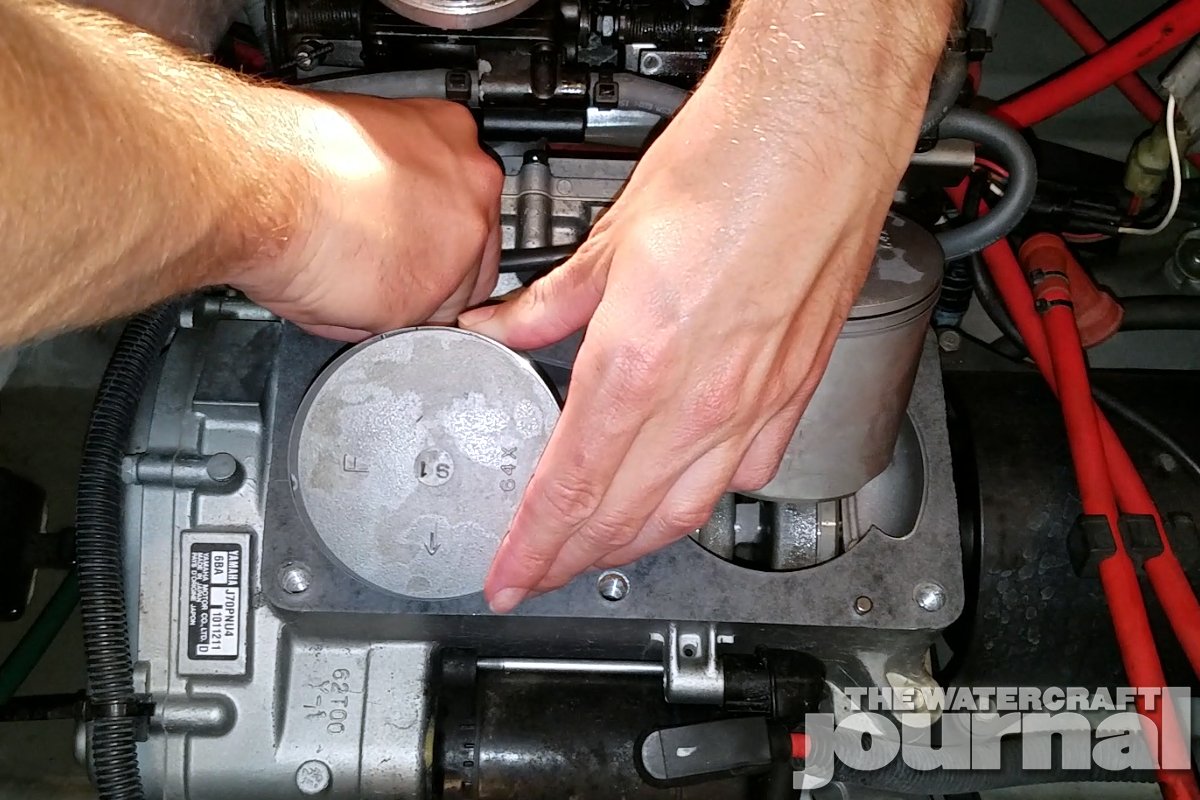
Both rings on each piston need to be installed with the end angles facing upwards as illustrated in the photo. The OEM pistons have stoppers that limit ring movement, make sure to place the openings at these stopping points to avoid pinching or damaging the ring. The wrist pin roller bearing, wrist pin, and washers should all be lubricated in oil before installation. Keep in mind these parts will need lubrication on initial startup and the pre-lubing install process will keep the new engine parts from starting oil starved. With towels still protecting the bottom end, start with the front piston. Pistons are installed with the “F” facing the front of the ski and the arrow symbol pointing toward the exhaust side.
Above left: Lubricate fresh parts and cylinder walls with oil for ease of installation. Also keeps the top end from starting oil-starved. Above right: This illustrates the start of the piston install process onto the rod. Take care not to let any small parts drop into the crankcase.
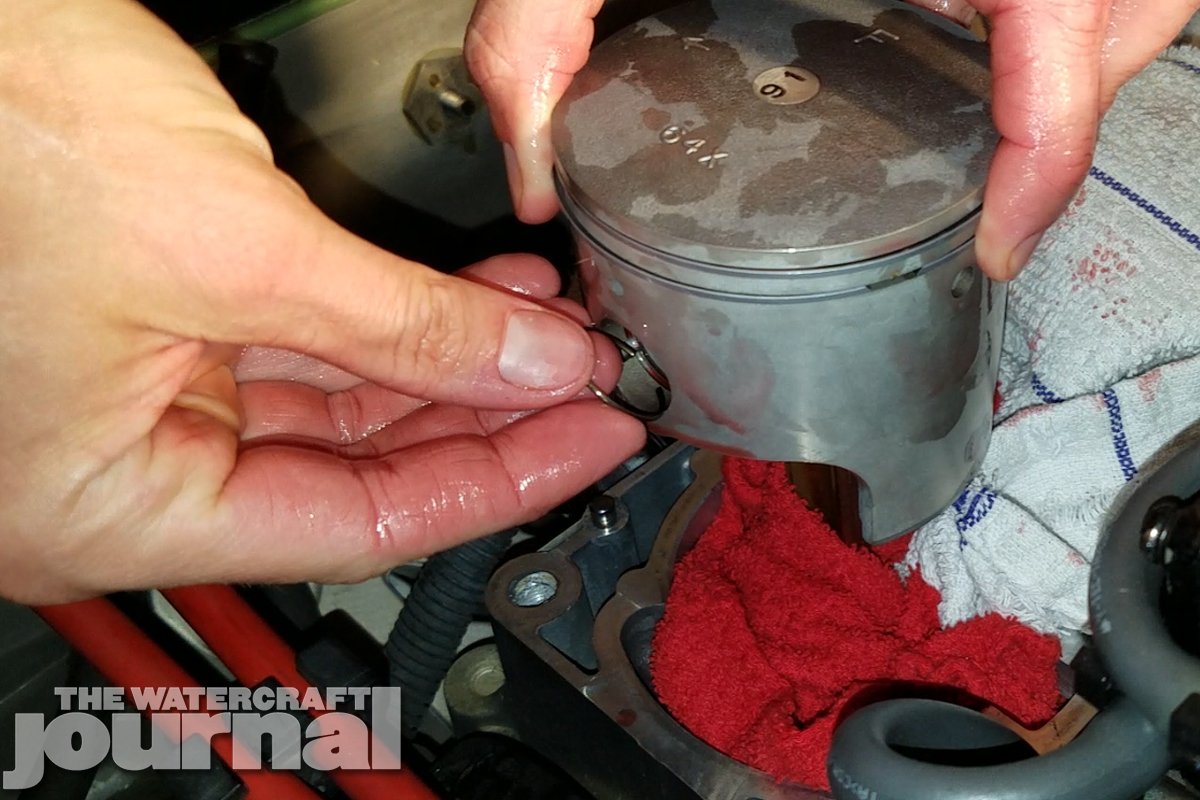
Above: Face the circlip opening downward and use an aggressive angle to compress it into the piston groove. Remove towels once pistons are installed.
Before installing the piston on the crank, place the front circlip in the piston groove with the opening facing down. It helps to press the circlip in from the top of the piston opening at a significant angle to keep it from springing back. It helps to have a friend for installing the piston on the rod because of the amount of parts you have to wrangle, but not impossible by yourself with patience. Place the lubricated roller bearing in the rod. Preinstall the wrist pin from the rear of the piston, then the rear wrist pin washer. Have the front wrist pin washer ready as you push the wrist pin through the roller bearing. Once the wrist pin bottoms out against the front circlip install the rear circlip in the same manner. Repeat for the rear piston and remember – have patience and make sure your towels firmly protect the bottom end from the inevitable dropping of small, oily washers and clips.
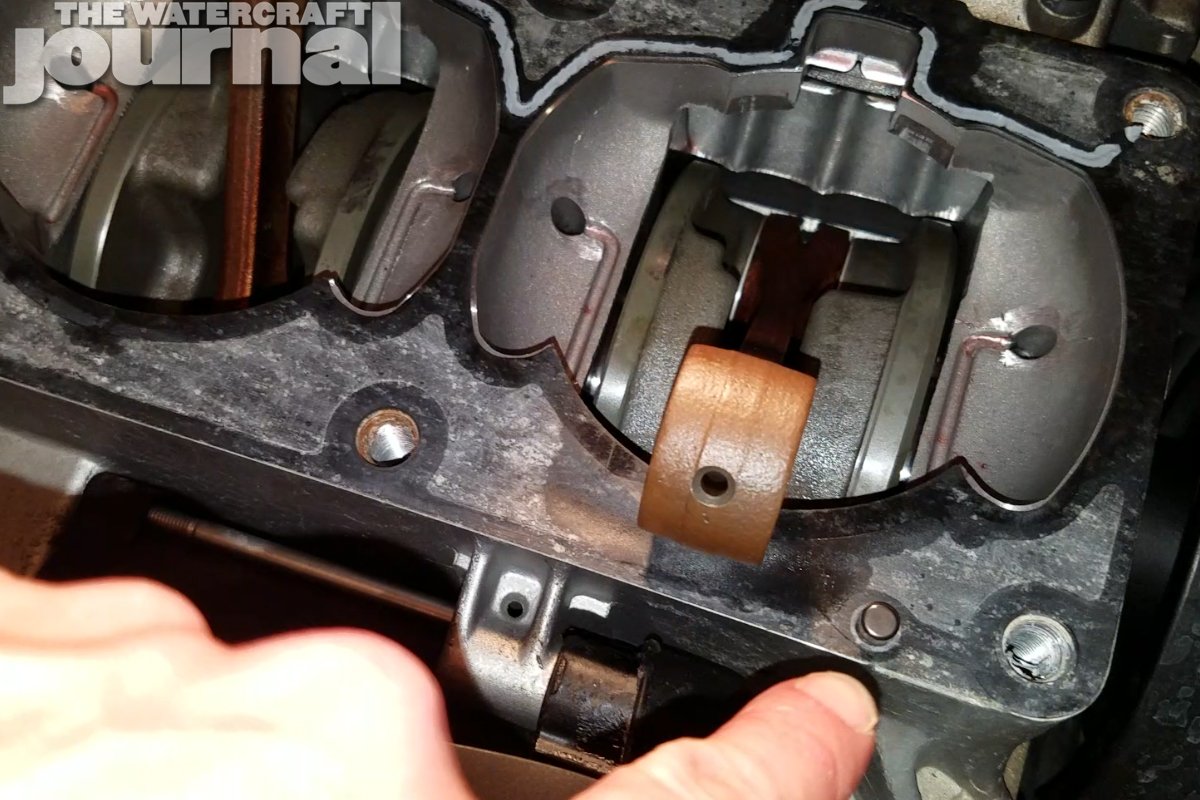
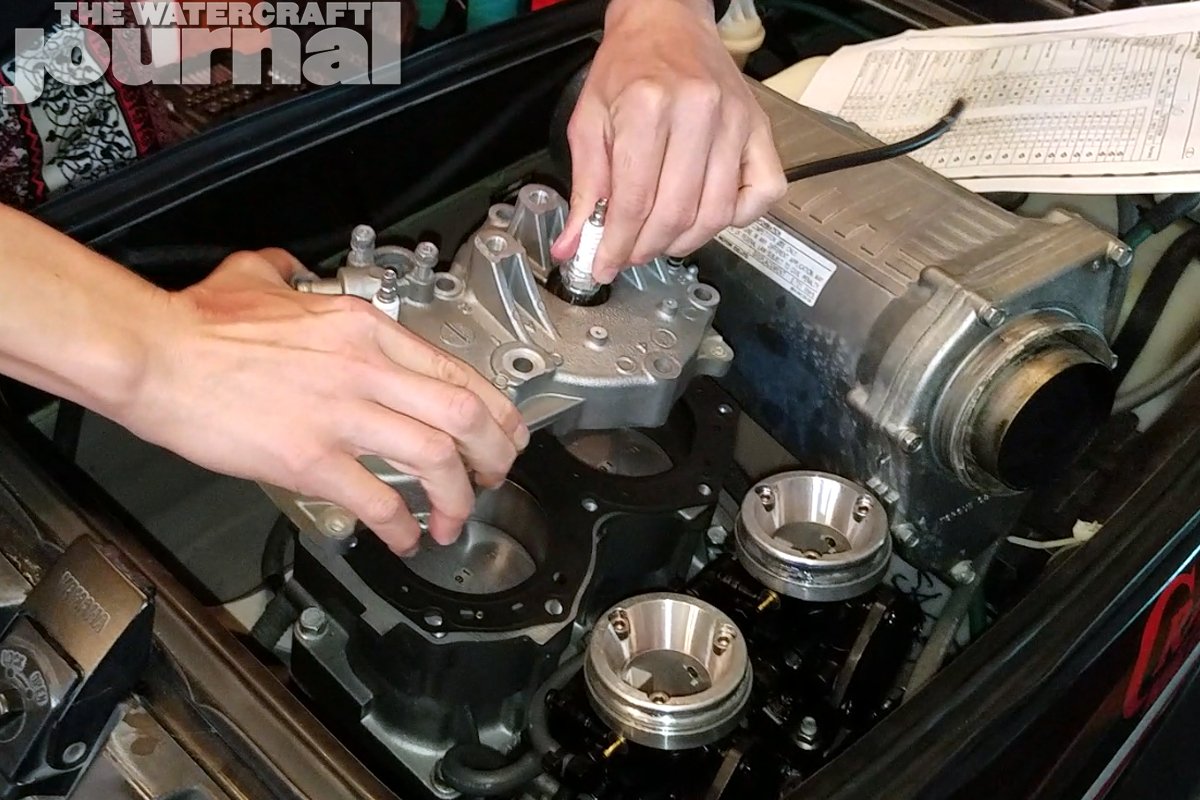
Heli-Coil Install Before installing the cylinder in the hull a small, yet very important step must be addressed – the exhaust bolt size discrepancy. A SuperJet’s 701cc cylinder has eight exhaust bolts which are M8 x 1.25 thread size. The 64x 760cc cylinder comes from the factory with M10 bolts/holes. There are a number of ways this can be alleviated, my clear choice on multiple engines so far has been to install a M8 x 1.25 Heli-Coil kit. The outer threads of the M8 Heli-Coil fit perfectly into the M10 threaded holes in the cylinder and the smaller OEM bolts can be utilized.
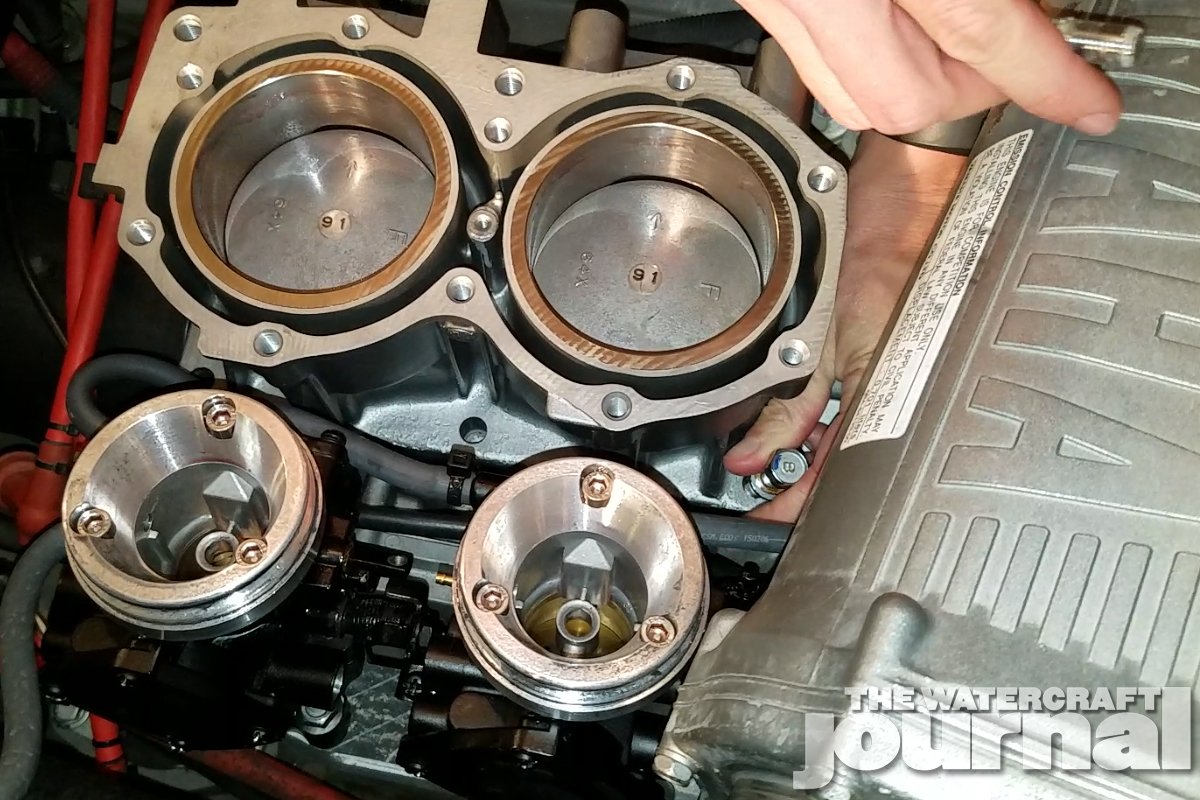
Top left: M8 x 1.25 Heli-Coil install to allow for smaller 701 exhaust cylinder bolts to be utilized. Top right: With the pistons installed, wipe any excess assembly oil off the surfaces and install base gasket. Take care to align on the two dowels. Bottom left: A ring compressor is recommended, but if you do not have one gently compress the rings and guide the cylinder over one elevated piston. Follow same process for lower piston. Bottom right: With the cylinder seated, make sure the pistons rise and fall without any binding.
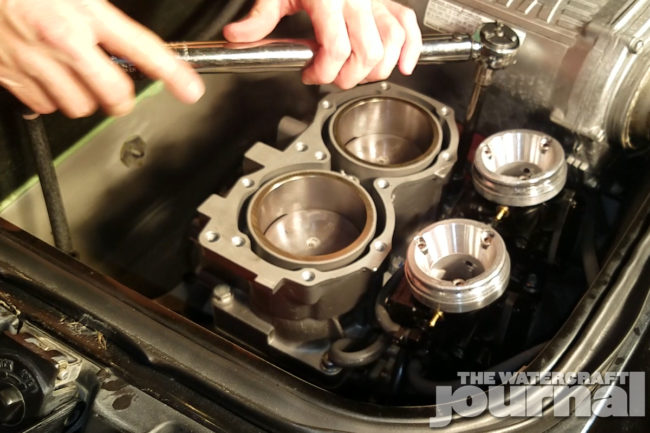
Cylinder Install Do a final cleaning on the case to cylinder mating surface with alcohol or similar cleaner to remove all oil residue. If using a new cylinder, be sure to swap your diode from the old cylinder. Install the new base gasket in the same orientation the old one came off, make sure to have the dowels installed on the case side to keep the gasket in place. A piston ring compressor is recommended for this step to minimize damage to engine parts from incorrect installation. If you do not have one, a helper is the next best option. The bottom of the cylinder sleeves are angled to help compress the piston rings and allow the pistons to slide into the cylinder without binding.
However, compressing the rings, keeping the pistons straight, and guiding both pistons into their respective sleeve can be tedious. It is best to start with one piston being slightly higher than the other, compress it’s rings and gently guide the cylinder down around the piston. Repeat with the lower piston and slide cylinder down onto the crankcase. Install cylinder to case bolts, taking care to note the different lengths. Follow the Yamaha shop manual’s guidance on torque specs and tightening pattern. Clean the head mating surface and install head gasket and head, taking note of the original gasket orientation. Follow manual’s guide for torque specs and tightening pattern.
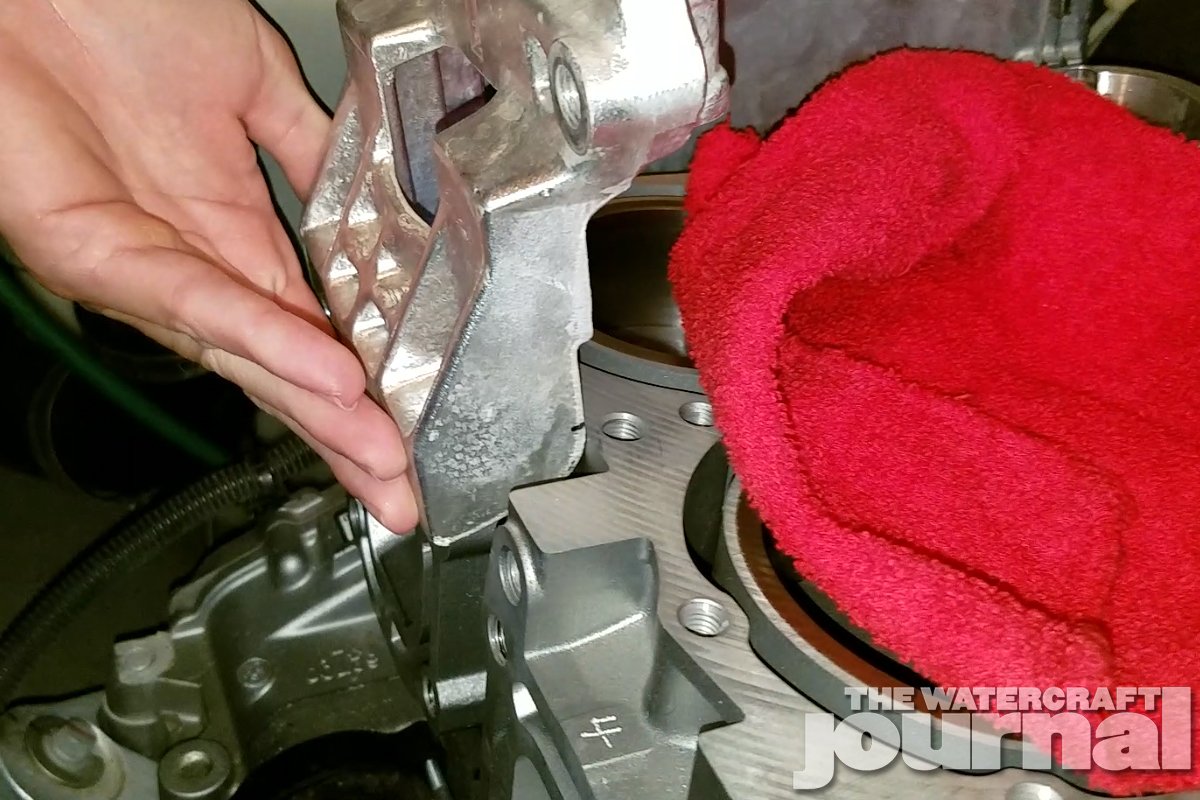
Top left: Follow the Yamaha shop manual for torque sequence and values. Top right: With the cylinder installed mark the exhaust bracket for clearance. The 760c cylinder has extra material in this area whereas the 701cc cylinder does not. Bottom left: Remove excess material on bracket and test fit before exhaust installation. Bottom right: Clean all sealing surfaces, install head gasket and head, taking care to align the same as the original gasket. Reference Yamaha’s shop manual for torque sequence and values.
Exhaust Bracket Modification This is the only “custom” modification that will have to be made when installing all OEM 760cc parts on your SuperJet. The photo illustrates the cut that has to be made in the OEM breadbox exhaust bracket to clearance the 64x cylinder. Place the bracket up to the 760 cylinder, mark your cuts, and use your tool of choice to remove the material. An electric grinder makes quick work of the soft aluminum.
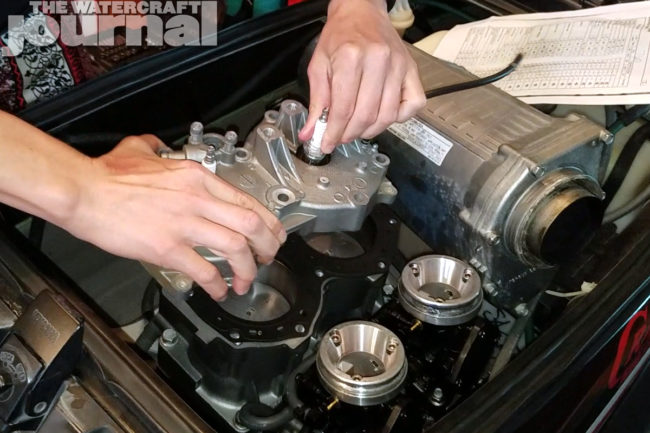
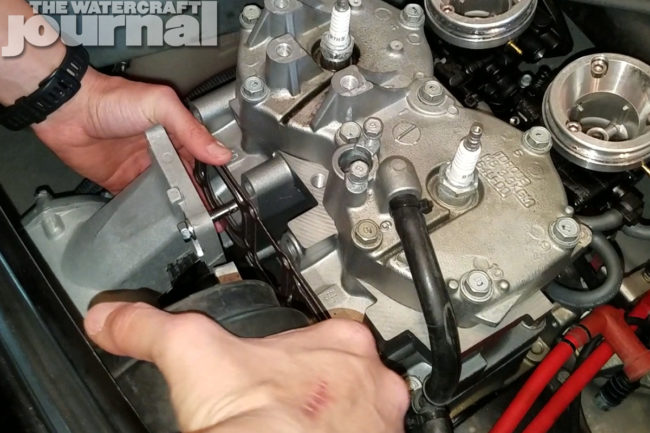
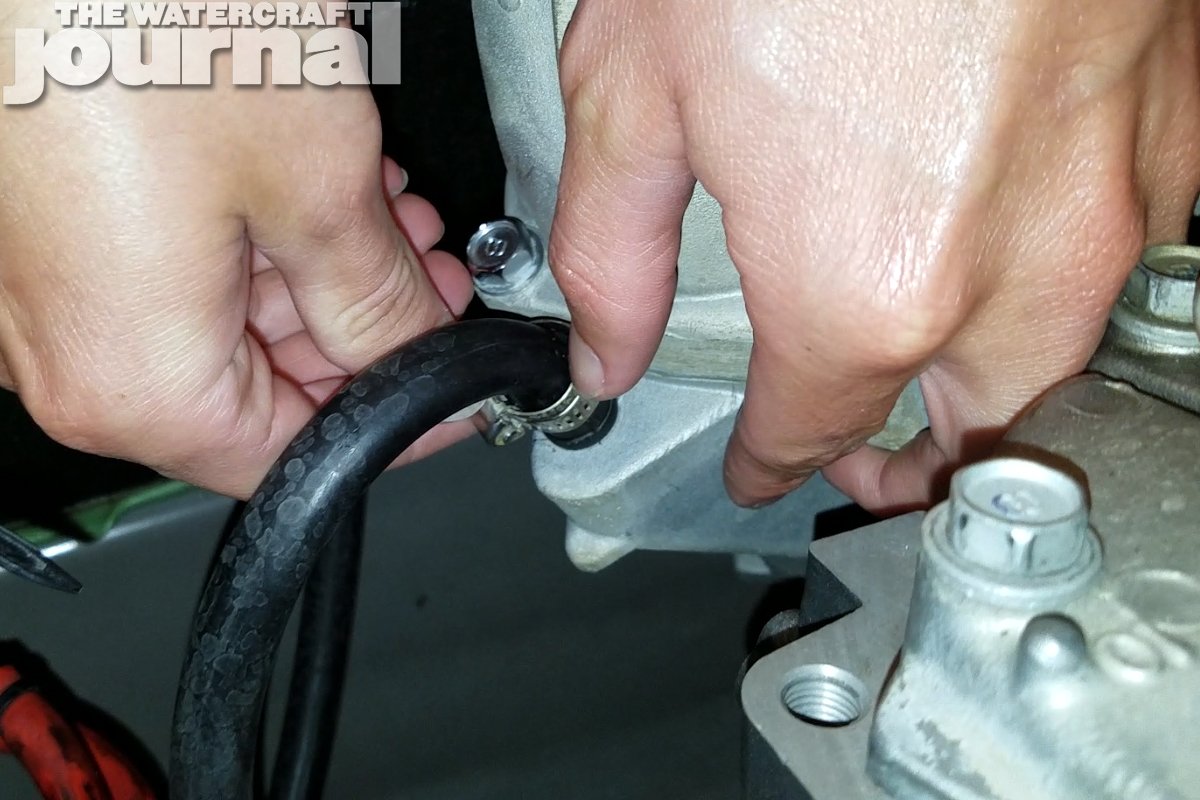
Peripheral Install Almost there! The exhaust install is the last large step before you can fire up the fruits of your labor. Do a final cleaning on the exhaust manifold and cylinder exhaust mating surface, place gasket, and install the manifold. The rear lower exhaust bolt is the most difficult to thread because of the limited space, it helps to install a few of the easy front bolts to hold the weight of the manifold while slowly working the difficult bolt into place. Once all manifold bolts are tight simply follow the same disassembly process in reverse – install and tighten worm clamps, bolts, sensors, hoses, plug wires, and battery connection.
Above left: Begin the exhaust install by attaching and tightening all water lines while they are easier to access. Above right: Clean all sealing surfaces and install exhaust manifold.
Above: Reverse the removal process with all connections. Tighten all worm clamps, exhaust bolts, and peripheral hoses and sensors. Make sure no tools are left in the bilge area.
Final Thoughts
There is an old adage that goes something like this: “you can have two of the three – cheap, fast, reliable.” In motorsports something can be cheap and fast, but not reliable. Fast and reliable are usually not cheap, and cheap and reliable is usually not fast. Sure, some aftermarket bolt on parts such as exhausts, heads, etc will get you more speed – but at the expense of reliability and longevity of your engine. In the SuperJet’s case, a Yamaha 760 swap combines OEM reliability with limited expense and a small increase in speed. And hey, who says you can’t spend more money later for those bolt on go-fast parts once you have the larger 760cc top end thumping away in your trusty SuperJet. Braaap on, my friends!
Jet surfing is a relatively new sport that is gaining popularity. There are now even racing series dedicated to the sport where racers compete. Getting into the sport is not cheap however, with new board prices being the same as buying a brand new jet ski.
As seen from the video, the initial steps taken were to remove major components from the ski and simply cut off the top deck from the hull. The next steps taken were to re-prep the top deck for the flat standing surface.
Once the new engine was sourced, the next step was to prep for installation. We imagine once the engine was located and installed, he would have routed fuel lines, cooling lines, the hand-held throttle, ect.
This was definitely a neat build and an interesting take on the jetsurf boards. We can’t wait to see some videos of this thing in action.
I found myself feeling a little sorry for the folks over at Sea-Doo this afternoon. Why my mind had singled-out Sea-Doo was due – in large part – to an anti-Sea-Doo hate group on Facebook. It’s the kind of group page that welcomes pictures from across the globe of smashed, cracked or sinking runabouts all blaming the manufacturer for its failure and interjects little else (particularly causality). Typically, I don’t give pages like these very much thought but a recent back-and-forth on a different-yet-eerily-similar Sea-Doo owner’s page made the other group’s presence all the more poignant.
“Who can tell me what ‘CM-Tech’ is?” the original post had read. I quickly provided a link to our review of the 2017 Sea-Doo GTR-X 230, the first Sea-Doo to feature the newfangled material, titled “All The Right Moves.” In it, we interviewed Sea-Doo Watercraft Global Product Manager, James Heintz who gave us a very thorough and detailed description to both the material’s compound and acrylic-coating process. Thinking I had performed my good deed for the day, I went on about my work. Suddenly, I was pinged with several questions from commenters; “That’s the wrong ski!” “So is it Polytech?” and my personal favorite, “Where did you get this quote?”
Mining a little extra patience, my responses were rather genial…at first: “The ’17 GTR-X 230 was the first Sea-Doo with CM-Tech;” “No, it’s not Polytech;” and “Again, this is a quote directly from Sea-Doo’s Watercraft Global Product Manager, James Heintz.” Unsurprisingly, people began commenting, “Is Sea-Doo paying you to say this?” “Nah, it’s just another name for Polytech;” and “Who? Never heard of him.” Some even took to messaging me privately to call me a corporate shill. Fun times, I growled to myself. Alas, this isn’t anything new for me, though. I find that I often go to the defense of the manufacturer rather than joining the mob. Mobthink often never solves anything and more often than not, makes a situation worse.
Currently, the mobs have focused their ire on Sea-Doo’s CM-Tech paint finish, particularly after Sea-Doo issued a bulletin instructing owners to not use high pressure sprayers and harsh detergents. Before that, it was Polytech. Before that, it was Yamaha’s timing chains in the SHO and SVHO engines (prior to 2017). And prior to that, it was pump “overstuffing” on the FZ series. And let us not forget Sea-Doo’s carbon seal. There will always be “something” – the story never changes. Yet, when a particular message board or Facebook group drums up enough popularity, suddenly what has occurred a few dozen times quickly becomes a pandemic effecting all persons regardless if they even have the right vehicle or not.
Back in the early 1990’s, my father bought a welding company housed in an old wooden WWII-era hangar on 223rd Street in north Long Beach, California, fixed between the whirring 405 freeway and the shadows of the high-reaching oil refineries. That summer I was employed to demolish a wing of the building, as well as relocate fabrication equipment, gather scrap and break down any other materials that he deemed as trash. Those two-plus months of demolition were some of the hardest days’ work in my life. Being only 14-years-old, that wasn’t saying much, but even as an adult I recall those days as being particularly grueling. Since then, I’ve had many physically taxing jobs: repairing roofs, clearing fields, home remodeling, landscaping, tree trimming and even repainting the landing tarmac at LAX during the middle of the night.
I cherish hard work, particularly physical labor. In many ways, I long for the days on my feet, wearing miles into the soles of my workboots and coming home so exhausted that taking a scalding hot shower was more attractive than food. Running this magazine isn’t hard work, but it’s difficult work – which is not the same. Days at the job site never entailed dancing around politics, minding what you said or fearing that you might hurt somebody’s feelings. As long as you could ruck the work and kept your bitching to a minimum, you were a good hand. These days I’m so tangled up in worrying about offending some reader, stepping on the toes of a contributor or stirring up such a ruckus that I wonder if that roofing position is still open.
The daily magazine, The Watercraft Journal and its bi-monthly-updated YouTube channel will still remain entirely subscription and membership-free. That’s something I believe in. It’s been key to our growth, our position as an industry leader in readership, engagement and usefulness to the PWC enthusiast. Whether they appreciate what they’re getting at no cost to them is an entirely different matter. It’s our advertisers who keep our lights on and it’s those companies whom have the gratitude of everyone here, and to whom we will continue to support. As they support us, we’re able to support the sport through publishing event coverage, news, reviews and interviews. So again, thank you for those reading The Watercraft Journal and thank you to those who support it.
Helen Gore’s life comes full circle after she succumbs to injuries suffered in a head on collision with another jet ski. Gore was a mother of seven children and spent her life as a caregiver inside and outside of her home. Her legacy would live on through 68 people who received her organs following the tragic accident.
According to News Channel 8, the accident occurred just before Mothers Day, which made it even more heartbreaking for Gore’s children, ranging in ages 12-26. They had big plans for Mothers Day. The kids were going to surround her with gifts, flowers, and balloons in celebration of all their love.
Instead, they would have to plan their mother’s funeral. Gore was only 41. Sunday, she and her husband were enjoying some time riding jet skis on the water off the Courtney Campbell Causeway in Clearwater,FL. Investigators said she was hit head on by another jet skier who was also killed. Gore was immediately rushed to Tampa General Hospital, where she passed away within 24 hours.
Her daughter Keosha Gore, is in disbelief that her mother is gone. She and her siblings are shocked by this tragedy. Yet, they are grateful that their mother’s life will continue through the 68 people who received her organs. It is still painful for them even though 68 people will benefit. They lost their mom, their inspiration, their hero.
Now they are struggling to make arrangements and pay for her funeral. If you’d like to help; here’s the link to a GoFundMe page set up in Helen Gore’s honor. We offer our deepest sympathies to the Gore family.


 FG: Upon receiving the sponsons, I was instantly impressed with the design, build, packaging of the hardware and detailed instruction provided. With the design of these sponsons, they are a tight fit, but with some light persuasion they will click into place.


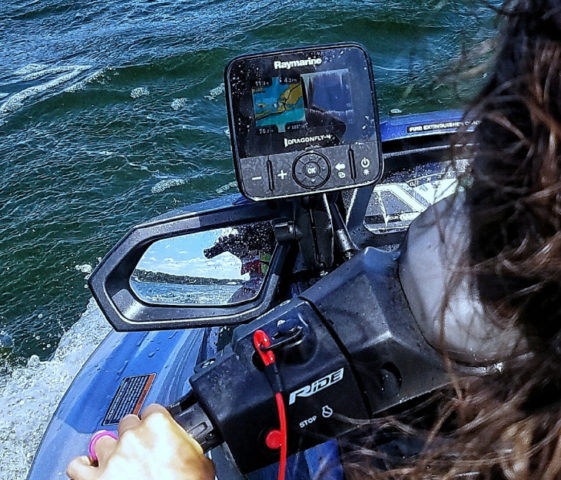
 Following weeks of research, they settled on the