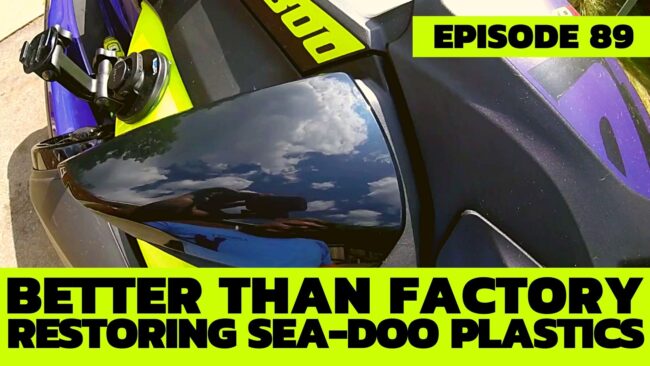
“Oh crap!” I yelled as precious 93 octane spat from the flexible filler neck of my SureCan jerry can. The spilled fuel splattered across the glossy black plastic cap over the left hand side rear view mirror of The Watercraft Journal’s 2021 Sea-Doo RXP-X 300, immediately discoloring the cap, bleaching it opaque within seconds.
I was attempting the precarious balancing act of refueling the Sea-Doo while still in motion so that the engine would continue its countdown to 5 operating hours, the halfway mark for the RXP-X’s break-in period. While this might’ve saved me a few minutes of lost time on the operating clock, it was going to cost me quite a bit of cash to replace the now ruined part.
Above: Here’s a pro tip, don’t spill gas on your Sea-Doo. Like, anywhere. The soft, glossy plastics are super sensitive and will discolor and bleach in a matter of seconds.
In an effort to shave down precious weight, Sea-Doo employs a variety of different decorative plastic surfaces on its decks. Nothing is actually painted; gloss black plastics (like the one I ruined) are molded that way. The same goes for colored components. It’s all in the molding process.
While we discussed a more radical approach to restored heavily faded and sun-damaged raw (dull or rough) surface plastics, repairing these high-gloss components has been a failed venture for most run-of-the-mill enthusiasts. In most cases, folks simply opted to replace the damaged piece altogether after finding that topical cleaners and waxes wouldn’t restore the luster these panels once came with.
Above: After literally dozens and dozens of combinations of polishing techniques and different compounds and waxes, these are two most successful polishes we’ve encountered, as well as the very basic list of tools needed to make your damaged plastics look better than new. No really. We mean it.
I too shared that same mindset. With previous units in my possession, I’ve had pieces be damaged by fuel spillage, overspray from aerosol sunscreen, waterspots and plain old UV-damage, and no combination of spray cleaner, soap, detergent, wax or polish could do the trick. A few different kinds of automotive-grade rubbing compounds dug too coarsely into the soft surface, and left visible scratch marks that couldn’t be rubbed out either.
And so I went repeating the fruitless effort again on this gasoline-bleached mirror cap. No product from XPS could undo the damage. Nor could any marine spray cleaner or that from my vast collection of automotive waxes. It was a goner for sure.
Above: A blue foam pad won’t scratch the surface like a harder, red pad. The professional-grade Power Cut Compound is also a more gentle rubbing compound formulated for gel coats and fiberglass that won’t burn through your plastic as quickly as those designed for paint.
Defeated, I ordered the appropriate mirror cap from RIVA Racing’s OEM catalog (PT# 269502427LH) and began to research how to correctly replace it. I was shocked that Sea-Doo required much of the top deck removed just to access the single set screw; unwilling to disassemble so much of a brand new RXP-X, redoubled my efforts: what can fix this?
I began with plastic polishes. Y’know, the kinds made for restoring headlamps. Although they weren’t aggressive enough, they opened the door to other cutting compounds. I had used Meguiar’s One-Step Cutting Compound to remove heavy scratches in the purple acrylic made by shipping it with a cover on. Unfortunately, it was again, just a little to coarse.
Above: After buffing the Power Cut Compound with the wool wheel at high speed, you might think you’re done – but you’re not! There’s still another step to do.
But, I did have a nearly unused bottle of Meguiar’s Marine/RV Power Cut Compound ($22.99). Going by hand showed promise, so I fished out my two-speed Ryobi electric drill and a soft blue applicator sponge pad. (Colors do matter when it comes to paint and polishes. Blue is one of the least aggressive. Red is one of the most. Stick with blue on this one.)
A quarter-sized dollop and the drill set on its lowest speed covered the mirror cap with ease, breaking down and lifting up the damaged layer, leaving a clean, fresh surface to be buffed smooth. Not wanting to let the compound dry, we used a soft yellow wool buffing wheel and set the drill at max speed. We didn’t apply any pressure, but let the wheel do it’s job.
Above: After cleaning off your blue applicator pad (or using a different one), apply the Scratch-X 2.0 to the plastic surface and massage it thoroughly into the surface at a low speed first, and then switching to full speed for a few seconds. Don’t apply any pressure! Let the pad do the work! Then, simply wipe it down with a microfiber cloth.
Within seconds, the shine was completely restored. By this time, the replacement cap had arrived, and I used it to compare my progress. At this stage I was close. Not perfect but close. Here, I returned to my collection and fished out a bottle of Meguiar’s Scratch-X 2.0 ($9.99). It’s more of a swirl remover than anything with just enough grit to possibly knock down the porous surface I had created with the Power Cut Compound.
Equally, Scratch-X 2.0 includes a very light polymer protection, which when I used the drill with the foam applicator pad (after I cleaned it off from the first use), worked great. Wanting to repeat my process, I went back to the wool pad and quickly undid all of my last step.
Above: Want to see that it’s better than factory? Look at the crispness of the reflection on the back piece versus the replacement OE piece (foreground) that we ordered from RIVA Racing. Our restored panel has a deeper black and sharper reflection than stock.
Yup, the wool pad left the plastic dull and heavily scratched. So I cleaned the plastic cap off with some XPS all-purpose cleaner and repeated my first three steps, choosing instead to wipe the plastic off by hand with a fresh microfiber towel instead of the wool wheel. And viola! the plastic cap piece was glossy again!
To check my work, I lined it up against the replacement panel from RIVA – mine was better! Using an old auto detailer’s trick, I pulled out a Mycanic 500 lumens LED light and shone it on both panels: the reflection of the bulbs were much more defined and detailed on my mirror than even the stock replacement.
Above: Will you look at the mirror-like reflections?! C’mon man, this is pretty impressive stuff and anybody can get these kinds of finishes – heck, don’t wait to ruin your plastics like we did, just go ahead and follow this process on your Sea-Doo and watch it glisten in the sun!
Again guys, I’ve been through literally dozens of different combinations of polishes, compounds, waxes with various methods of polishing and this one works the very best. See the pictures above and the video below. I’m talking mirror-like finishes here. Sea-Doo won’t likely change to a more durable plastic anytime soon, so it’s on us super anal-retentive types to find the best way to keep our skis looking tiptop.
I joke in the video that the wool pad will leave spun felt all over your Sea-Doo, and that is no exaggeration. I found some in the glove box, and it was never opened during this process. Other than that, there’s literally not one complaint – and if you follow these steps, you won’t have one either.


Just wanted to make this note for those of you looking for Scratch X2.0.
It’s a “Unicorn”.
No not really It is a scratch and Blemish remover.
The current product is SCRATCH X # G10307 7 oz.
From what I have found several online sellers are using old art work showing 2.0
The current ScratchX should do the same awesome job that Kevin discovered and demonstrated.