It’s no secret that surf is easily some of the most grueling, challenging conditions to dare to ride in. When the sport of jet ski racing first began, venues featuring surf riding quickly became heralded as some of the toughest races in the circuit, weeding the “men from the boys” as it were. Injuries were nearly as common as broken equipment, and racers learned to fear these events. And as the lineups began to thin, so did these crucibles.
That is why it is so significant that RPM Racing Enterprises continued its Huntington Beach Jet Ski Freeride & Motosurf event. The Southern California town is quite literally the same “Surf City” that Brian Wilson and The Beach Boys sang about over 50 years ago. The breaks are heavy, fast and come in a differing paces depending on which side (north or south) of the pier you ride. Surfers take years to master Huntington. Jet skiers longer.
That’s why SoCal local and Hydro-Turf ambassador Mark Gomez shined so brightly at this year’s second annual event. Gomez not only clinched top billing in the weekend’s freeride portion – absolutely wowing crowds gathered on the famed cement pier, fighting hardscrabble against fellow competitor Brandon Lawlor – but also competed in Pro Ski Open, Vintage Ski 550 and Sport Spec class. Such a feat is nearly superhuman and Gomez has the video to prove it.
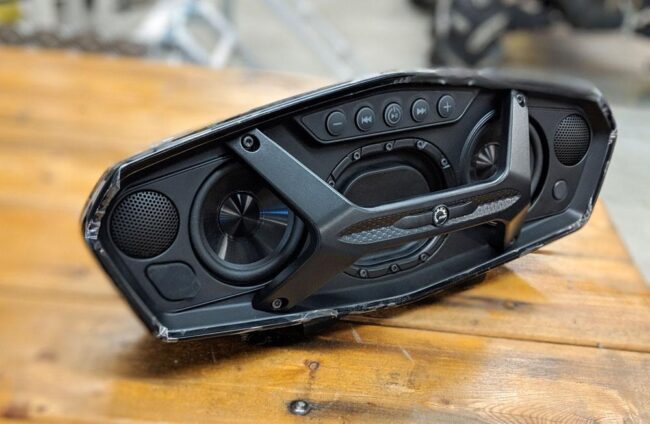
Many of us like to listen to music while on the water and Sea-Doo is taking music a step further with its innovative portable audio system. It’s pretty cool. Take your tunes along after you’ve reached your destination. The component’s portability makes it useful for tailgating, working in the yard, or just relaxing on a riverbank.
The Sea-Doo Spark Portable Audio System will enrich the Sea-Doo Life by giving you more fun on the water. You know how it is when you’re excited about hitting the water and you’re amping to your favorite music. Music helps get the adrenaline flowing, so why not keep it going with some sounds from the 50-watt audio system with its Bluetooth connectivity? This bad boy works on ALL Spark models.
The system is also fully submersible, which makes since. After all, we don’t always stay upright on our skis. Stuff happens. The system does have one necessary component needed for installation and that’s a Support Base with quick attach system. It’s required for a quick install.
The speakers are front mounted and positioned toward the driver to get the greatest sound clarity. It also has a convenient control pad on the speaker for volume and song adjustment. A rechargeable lithium battery is all it takes to power it up for 24 hours.
The Sea-Doo Spark Portable Audio System will bring you joy. Maybe you just want to chill and ride your Sea-Doo while listening to some smooth jazz. Whatever your preference, this system has you covered!
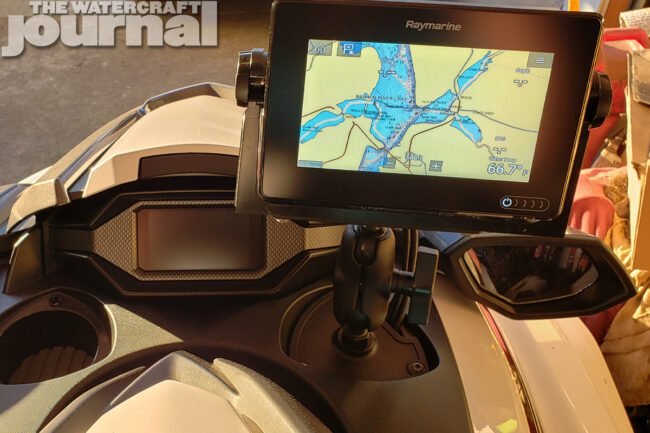
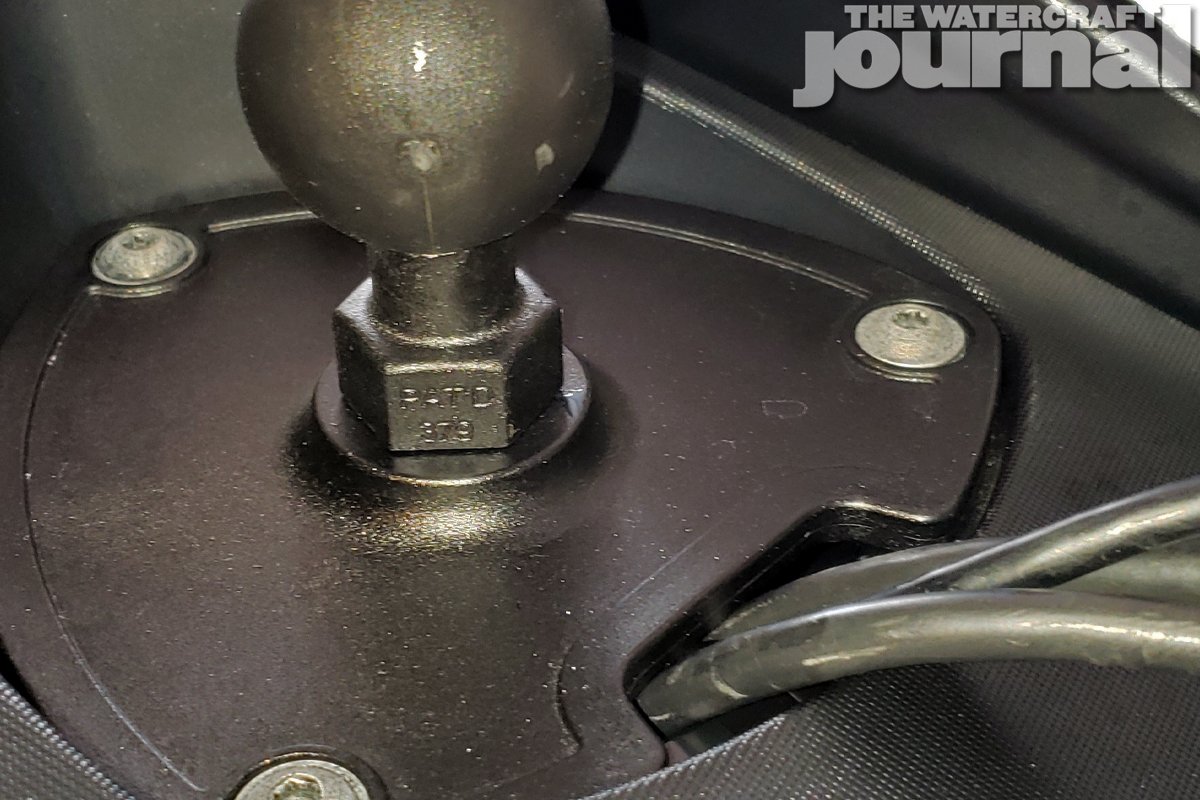
Yamaha rattled a few cages when it announced its partnership with accessory king RAM Mounts for its entire 2019 FX WaveRunner lineup. Replacing the screw-top watertight storage cubby on previous models, the new FX’s feature a pair of Hydro-Turf padded recesses where either a cup holder or a sturdy triangular puck can be mounted. The puck is cast with a slight recess permitting a small wireloom to feed through. This was intentionally made to permit a Garmin or other handheld-style GPS to be mounted.
Through Yamaha’s newly expanded accessory catalog, customers could opt for the Garmin GPS and transducer package (a standard feature on the top-of-the-line Yamaha FX Limited SVHO WaveRunner). The transducer is non-invasively mounted externally, sharing the existing bolt holes with the ski’s folding swim step bracket. Yet, for those adventurers looking to truly explore new and exotic locations far beyond the constraints of a single-tank of fuel, often require more in the way of superior navigational equipment.
Top left: First, remove the push pins holding the 2-piece bulkhead wall from the front storage bin. Top right: Remove the 3 bolts holding the decorative trim from the righthand side. Bottom left: One of the 3 requires a 10mm socket. Bottom right: All others require the same 4mm hex driver.
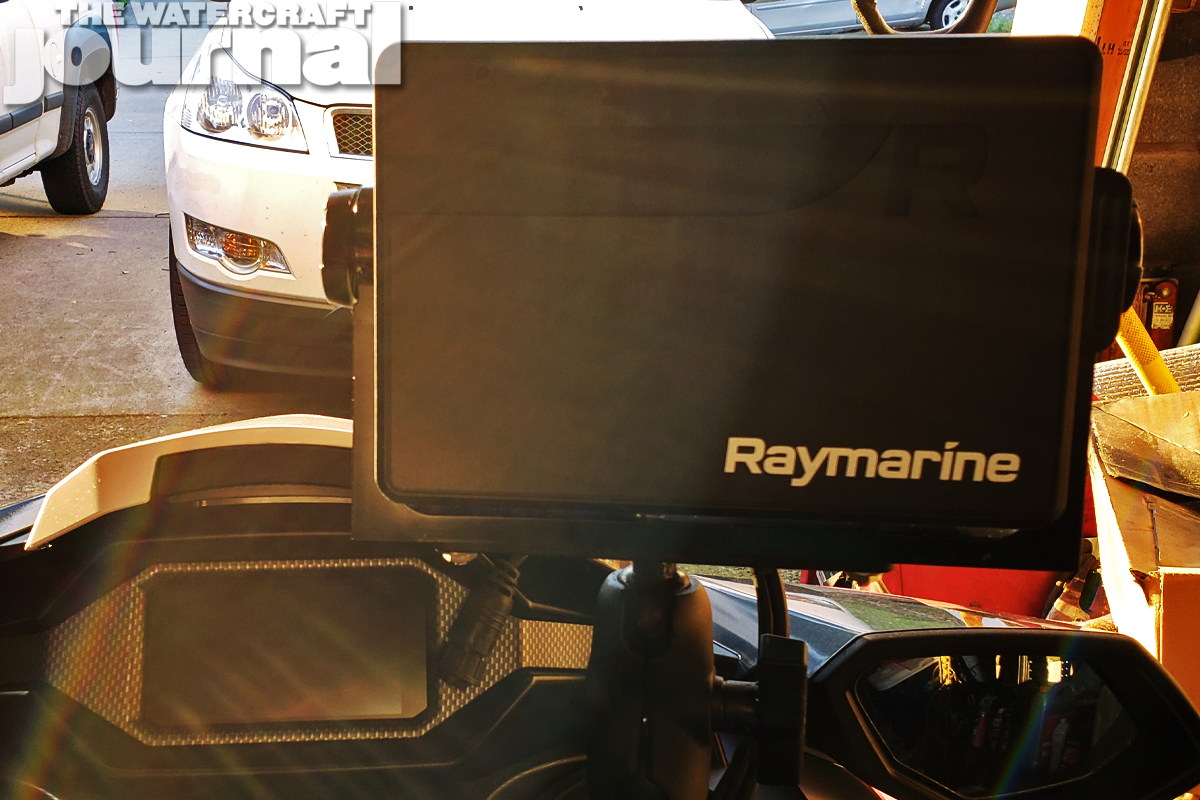
Recently, The Watercraft Journal spoke with Middle Tennessee Personal Watercraft Club member Tom Hill, who walked us through how he installed a Raymarine Axiom 7 Chartplotter and DownVision through-hull transducer. Hill chose the Axiom not only for its compatibility with other Raymarine accessories, but also its Wi-Fi and Bluetooth connectivity, multifunction navigation system, RealVision 3D sonar, and detailed DownVision sonar.
First, disconnect the battery (positive and negative) after removing the split bench seat. Next, remove the bulkhead partition between the front cargo bin and engine compartment (it separates into two plastic pieces). They each have two white plastic push pins that you will need to push the very center pin in. A small Phillips screwdriver will help push them in then remove whole pin. Once the pins are removed you can separate the two pieces for removal by sliding them towards each other to unlock the center section.
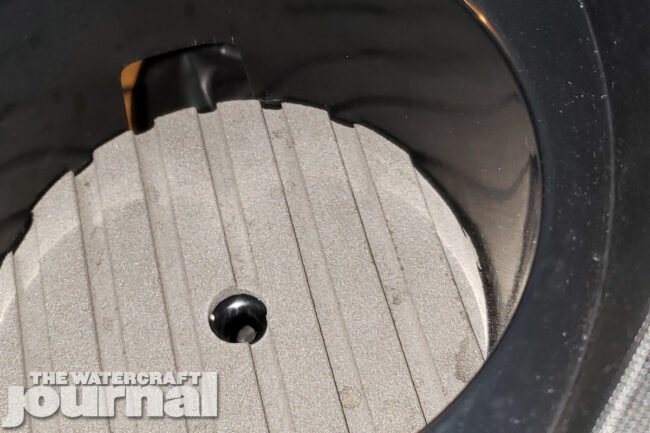
Top left: The fairing running alongside the console slides out. Don’t pull it off or you’ll break the tabs. Top right: The through-hull transducer is set back in the rear of the hull, pressed into a thick bead of pure clear silicone and left to cure over 24 hours. Bottom left: The factory cupholders come with a relief to let wires through. Bottom right: We had to open up the hole to let the larger Raymarine plugs through.
Remove the side trim panel that would be on the inside of your right leg when sitting on ski. There are three 4mm hex bolts. There is one nut hidden in the engine compartment that a requires a 10mm socket. With these removed, you can remove the large fairing running alongside the console (on the right-hand side) via the same 4mm hex socket. There are three hex socket bolts. Gently slide it forward so the tabs that go into the center console unhook.
With these removed, you now have full access to everything you need. Hill mounted his DownVision transducer in the right rear of the hull, pressing it into a bead of 3M pure silicone squeezed from a caulk tube. Hill notes that the object here is to avoid any air bubbles in the silicone. He explains, “I put down about 3/4-inch thick bead and kinda push and slightly turn the transducer back and forth to squish out most of the silicone. That way you get no air pockets underneath it.” Let it dry 24 hours before proceeding.
Top left: Once we ran all of our GPS’ wires through, we reused the factory rubber boot and tie to close up the opening. Top right: We installed the factory RAM mount puck using the 3 hex bolts with a larger RAM ball socket. Bottom left: Because of the heft of the 7-inch Raymarine GPS, we went with the larger diameter mount and coupler. Bottom right: And now, we can install our Raymarine chartplotter.
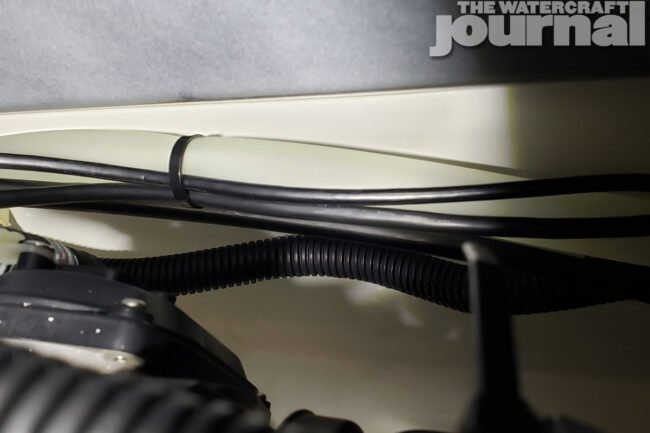
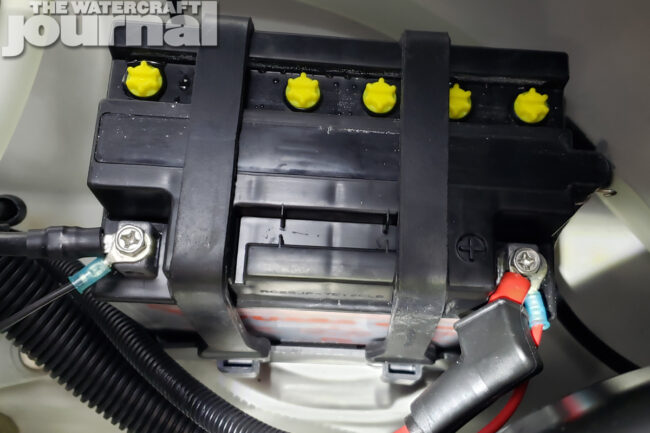
Once the silicone has dried, run the wires up from transducer on the right side of engine and lay them on the fuel tank. (Make sure to also run power lines to the battery, but do not connect them to battery yet.) With the wires resting on the tank, you can reach them from the front hatch area. Take a flashlight and look up under the hatch. There you will see a rubber boot coming down from the console near the steering mechanism where the factory wiring and the steering cable runs through it. There is a removable cable tie on it.
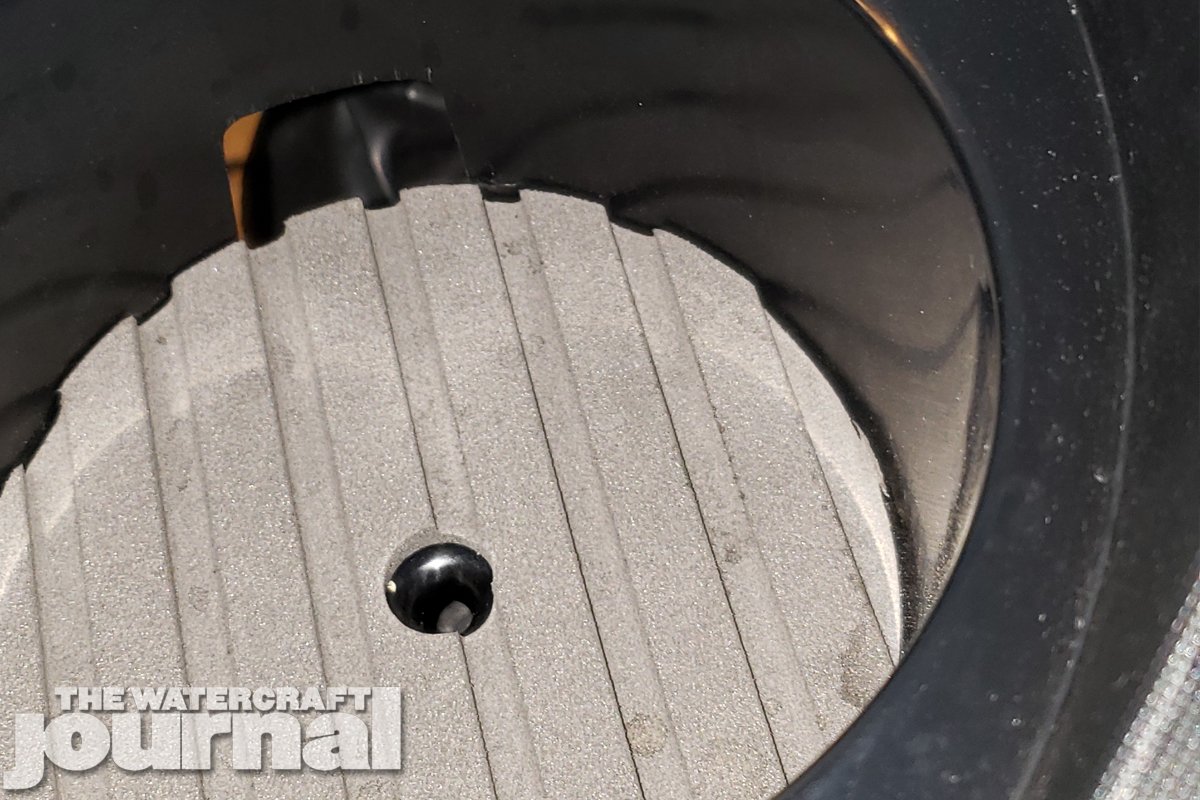
Simply remove the cable tie (to be reused later) and feed the power and transducer cables up through the boot. Smartly, the cup holder has a small hole in the base where the cables can be fed through.Unfortunately, the Raymarine Axiom 7 cable ends are just larger than the hole, so we used a round file to make the hole a little larger. Now fasten the factory supplied accessory mount on via three 4mm hex socket bolts.
Top left: We ran our wire loom parallel with the factory footwell drain hoses and ziptied the two together. Top right: With our wiring complete, we finally attached our harness to the battery. Bottom left: Now we can backtrack our steps and reinstall our fairing and trim panels. Bottom right: Now we’re ready to hit the water and chart a new course through some new, unfamiliar areas!
The Axiom 7 is fairly heavy compared to other smaller GPS units, so we used a RAM mount size-C ball with 1/4-inch by 20 stud. The thread on the factory mount plate is 1/4 x 20 and a 1/2-inch deep (the hole does not go all the way through). The RAM ball stud was too long for the mount so we had to cut it shorter. Once done, we used a little blue Loctite on the shortened ball stud. We also purchased RAM Mount 3.5-inch marine aluminum extension and the appropriate base holder for the chart plotter.
Once hard mounted, we were ready to connect the wires to the battery. We do recommend an inline fuse on the positive side. Once we finalized our installation we zip-tied our new wires to the drain hose running down the side of the ski for a neat and tidy layout. You don’t want wires flopping around when you hit the rough stuff. Finally, we reinstalled the panels back on (following our steps in reverse order) and off we went.
Special thanks to Tom Hill and providing The Watercraft Journal the text and copy.
If you’re a race fan 2019 is shaping up to be a wild one. In addition to major moves from industry manufacturers, we’re also seeing different race teams snatch up talent left and right. The latest being a big move for Broward Motorsports and Dean’s Team; the acquisition of AquaX Pro Rookie of The Year, Christian Daly. The full press release is below.
P1 AquaX wrote: After a phenomenal first year in the Pro division it was announced this week that the Pro Enduro Rookie of the Year, Christian Daly, will ride for Fort Lauderdale’s Broward Motorsports and Dean’s Team in the upcoming P1 AquaX USA race season.
“We are proud to announce the addition of Christian Daly to the roster,” commented Sam Nehme, owner of Broward Motorsports. “We feel Christian has done an amazing job on the track in just a few short years that he has been racing. We know that having him join our team will elevate him to the next level. It is the next generation of racers just like Christian that will showcase our sport to the world”.
“I’m so stoked to join this team,” said Daly. “I’ve admired Broward for years and can’t thank them enough for this opportunity. Deans Team is all about high performance and I’m itching to ride the boats. P1AquaX is doing a great job growing the sport and I’m glad to be part of it. I’ve been training hard and will be ready when the first flag drops.”
Daly will ride a Yamaha GP1800 with a star studded line up of riders including reigning P1 AquaX champion, and current World No 1 ranked, Eric Francis, and 34 World and National title holder, Chris MacClugage. The five rider lineup also includes Sophie Francis and Chris Saxon.
Daly’s first race will be in Daytona Beach, April 14-15. 2019
The Yamaha Variety Jet Trek is easily one of the world’s largest gatherings of personal watercraft enthusiasts united in raising funds for a special cause. The money goes to help disabled and disadvantaged kids; providing “computers, school buses equipped with wheelchair access, special technology to help kids read or hear, and waterproof wheelchairs that can be used on a beach or at a swimming pool,” according to a report by Boat Advice.
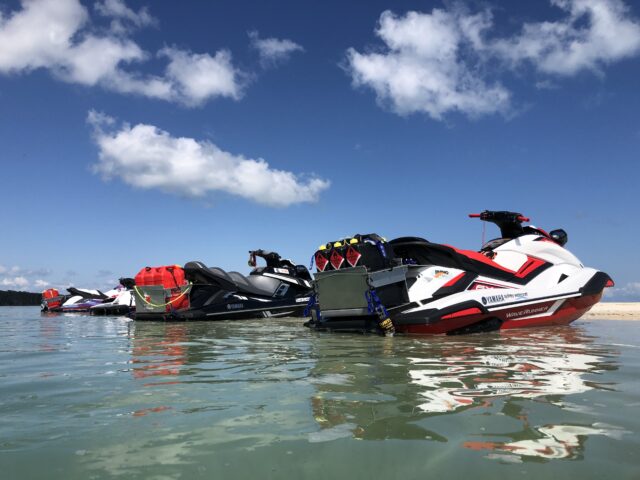
This year shattered records by raising a total of $404,708 – the highest ever recorded from a Jet Trek – surpassing last year’s $380,000 and $270,000 in 2017. Moreover, this year’s Jet Trek welcomed more riders and dared a more challenging route than ever before. The annual event went from from Bundaberg to Hamilton Island, the last stretch of Queensland coastline that the event had yet to cover during its 20 years.
Tracking the route from Bundaberg to 1770 (Agnes Water) to Yeppoon and then on to Stanage Bay, Mackay and Airline Beach before finishing on Hamilton Island. Yet much of the event’s challenge came not by rapidly changing sea states (although that happened regularly) but the logistics of the support crew, as the town of Stanage is so remote that is calls for transporting all of the ski down a 96km stretch of dirt road.
Add to that Stanage’s limited electricity supply (meaning using air conditioning in one house dims and the lights next door); limited supplies from the pub/gas station/post office; and non-existent WiFi, and you’ve got a problem. Refueling 100 jet skis (almost all with accessory fuel cells and jerry cans) nearly depleted the town’s fuel supply. The extra fuel was necessary to make the 190km run from Yepoon to Stanage.
Riding in surging swells is not for the faint of heart, and being caught in the middle of the ocean covering big distances aboard a jet ski can be overwhelming. Add to that a few open ocean refueling stops – without getting sea water in your gas tank – added to the challenge. Rider were encouraged to ride alone except for those few smooth days, where passengers were temporarily permitted. Safety is key for the Jet Trek and the toll on both body and machine is extreme.
When Christopher Columbus said the ocean blue in search for new land, people doubted him and called him crazy. When Clayton Jacobson II invented the Jet Ski, a lot of people must have thought he was crazy. Well, crazy is going to be the theme of this news story.
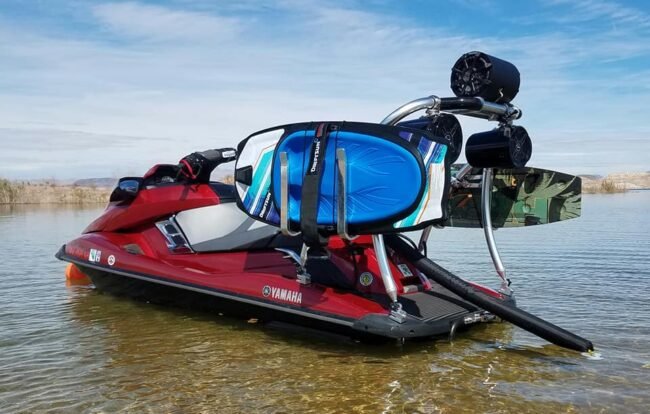
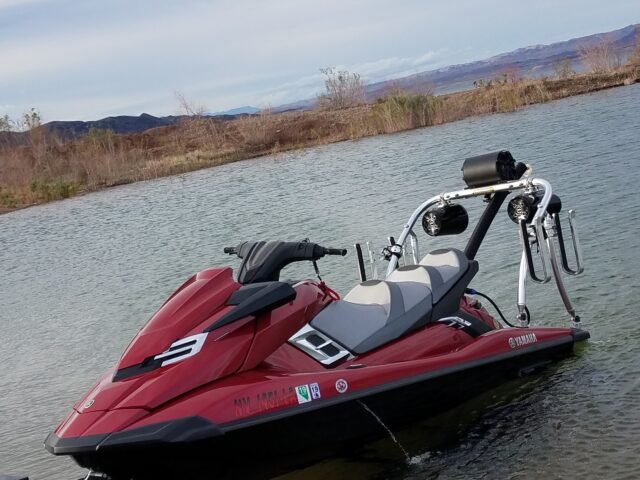
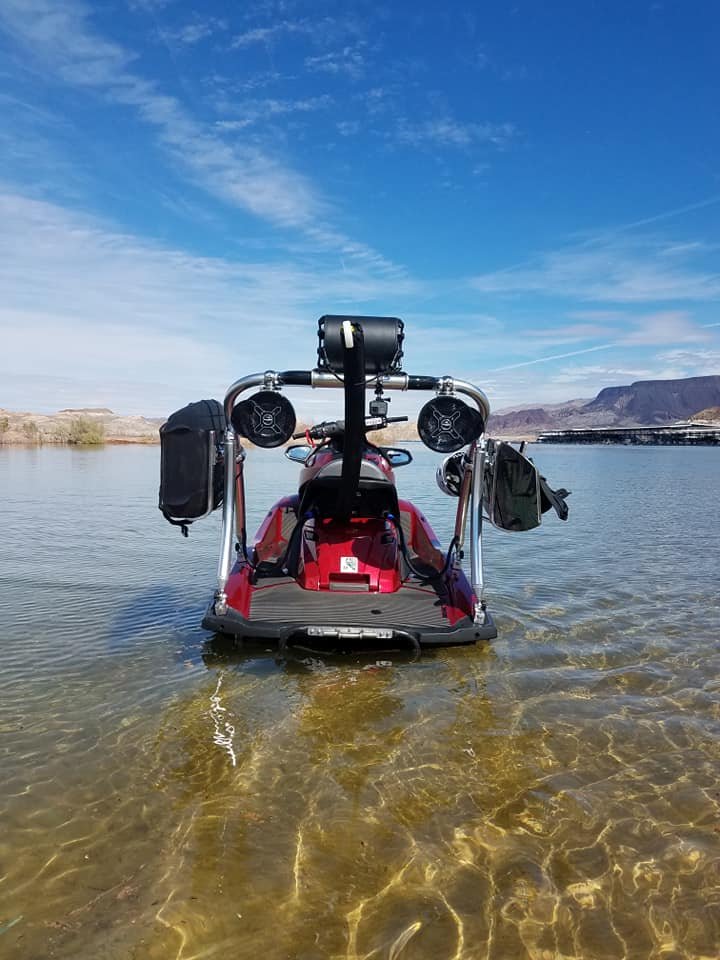
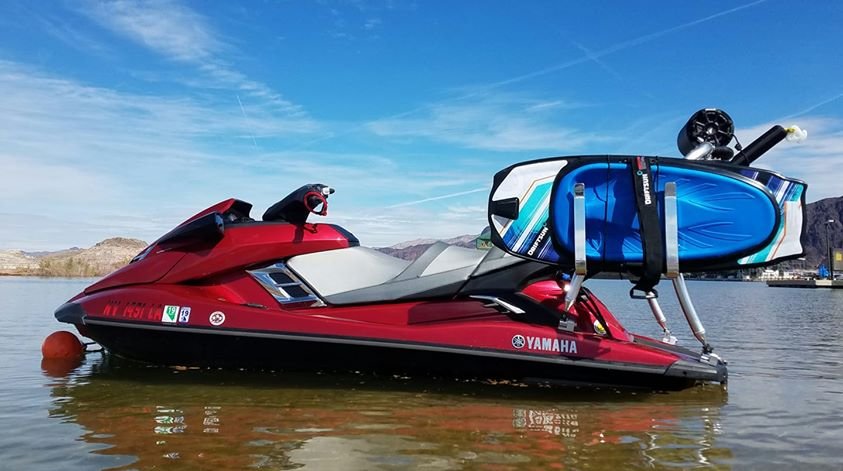
People buy personal watercraft because of their ability to go fast, handle tight and to have fun. Well given the much smaller size PWC’s have than boats, there are some sacrifices made. People love to be the life of the party and one individual is trying to do just that. Loren’s PWC is a 2015 FXHO Cruiser with the 1.8L engine. He felt that he needed to spruce up his PWC with a board rack. This idea started with him wanting a new solution to carrying his boards around without putting them in the footwells. The board racks utilized in this rack are Reborn Wake surf Racks.
Loren likes these racks because they secure any type of board: wakeboard, wake surf board, wake skate among others. If you build a rack and have your boards on it, you got to have speakers as well. Someone needs to bring the music to the beach. Loren has a 6’’ Bazooka speaker facing towards the rider and has a 8’’ speaker facing towards the rear, so when towing someone they can enjoy listening to music while they are tearing up the water. While there was a 10’’ subwoofer mounted to the rack, Loren scaled it down to an 8’’ subwoofer. The speakers are powered by a Wetsounds Micro 4 amp paired with a Wetsounds Micro subwoofer amp.
Loren says that at speeds of 55 mph you can hear the music and when you are traveling at speeds under 35mph it is super loud! He has not noticed any changes in the top speed or the way the watercraft rides. He estimates he only added about 65 pounds of weight with the board rack, speakers and subwoofer.
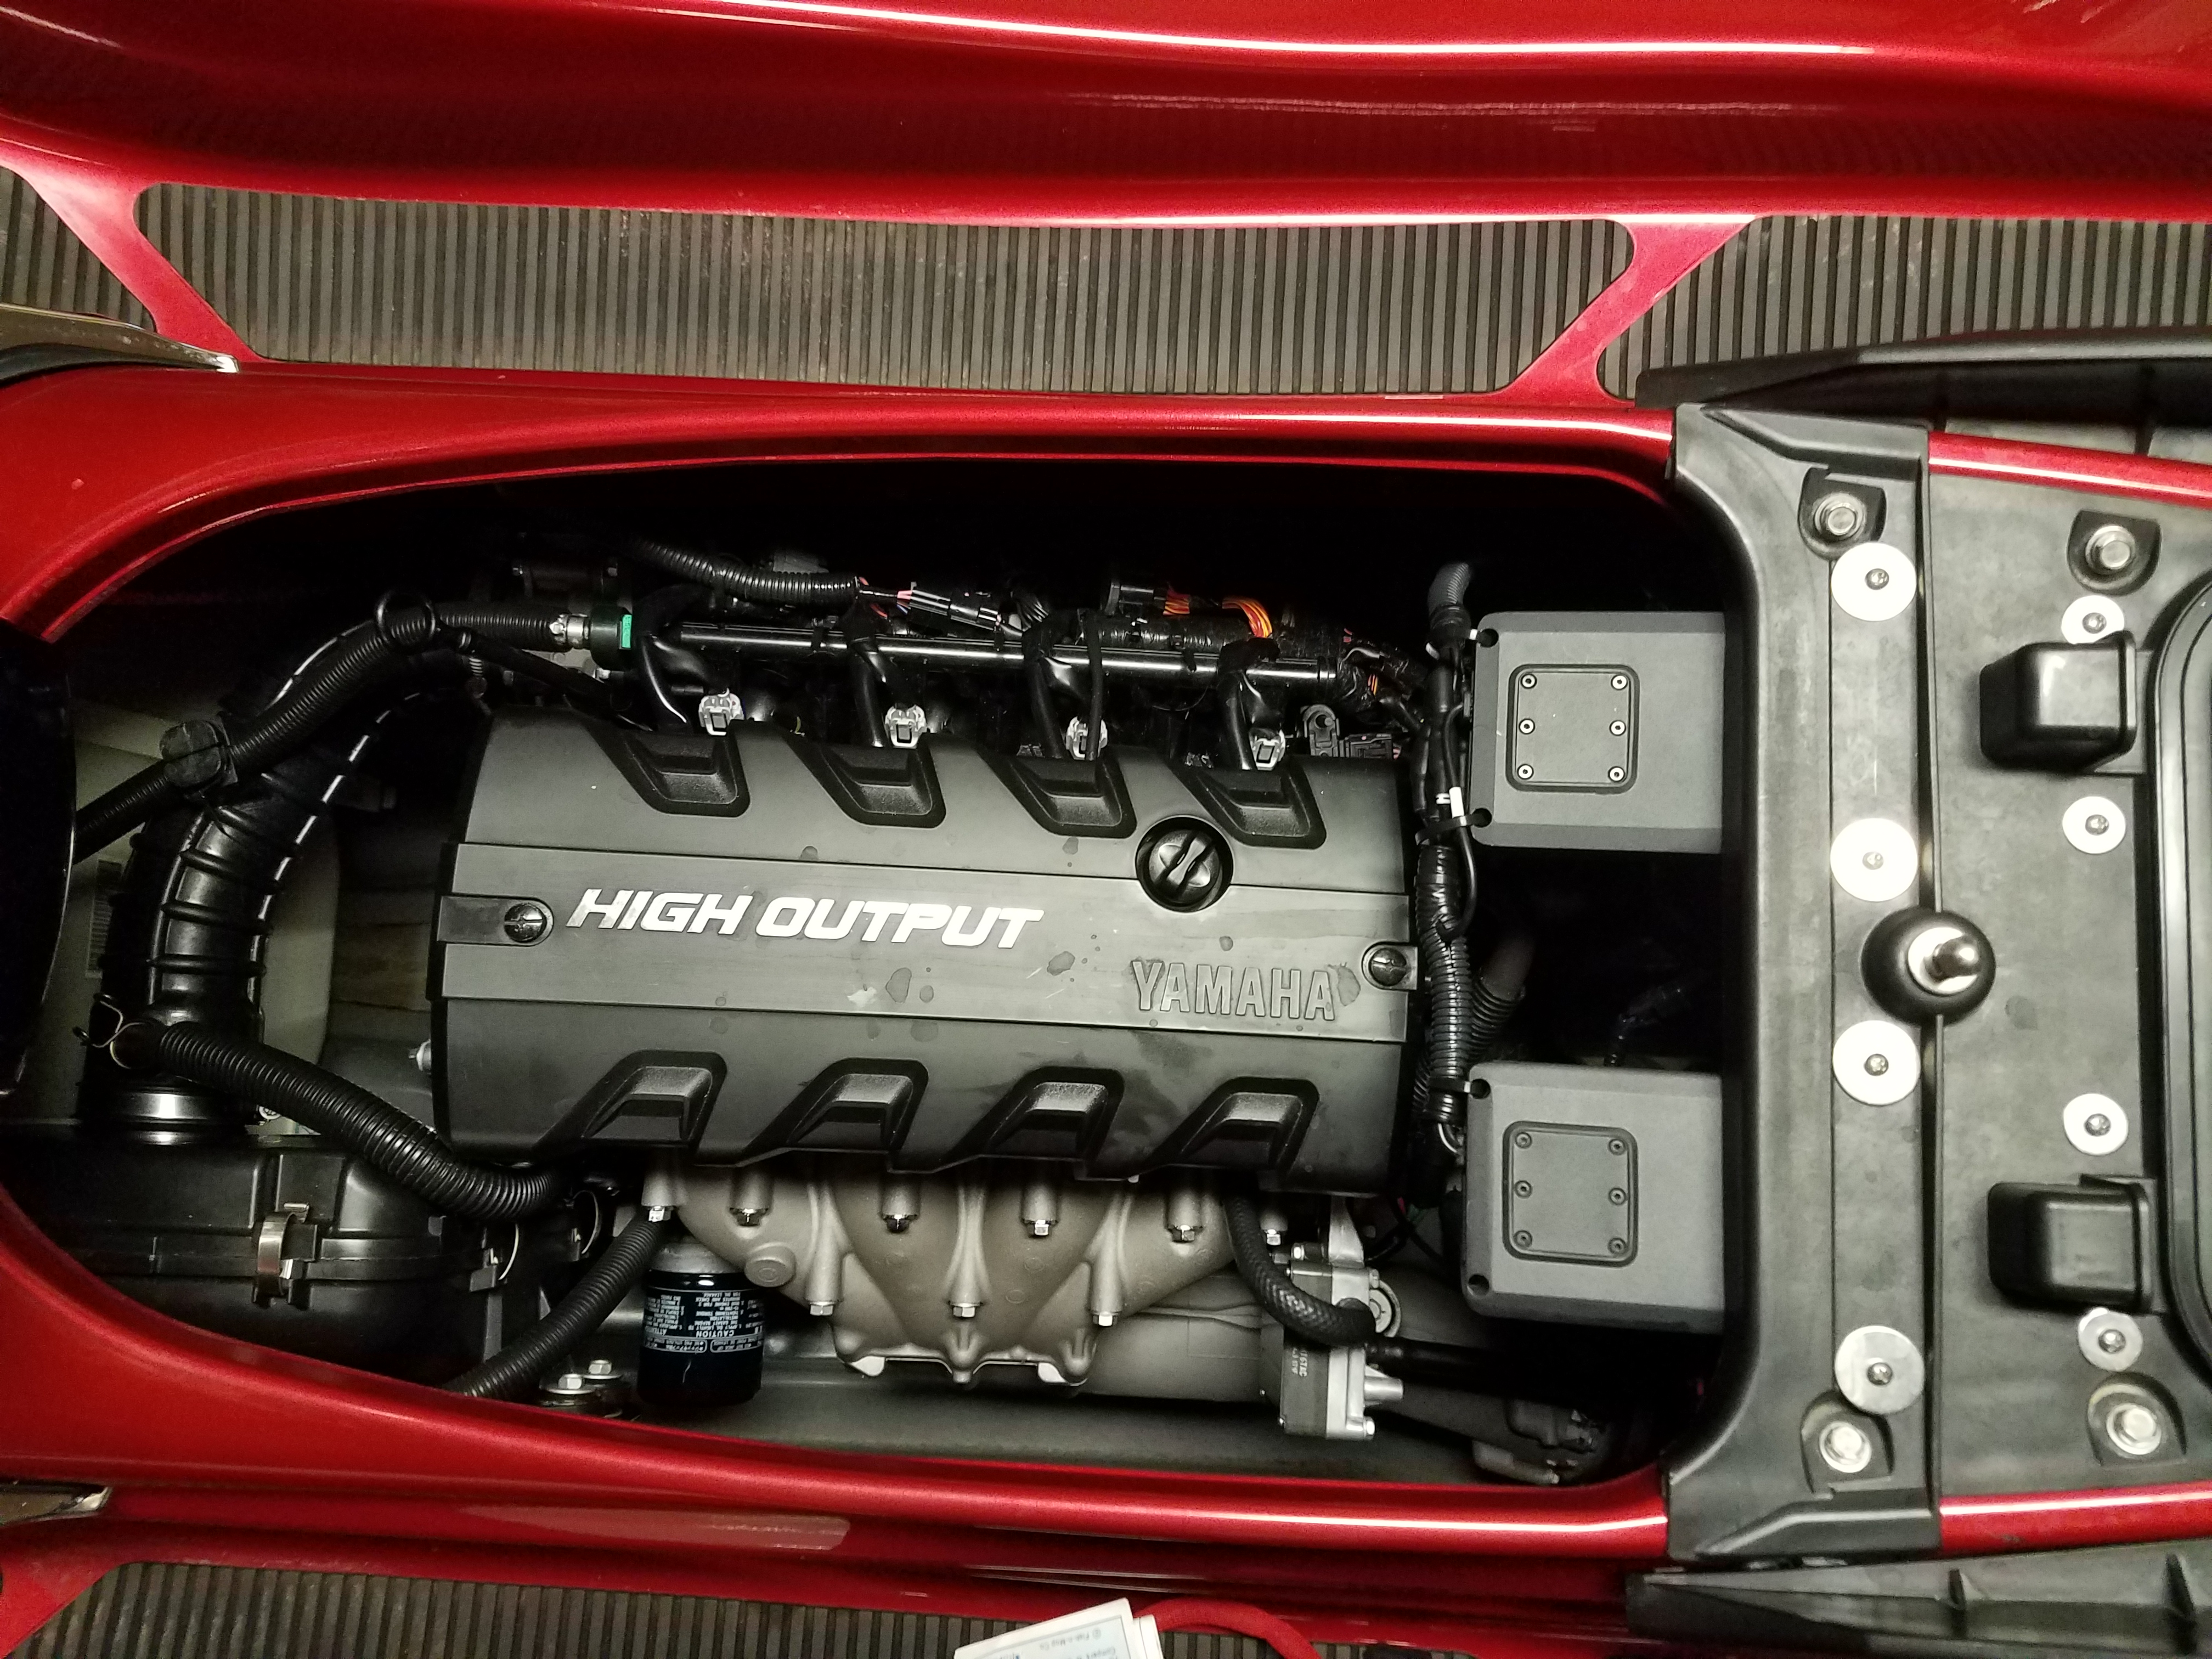
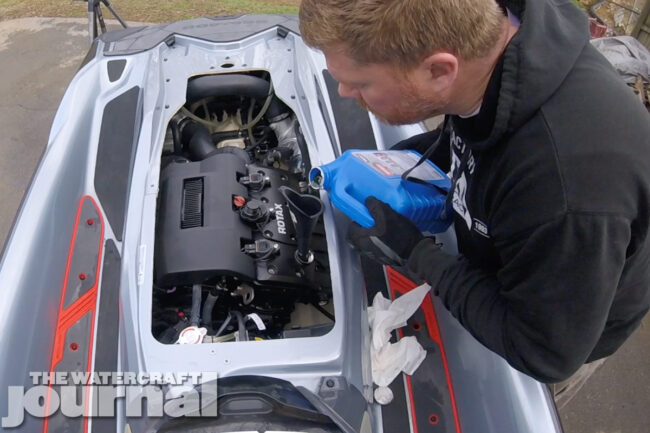
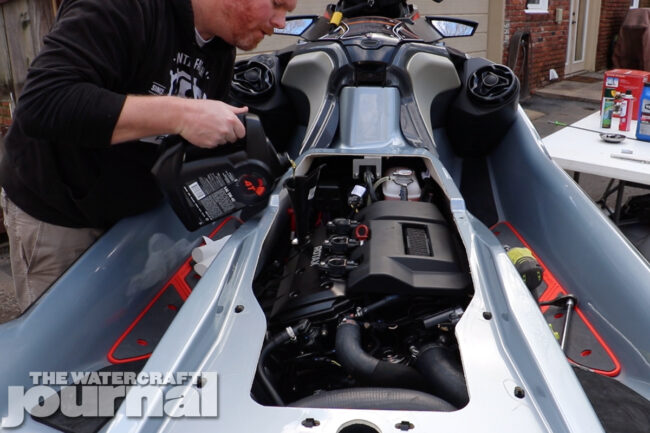
Getting the optimal performance out of your supercharged personal watercraft really isn’t all that difficult – that is, if you follow the guidelines outlined by the owner’s manual and manufacturer’s recommendations. In the case of our 2018 Sea-Doo RXT-X 300, we had just surpassed 50 hours on the clock and knew it was time for service.
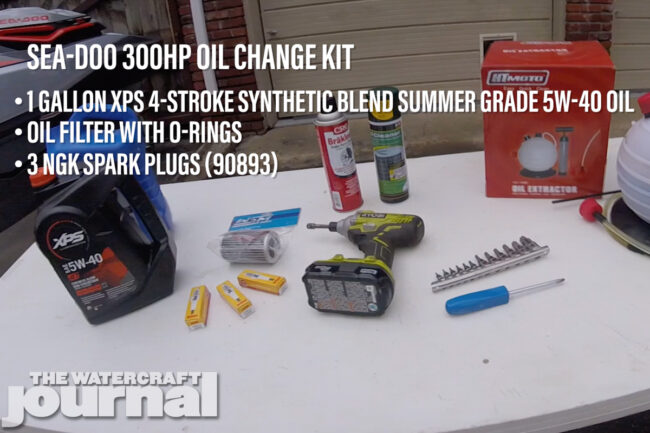
Although it’s best to have your local dealer’s service department or certified BRP mechanic tackle your ski’s service, many of you are the do-it-yourself types – like ourselves – so we’re going to show you how we recommend changing the oil, filter and spark plugs, with a few extra steps to ensure your machine runs its very best.
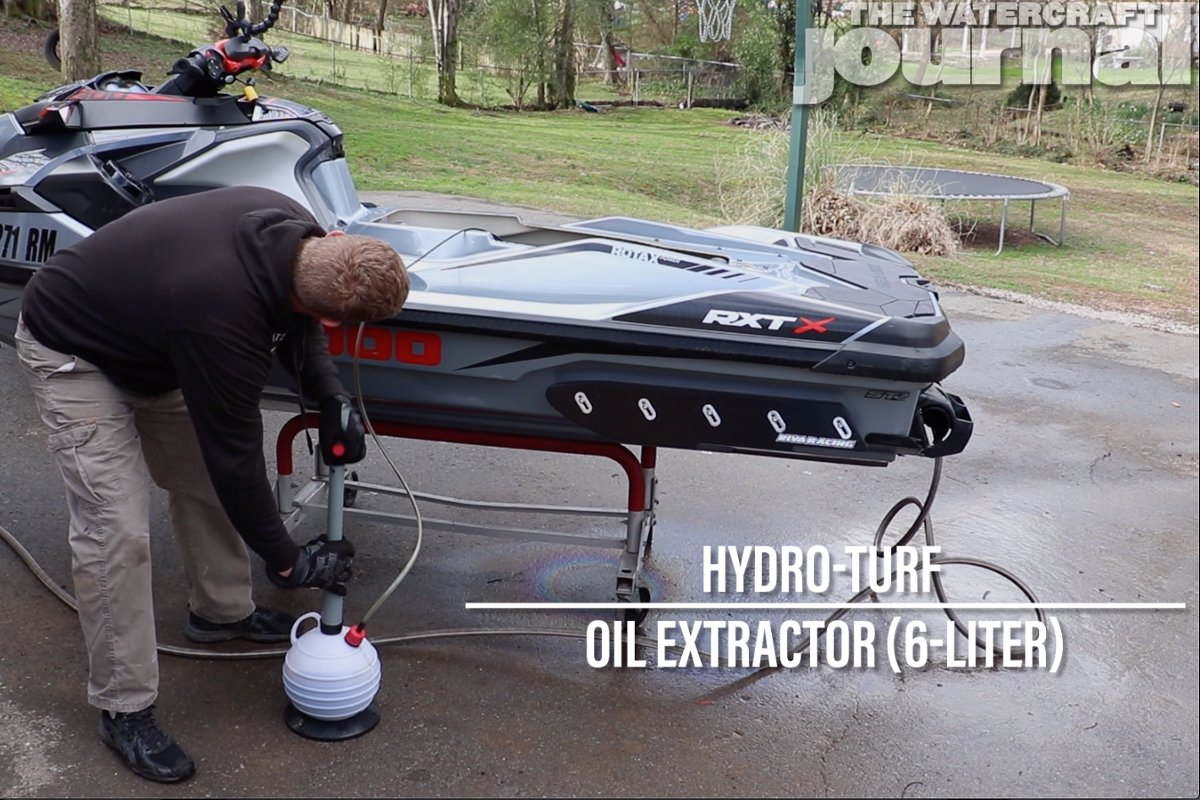
Next, we picked up a Hydro-Turf Fluid Extractor to siphon the oil out of the dip stick tube. Hydro-Turf offers an optional 15-liter version, but the 6-liter pump was all we needed for the work we were doing today.
Most all technicians agree that it’s all but impossible to siphon out all of the old, dirty oil, which we believe to be true. That is why we picked up a gallon of generic store-brand 5W-40 synthetic blend to use as – what we like to call – sacrifice oil. More on that in a minute.
As always, we begin by disconnecting the battery. Next, we start easy enough by removing the two-piece seat and the engine inspection cover. Don’t forget that in addition to the 10 torx head screws along the sides that there are 3 more hidden under the ski pylon cover plate. With the engine compartment fully exposed, working on the Sea-Doo is remarkably easy.
Our dipstick read slightly above the fill line, which is spot on when the engine is cold. Too often, people overfill their engine oil, which produces a windage effect inside of the crankcase. Windage slings oil under the pistons, connecting rods and crank, and can actually slow down their rotation, decreasing RPMs.
Over-filling the oil level can also result in potentially damaging crankcase pressure, pushing super-heated vaporized oil out of the crankcase and back into the engine’s intake, coating the intercooler in a thick film that reduces the intercooler’s effectiveness.
Earlier this year, we explained in great detail the detriments of oil windage, excessive crankcase pressures (ie. atmosphere) and how to avoid it. We strongly recommend you click this link to go back and look it over.
RIVA Racing’s own Brian Rosencrantz cautioned, “A common cause of poor performance is over-filled engine oil. Failure to follow the correct procedure will result in the ski being over-filled. This causes decreased engine performance due to windage losses in the engine.”
So again, we were cognizant not to exceed the recommended 3 quarts of oil. Carefully feeding our fluid extractor into the dip stick tube, we sucked out just a little under 3 quarts of burnt, spent oil. Knowing that a few ounces of the old oil remained inside and not wanting it to contaminate our fresh XPS oil, we poured in 3-quarts of our cheap “sacrifice oil”.
The sacrifice oil does a couple things: it helps wash out any lingering carbon deposits around the pistons that could contaminate our high grade XPS oil, as well as dilute the remaining ounces of old oil enough for our extractor to suck them out. Obviously, we matched both the synthetic blend and weight to the XPS oil.
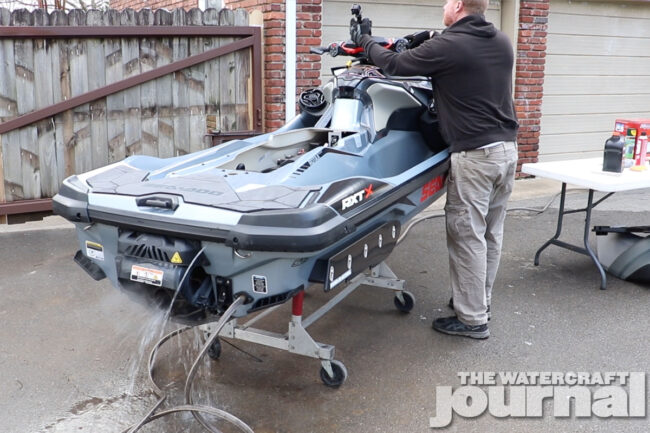
We then turned on the hose and let the engine idle for a little over a minute. Although not mandatory, this extra step helps flush out the remaining deposits inside of the crankcase, ensuring that our XPS oil won’t be contaminated as we pour it in.
Using our extractor we then withdraw the sacrifice oil and poured in our XPS oil. BRP insists on using a synthetic blend, which means a blend of mineral oil (conventional or crude) and synthetic base oil. Due to their unique tight-knit molecular bond, synthetics allow for lower viscosity grades like 0W-20, ideal to improve fuel economy.
The problem is that these lower viscosity oils don’t wick or dissipate heat like heavier, conventional-based oils. Equally, synthetic oils are far “slicker” than crude/mineral oils. Normally, this attribute is preferred among oils, but for Sea-Doo, the slicker oil permits too much slippage between the supercharger clutches and can quickly burn up these sensitive components.
With an engine filled with fresh XPS oil, we removed the old oil filter. The filter is enclosed by a sealed lid that uses two rubber o-rings. The filter is attached to the lid by a rubber grommet, meaning replacing it simply means popping the old one off and replacing it.
Whether the o-rings look good or not, we recommend replacing them as the service kit comes with new ones anyway. With those replaced, we applied a little bit of fresh oil to the rings and reinstalled the filter and lid, tightening the lid snug.
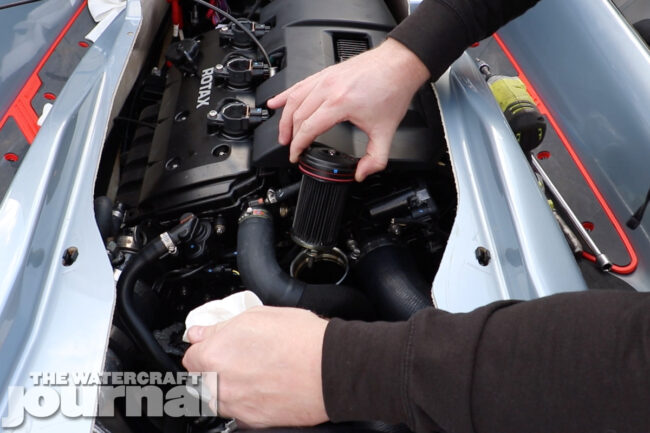
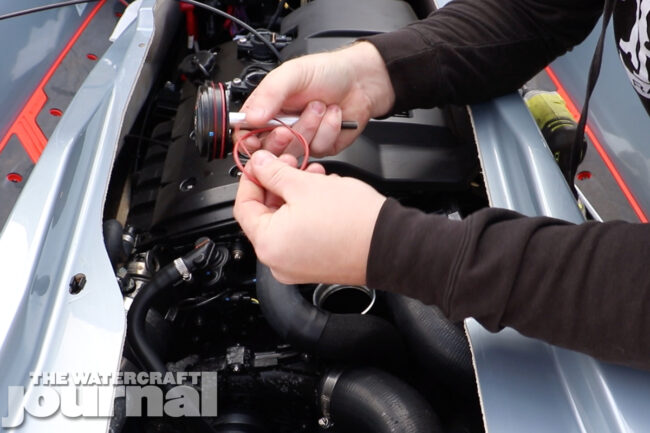
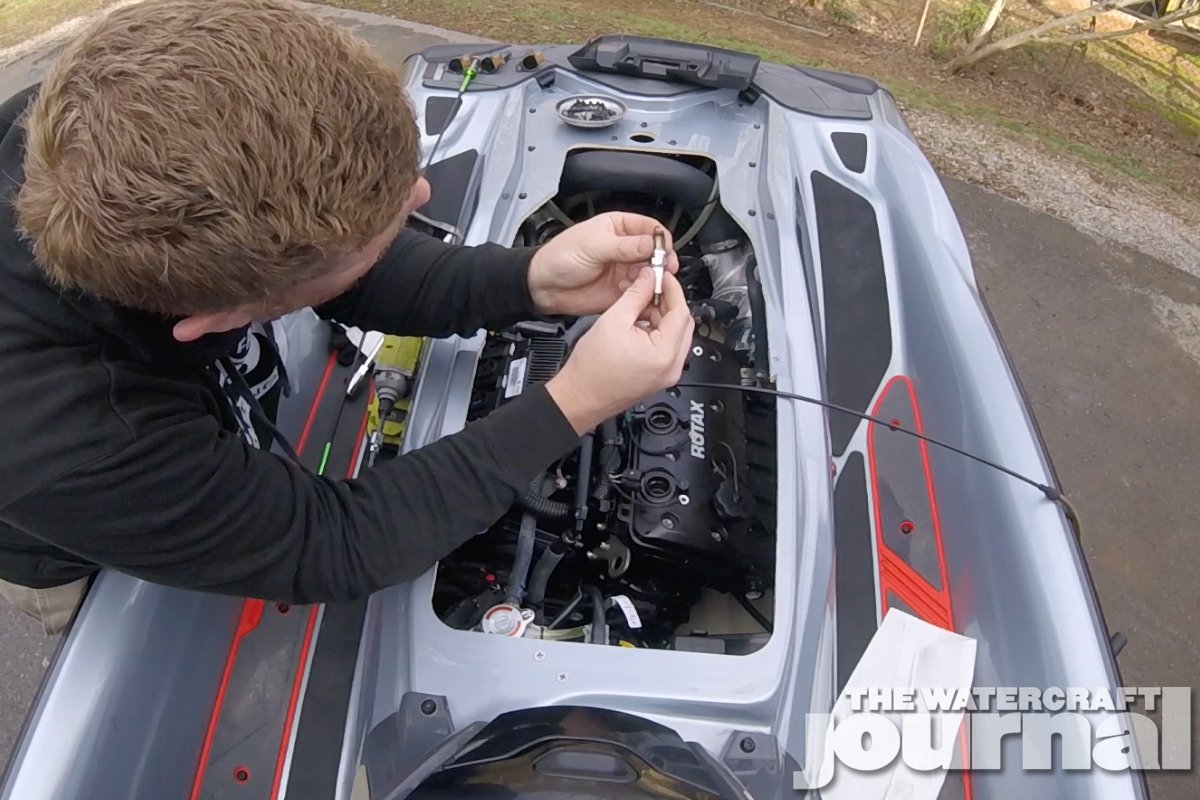
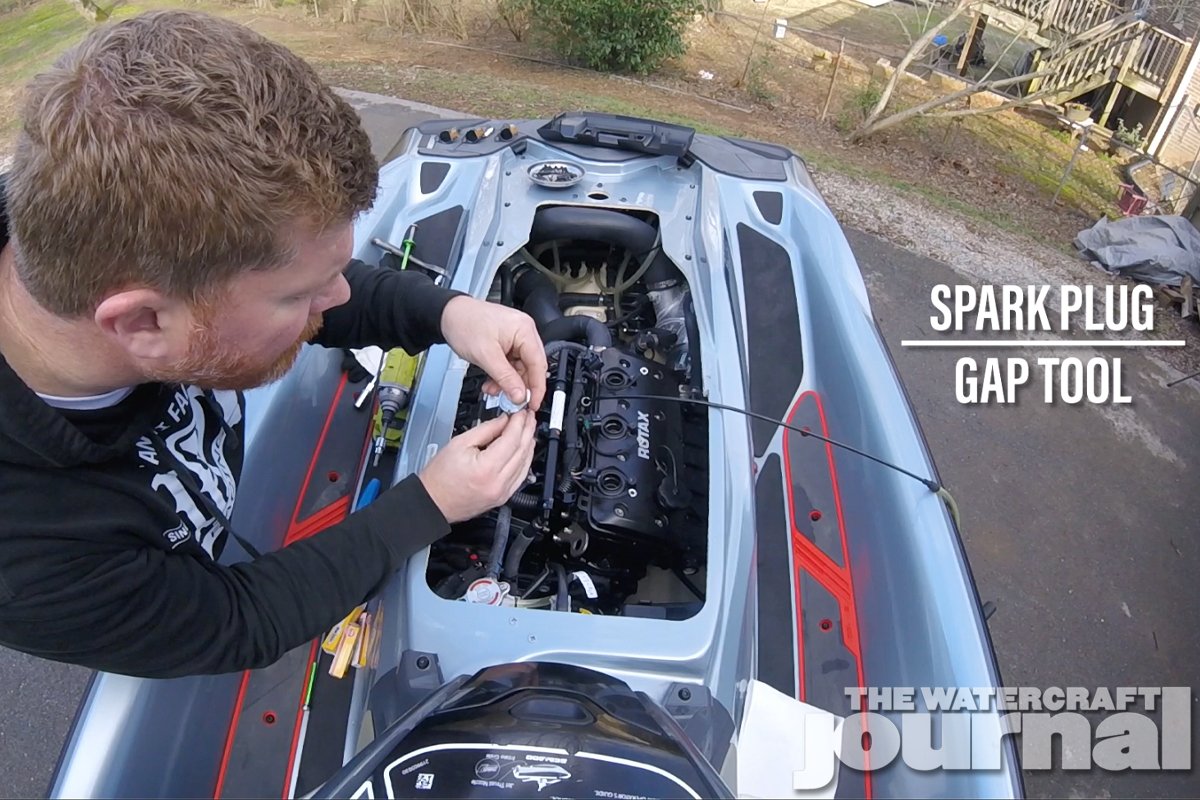
To complete our service, we needed to swap out our spark plugs. The decorative engine cover is easy to remove; just take out the dip stick, and unsnap the two pegs holding the cover to the intake manifold. Next, we unplugged each of the coil packs from the harness. Each coil is attached to a snap-and-prong connector, so just press down and slide each one back.
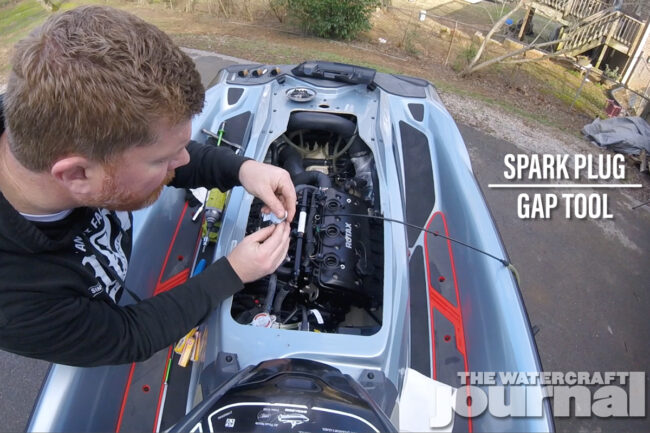
Each coil pack is held down by a torx head screw. Back each one off and remove the respective coil pack. Using a spark plug socket and a long extension, we removed each plug and observed the discoloration of each electrode. Using a simple dial indicator, we saw all 3 spark plugs fell within the .025-thousands to .030-thousands range, per the service manual.
It’s always wise to double check the spark plug gap – pre-gapped plugs are often close, but shouldn’t be blindly trusted. We manually gapped each new spark plug’s electrode to .028-thousands of an inch. BRP’s service manual suggests applying some anti-seize to the threads before torquing each plug to 17 lbs. feet. Most mechanics often call this “snug”, which is just a twist over hand-tight at best.
Next, reinstall each coil pack, making sure there’s no debris to interfere terminal. Plug each coil back into its respective socket, and snug down each screw. Content with our work, we reconnected the battery, turned the hose back on, and fired up our newly serviced RXT-X 300.
In order to preserve our carbon ring seal as long as possible, we didn’t let the engine warm up longer than a minute or two. The carbon seal is only cooled when it’s in the water – whether idling in one spot or at speed – so letting it spin out of the water too long can damage the sensitive part.
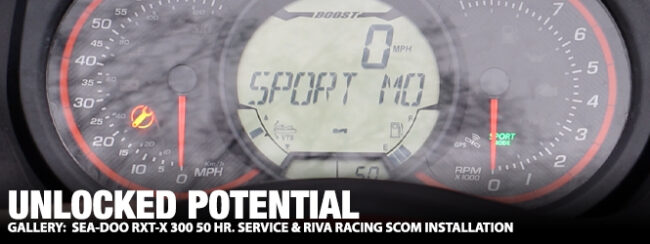
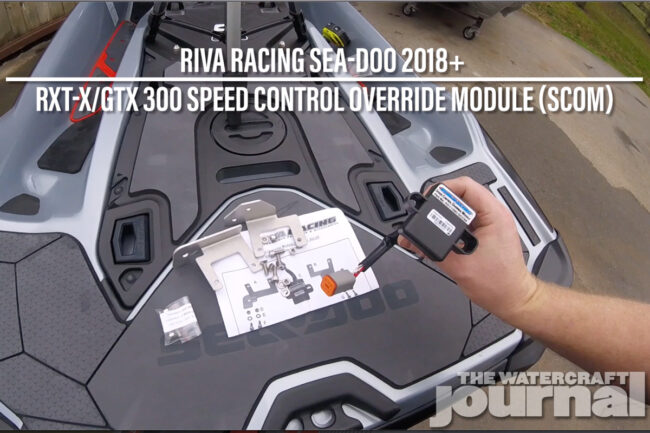
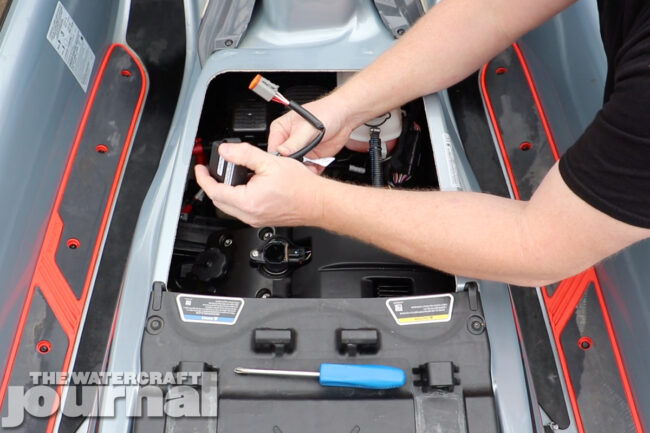
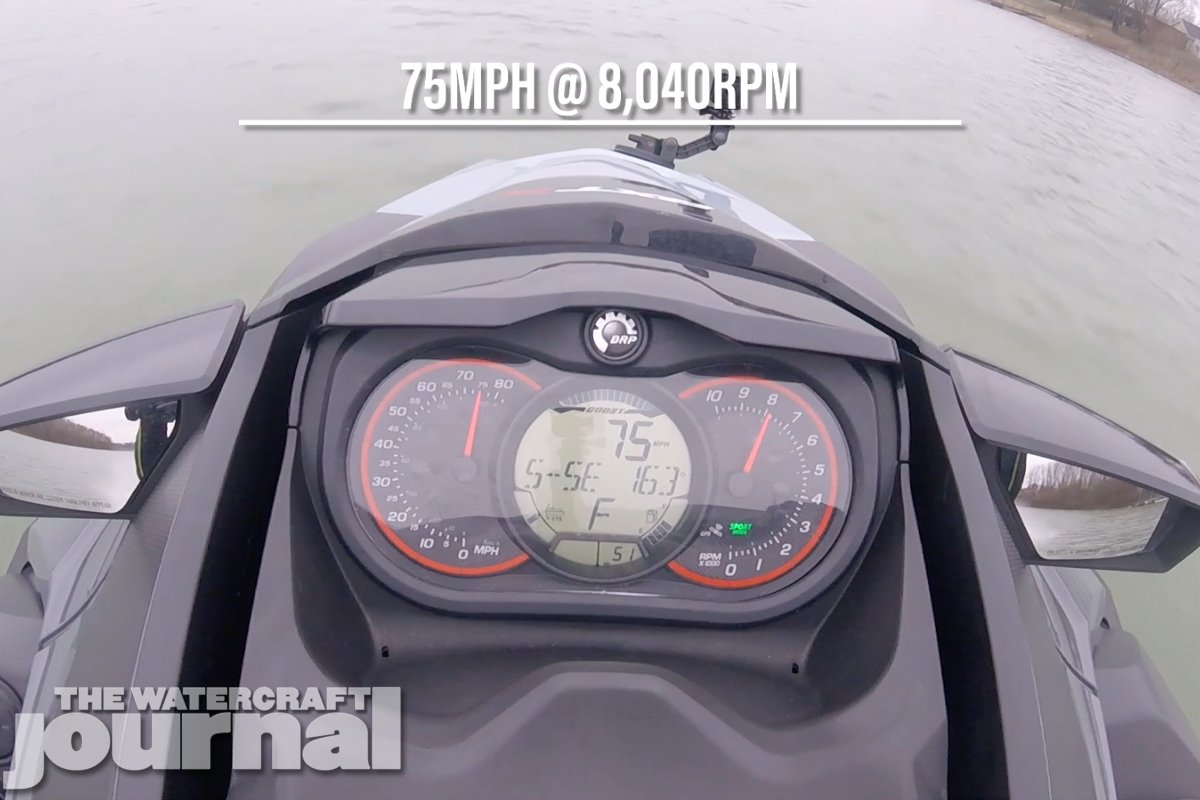
But that’s not all for our 2018 Sea-Doo RXT-X 300. We also got our hands on a RIVA Racing Speed Control Override Module. Believe it or not, this one product can unlock the hidden potential within the Sea-Doo RXT-X 300, allowing it to run at a sustained 74-plus-miles per hour.
It does this by interrupting the signal to the factory-installed GPS-monitored speed control function in the craft’s iControl brain, which maintains the Sea-Doo at a United States Coast Guard-approved 68-plus-miles-per-hour. Please understand that it does not reprogram the ECU or permanently alter the performance or every day function of the watercraft. It is 100-percent reversible and non-invasive.
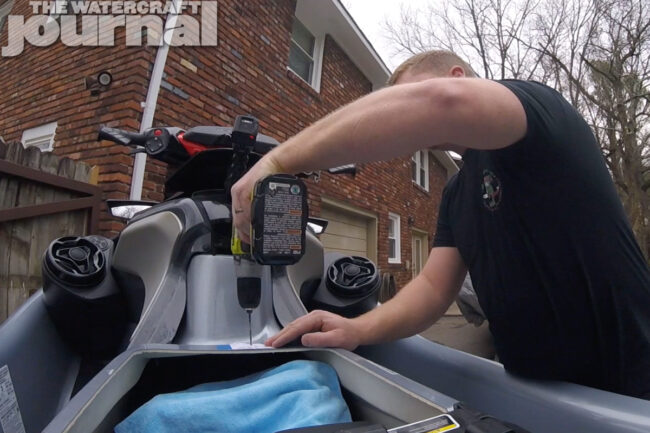
Using a paper template provided in the instructions, we marked the two holes where we will drill – careful to align properly to give the SCOM plenty of room away from the reservoir bottle. Drilling the Sea-Doo’s proprietary CM-Tech deck makes quite the mess so we laid down a towel to catch most of the dust.
Using a smaller bit to drill our pilot holes, we then used the supplied bit to open the holes wider. We also used a larger bit to countersink the holes, so the supplied mounting bolts would lay flush to the surface. RIVA provides nylock nuts that won’t back off or vibrate loose. Tighten these with a 10mm box-end wrench.
With our SCOM mounted, we next removed the harness diagnostic cable from the reservoir socket and plug it into the module. We then plugged the SCOM’s lead into the reservoir socket, taking the factory plug’s place. With that complete, we reattached the positive terminal to the battery and readied to fire up our newly “unrestricted” RXT-X 300. Before we did though, there was one new trick we wanted to try:
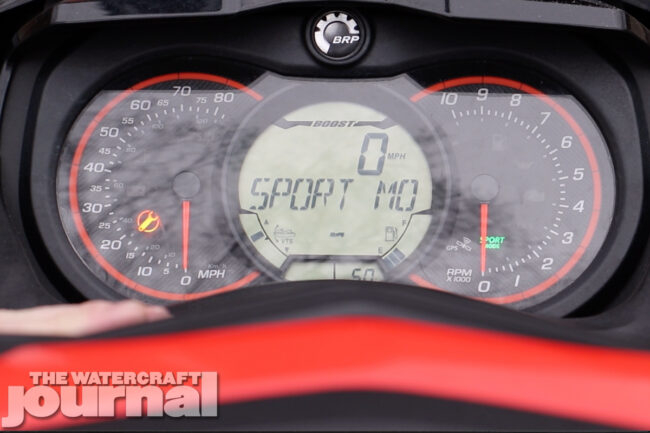
The RIVA SCOM allows for the Sea-Doo to be set into “Sport Mode” before starting the ignition. All you have to do now is tap the Start/Stop button, allowing the gauge cluster to wake up. Then you can set your ski to “Sport Mode” like you would normally when the engine was running, by tapping the Sport button once, and once more to confirm.
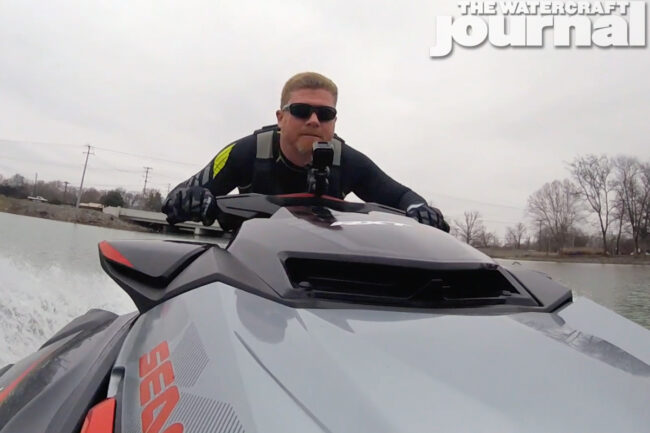
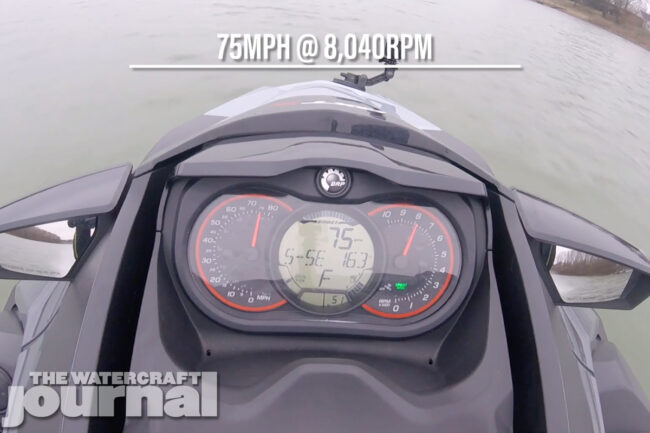
Either selecting Sport Mode before ignition or after, the 2018 Sea-Doo RXT-X 300’s arm-stretching acceleration remained the same. It was only as we crept up past 68 miles per hour did the SCOM truly prove its worth. With our trim set at 5/8 an a few gallons of gas in the tank, we continued to see gains the longer we held into the throttle.
Wanting to record our progress, we selected the top speed feature on the Sea-Doo’s dash board as well as recorded our top speed using both our Garmin GPS and a top speed app on our iPhone 8. What we saw – 75 miles per hour at 8,040rpm – was truly impressive, especially on a bone stock 2018 Sea-Doo RXT-X 300.
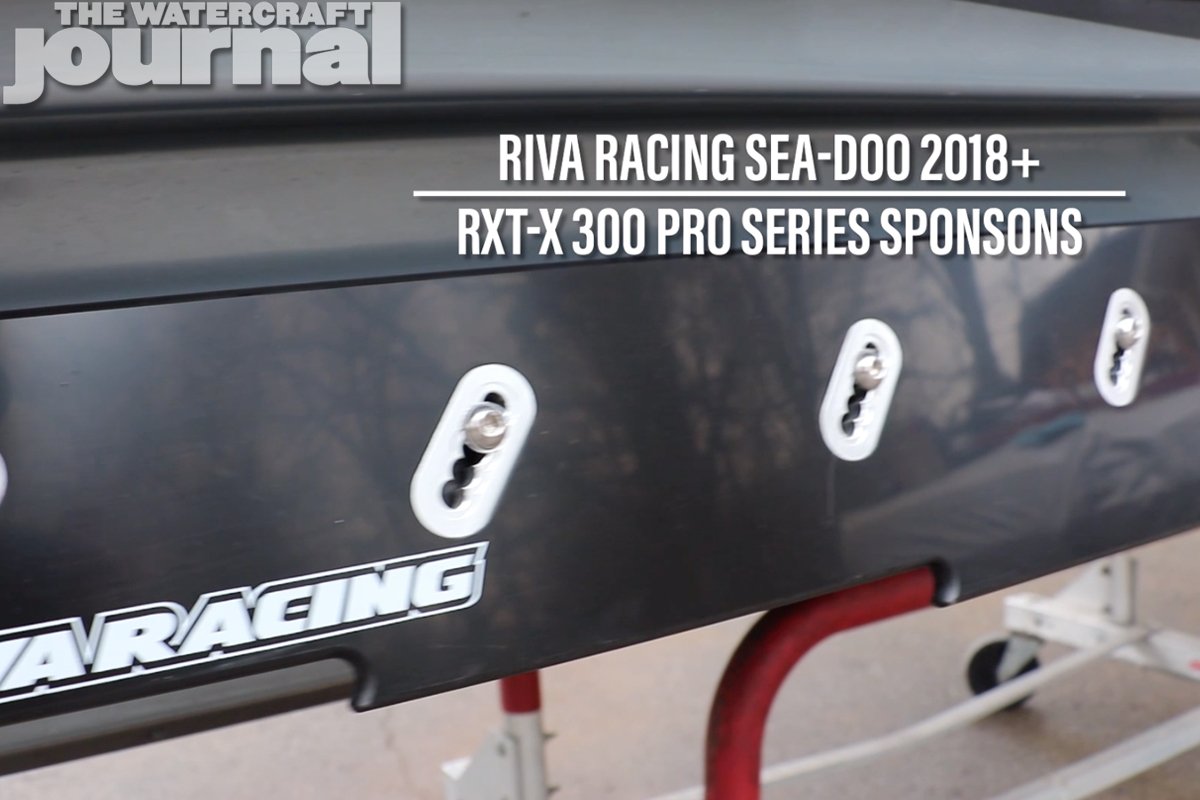
Take into account that these speeds were achieved with a 240-pound pilot riding at an elevation of 450 feet above sea level, and riding with our aggressive-handling RIVA Pro Series sponsons set at the 4th lowest position (which admittedly, were probably responsible for some drag); it’s pretty exciting stuff, especially when speeds like these took literally thousands of dollars in aftermarket parts and tuning just 10 years ago – and a huge testament to the power the factory Sea-Doo is putting out.
In an aim to improve the customer experience, Yamaha has launched a revolutionary new customer lifecycle program. They call it “Livin’ the Water Life” and it will enable personalized communications between Yamaha and the owner about their WaveRunner or Boat.
Yamaha is hoping to create an “amazing ownership experience” for the loyal Yamaha customer that will bring them back to Yamaha Watercraft every time. Below is the full press release and as always, be sure to check out yamahawaverunners.com for all of the latest info.
Yamaha WaterCraft Group Launches Post Purchase Customer Lifecycle Program for WaveRunners and Boats
“Livin’ the Water Life” owner program includes regular, personalized communications based on the model purchased.
April 1, 2019 – Kennesaw, GA — Owners of Yamaha WaveRunners and Boats will have an entirely new experience with their product and the Yamaha brand with the launch of the new Customer Lifecycle program called “Livin’ the Water Life” that went live today.
The program sends a regular schedule of emails over three years to owners that includes:
Tips and tricks to using their product (docking, trailering, connecting Bluetooth, etc)
Pre- and post-ride checklists
Maintenance guides and service reminders
Boating destinations specific to where they live
Top accessories for their model
Yamaha Extended Service promotions
Information on boating safety courses
Cross promotions with other Yamaha products
Yamalube and GYTR promotions
New product information and repurchase incentives
The emails are focused on driving owners back to their dealerships for service, accessories and future Yamaha products.
“The experience with the Yamaha brand doesn’t stop at the point of purchase, it really only begins,” said Andrew Cullen, Digital Marketing and Communication Manager. “This campaign is 100% focused on making ownership with WaveRunners and Boats an amazing and unforgettable experience, and one that will keep them fiercely passionate and loyal to the brand, now and in the future.”
“The goal at the end of the three-year campaign is to have created an amazing ownership experience that makes loyal Yamaha customers want to step up into a new model, and stay with the Yamaha family and their local Yamaha dealership for all of their outdoor recreational needs,” said General Manager Bryan Seti. “Our digital team has created a cutting edge and uniquely personalized platform that will impress our customers and grow all aspects of the Yamaha brand.”
Starting today, we’re going to give you until April 30th, 2019 to submit a 250-300 word essay telling us why you feel you are deserving of a Bopenski Kickback chair, as well as how you plan to use it this year. You also need to include a high resolution image of you with the personal watercraft that you plan on using your new Kickback chair on. The winner will not only get a brand new Kickback chair, but an embroidered hat and neoprene drink koozie.
All entries should be emailed to [email protected]. Your essay can either be a Word document, Text file or written directly in the email itself. And just like in high school, your essay will be graded for word count and following the assignment, as well as grammar, syntax and punctuation – because we’re jerks like that.
The Bopenski Kickback PWC chair is the only chair specifically designed for PWC use; is built using top-of-the-line materials, is fully adjustable to fit any runabout watercraft with an elevated tow eye (ST3-platform Sea-Doos require the retractable ski pylon); and best of all is designed to last for years, not just a single season or two. You can find more information at Bopenski Watersports, and is sold at RIVA Racing, Watercraft Superstore, Cycle Springs Powersports and beyond.
Greenhulk.net is the world’s biggest community of personal watercraft enthusiasts that is also accompanied by its PWCPerformance.com store selling proven, high-quality performance parts from some of the most revered companies worldwide for turning your boring ol’ bone-stock watercraft into a octane-burning, water-boiling lake rocket. Moreover, Greenhulk founder, Jerry Gaddis is one of the most respected persons in the PWC industry. So when Gaddis makes a major addition to his forum and store, it’s well worth paying attention.
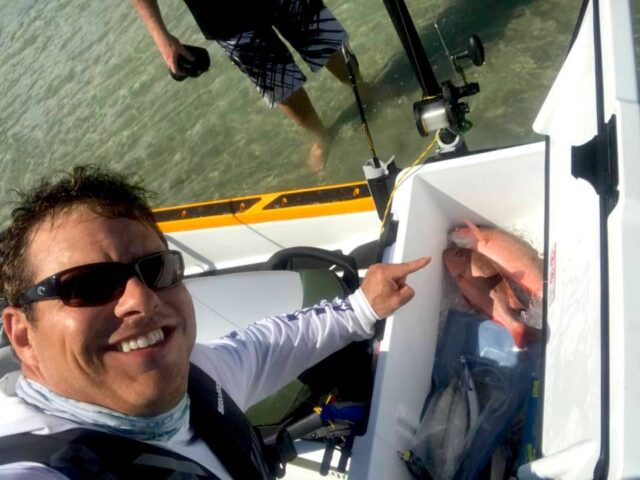
Last month, Gaddis announced the launch of www.GreenHook.net, a portion of the existing Greenhulk.net forum as well as a section of his PWCPerformance.com store dedicated to personal watercraft fishing. Albeit slow to pick up momentum in the United States, PWC fishing has quickly become the fastest growing segment of specialized interest in the watercraft market worldwide. Australia, New Zealand and South Africa have played host to the sport’s rapid growth and many are waiting for the North America to catch on quickly.
Major additions to the fishing side of PWCPerformance.com is the inclusion of entire Kool PWC Stuff catalog of watercraft racks. These American-made, powder coated racks come with adjustable, rubberized feet; optional rod holders; and even mounts for narrow-gauge Rotopax jerry cans; as well as being able to carry huge 54 quart coolers. And new for 2019 are Kool PWC Stuff’s specific storage racks made for Se-Doos equipped with its Linq accessory mounts. You can see them all here, and join the forum conversations here.


")


 The program sends a regular schedule of emails over three years to owners that includes: