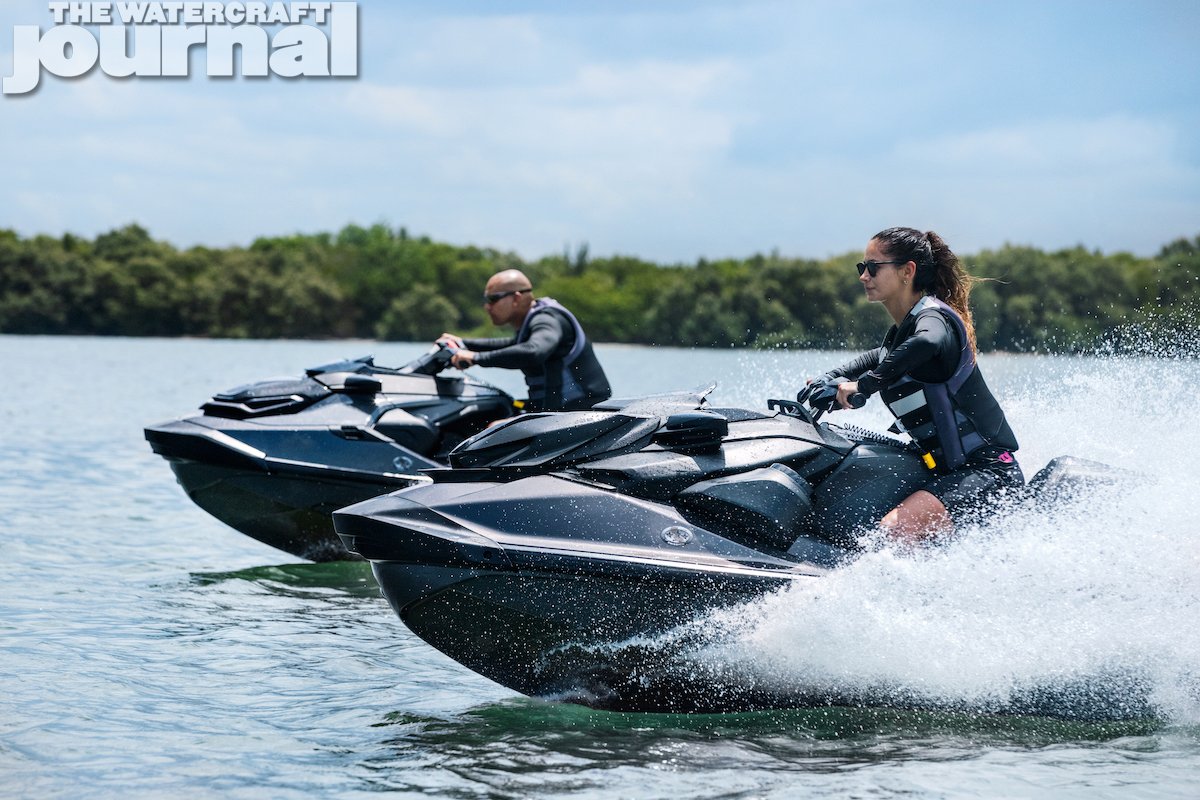
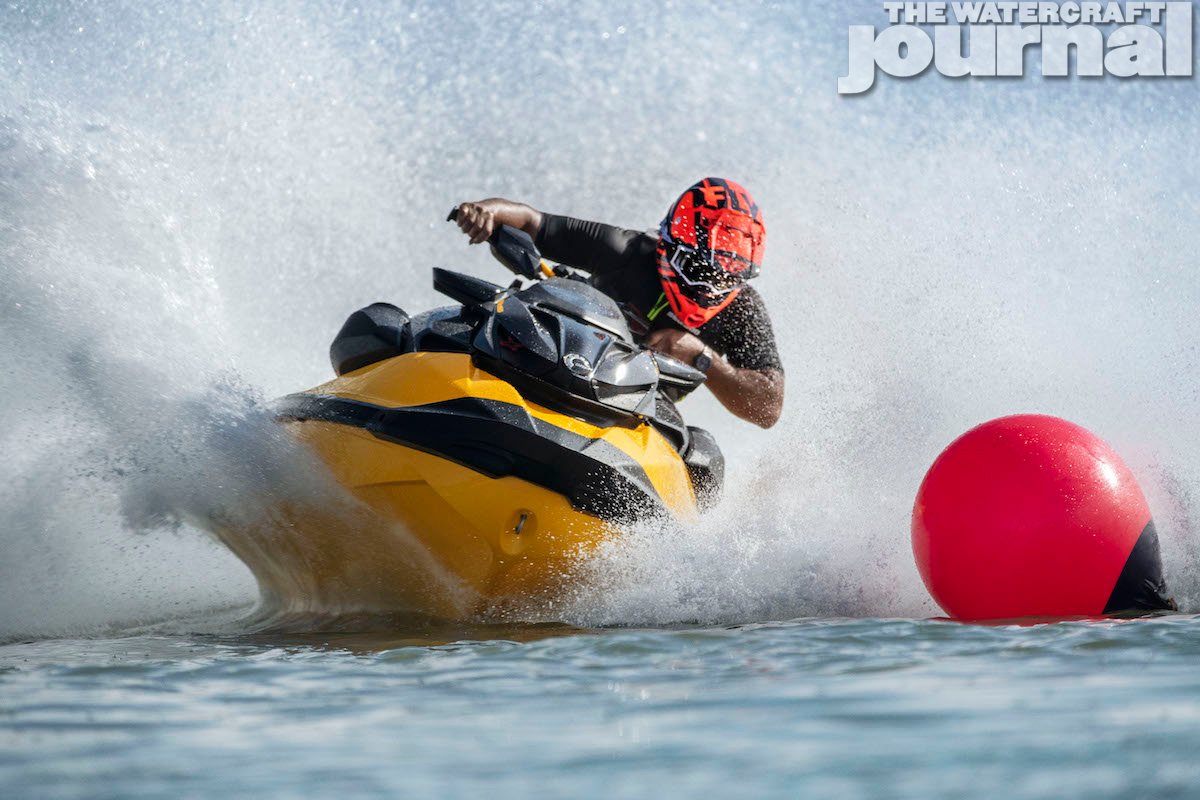
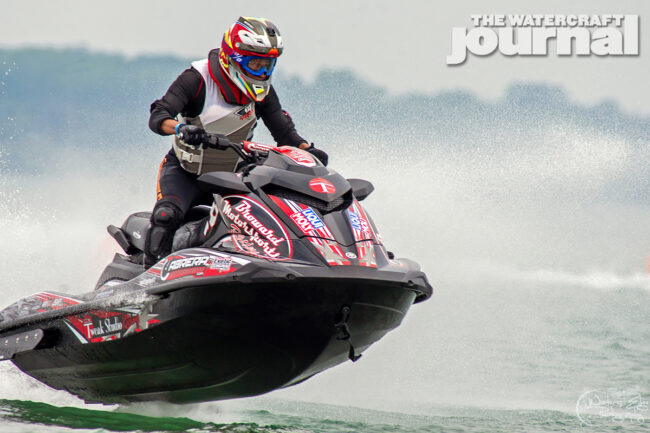
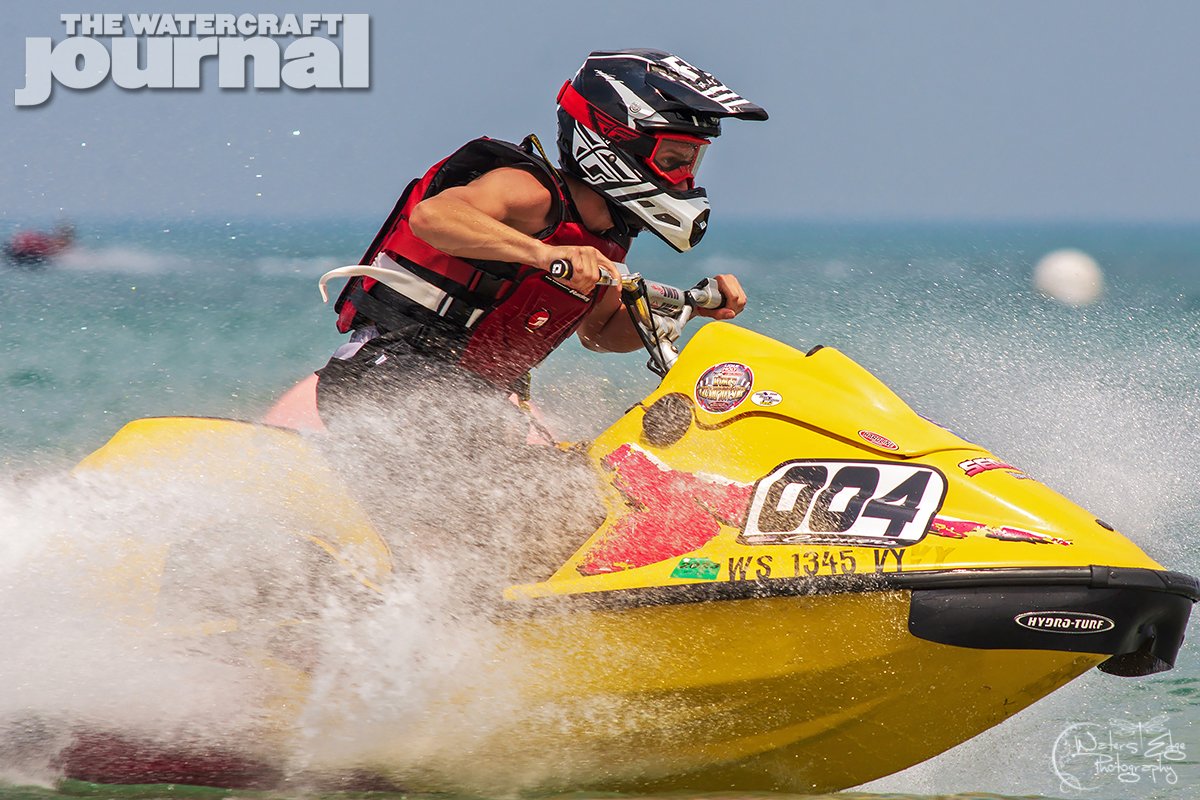
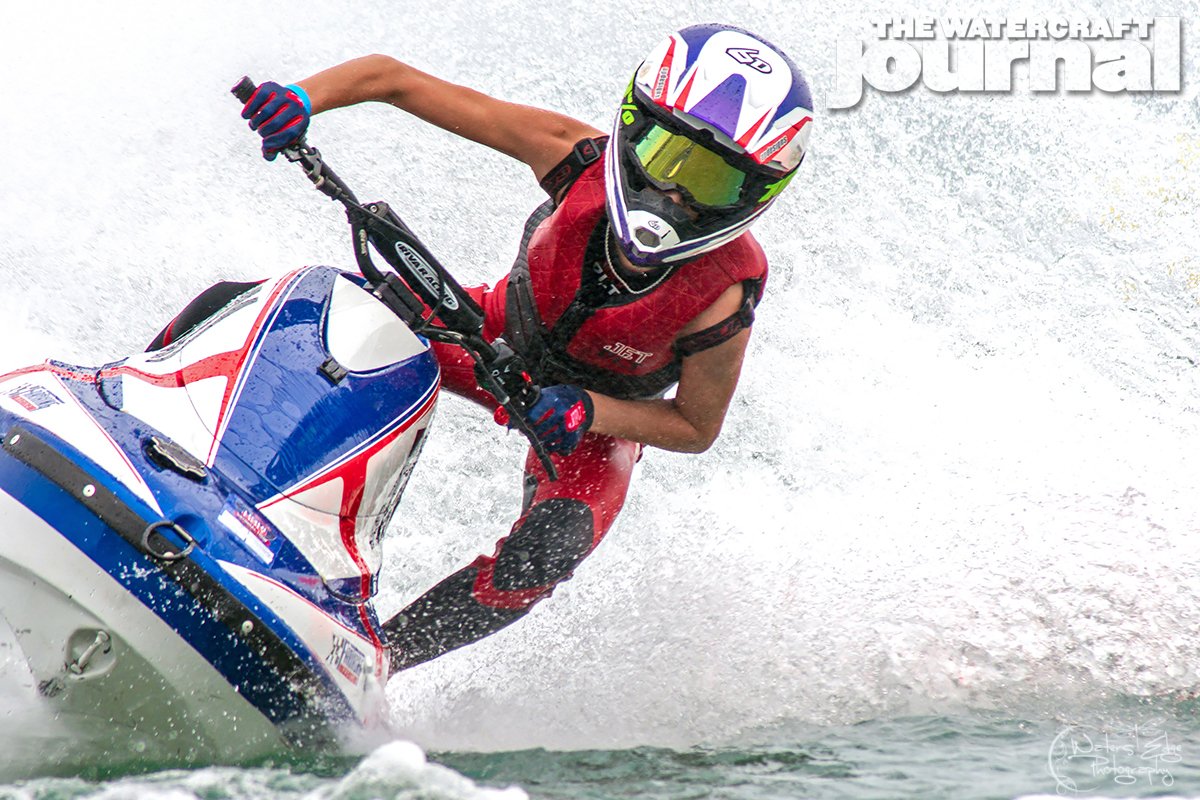
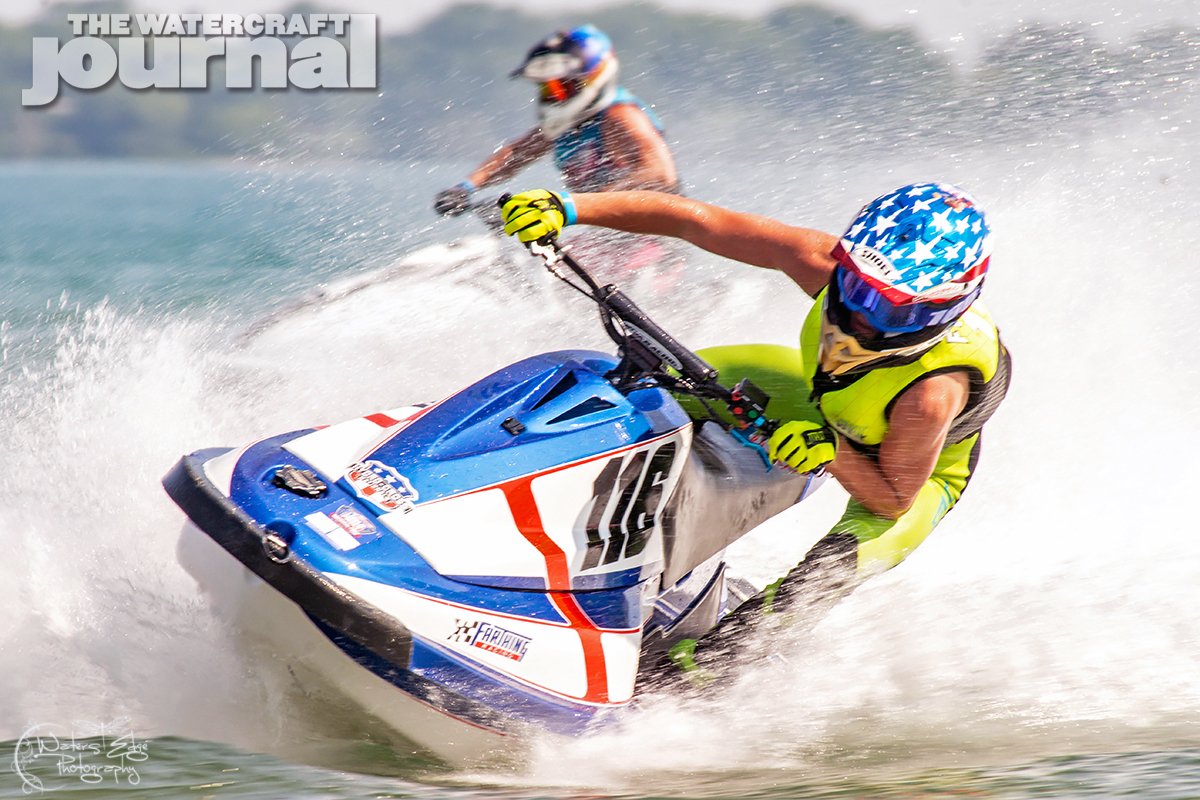
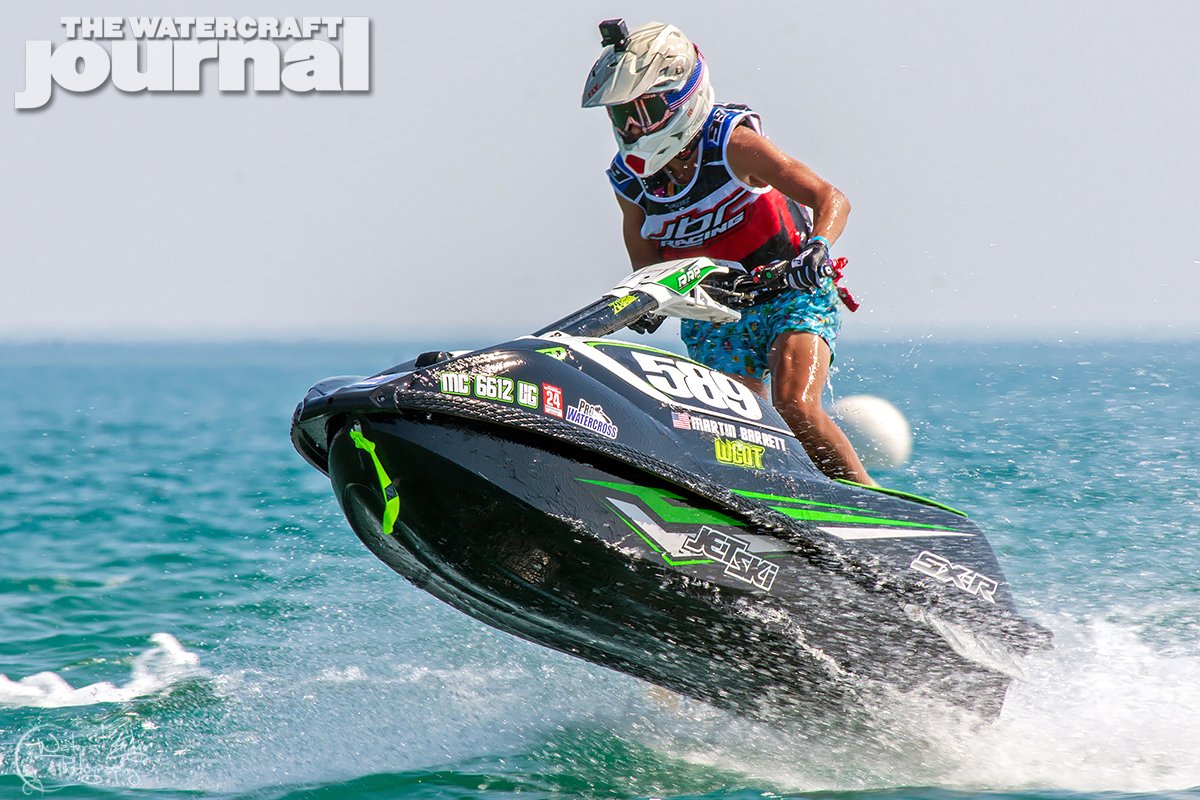
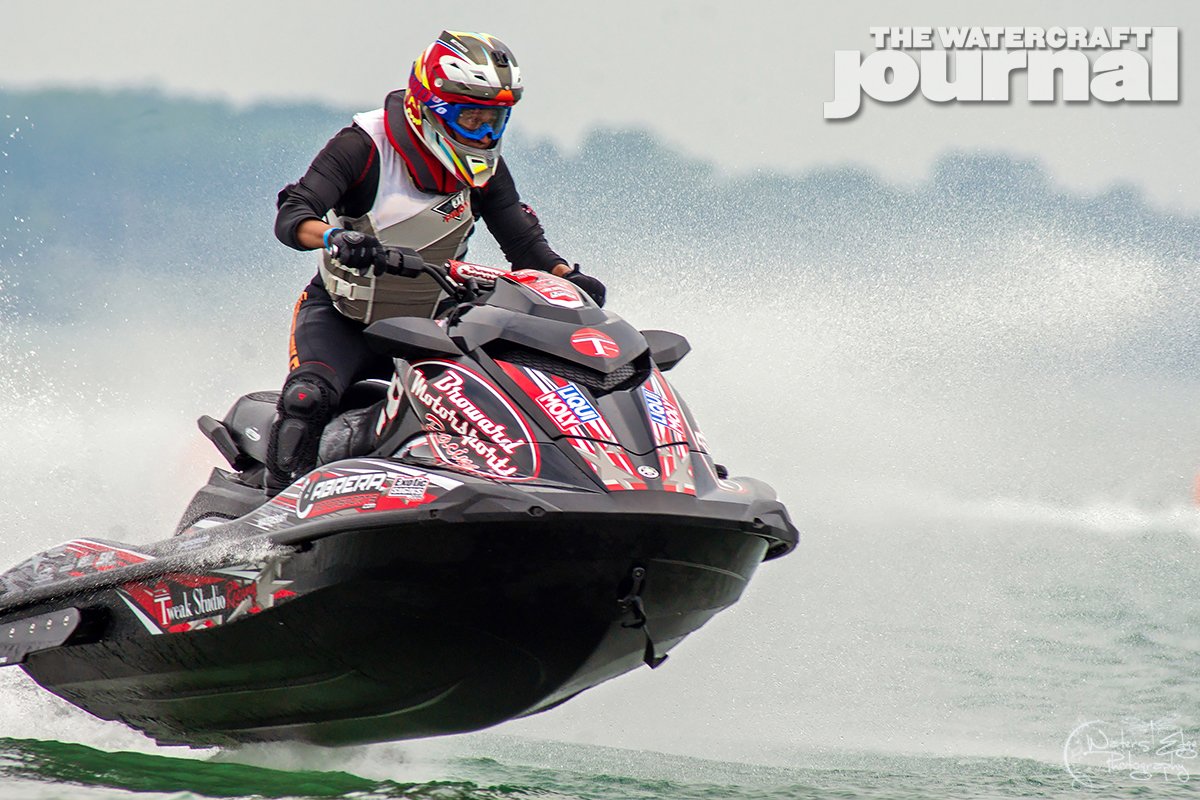
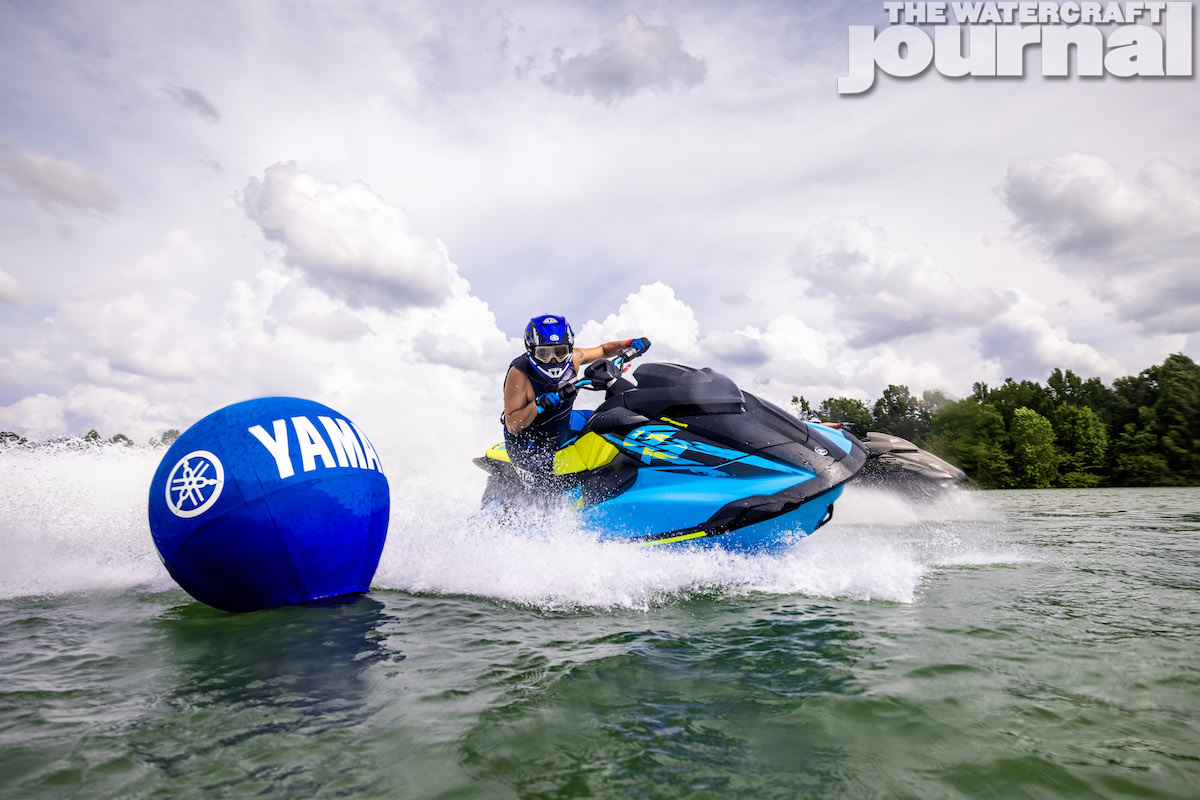
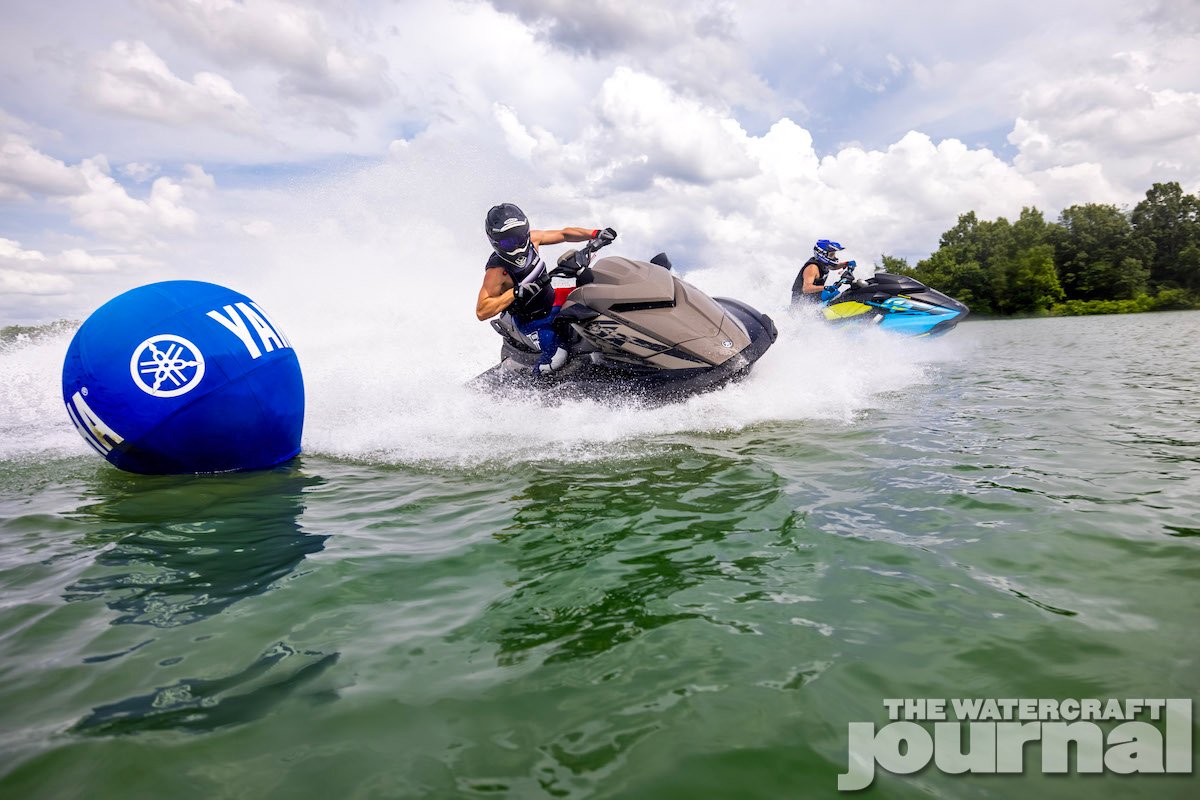
Yamaha riders smashed the rest of the field in Round 6 of the P1 AquaX Pro Enduro held in Michigan City, Indiana. The Yamaha crew grabbed the Top 8 spots with Chris MacClugage leading the charge with first place finishes in the first two motos. He dominated the track on his Yamaha FX SVHO and scored enough points to take the number one spot for the weekend of racing.
Jimmy Wilson, who also rides a GP1800R, picked up second place. MacClugage and Wilson ride for Broward Motorsports and VJ Ramgeet, who rides for Dmacc Racing, rounded out the podium with a third-place finish on his Yamaha FX SVHO. The next P1 AquaX racing event will take place in St. Petersburg on September 4-5.
Here’s the official press release: Yamaha riders dominated Round 6 of the P1 AquaX Pro Enduro held in Michigan City, IN taking the top 8 spots.
Broward Motorsports rider Chris MacClugage led the charge with first-place finishes in the first two motos and enough points to take the spot for the weekend.
He was followed by fellow GP1800R rider Jimmy Wilson, also for Broward Motorsports. VJ Ramgeet, for Dmacc Racing, rounded out the all-Yamaha podium for finishing third aboard a Yamaha FX SVHO
P1’s next AquaX racing event is in St. Petersburg on September 4-5.
To say that 2021 didn’t go according to plan would be an understatement. Logjams in international and domestic shipping; sudden winter ice storms freezing pipes at processing plants; and sweeping national shutdowns halting production delayed Yamaha’s production and delivery of its 2021 model line much to the chagrin of dealerships and customers alike.
Add to that the perfect storm of ever-increasing public demand and the reveal of a newly redesigned VX and GP lineup, Yamaha had more than its fare share to contend with in a single model year. So it came to us as a huge surprise that Yamaha didn’t just reissue last year’s models with some “bold new graphics”, but rather made major significant changes to the brand’s flagship FX line, as well as add a new machine altogether.
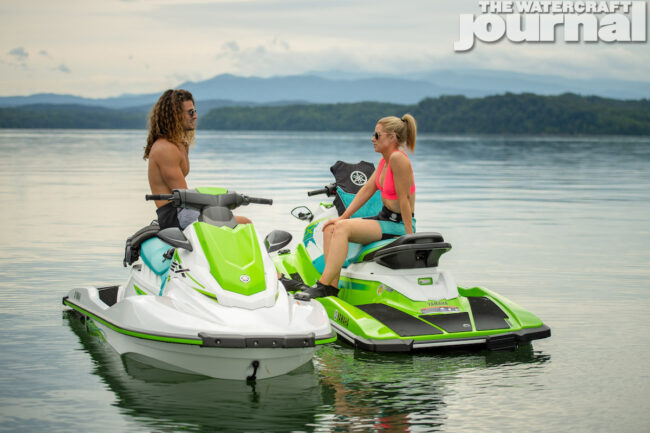
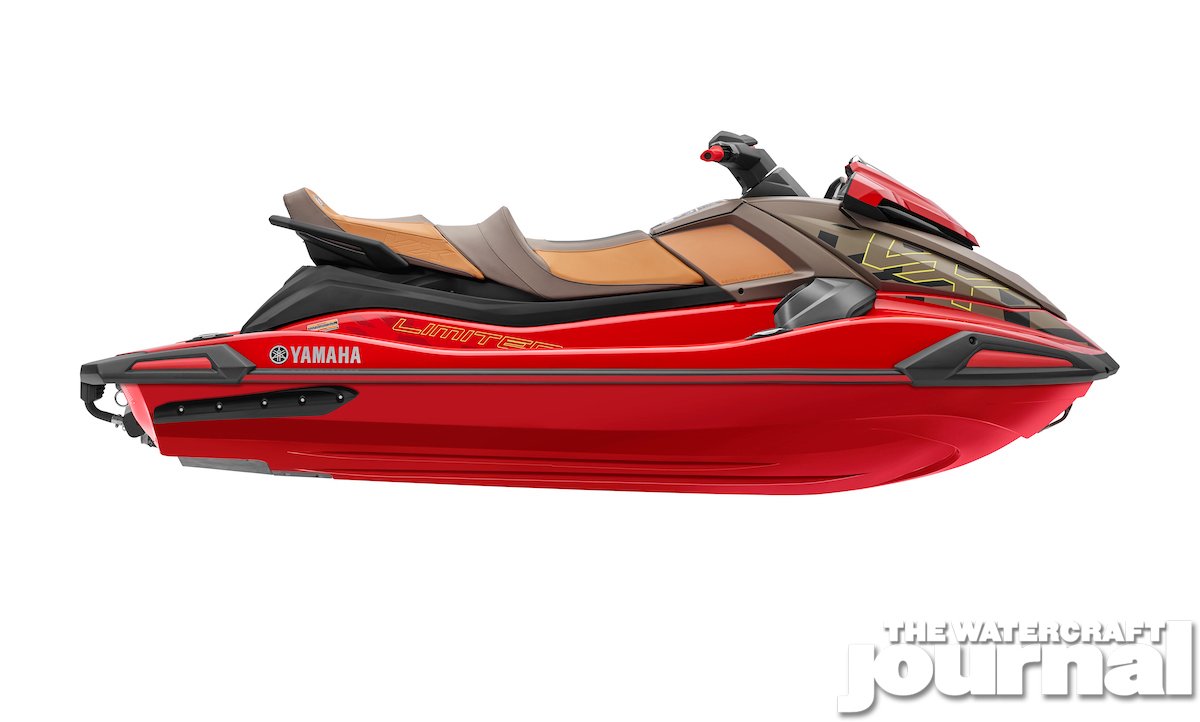
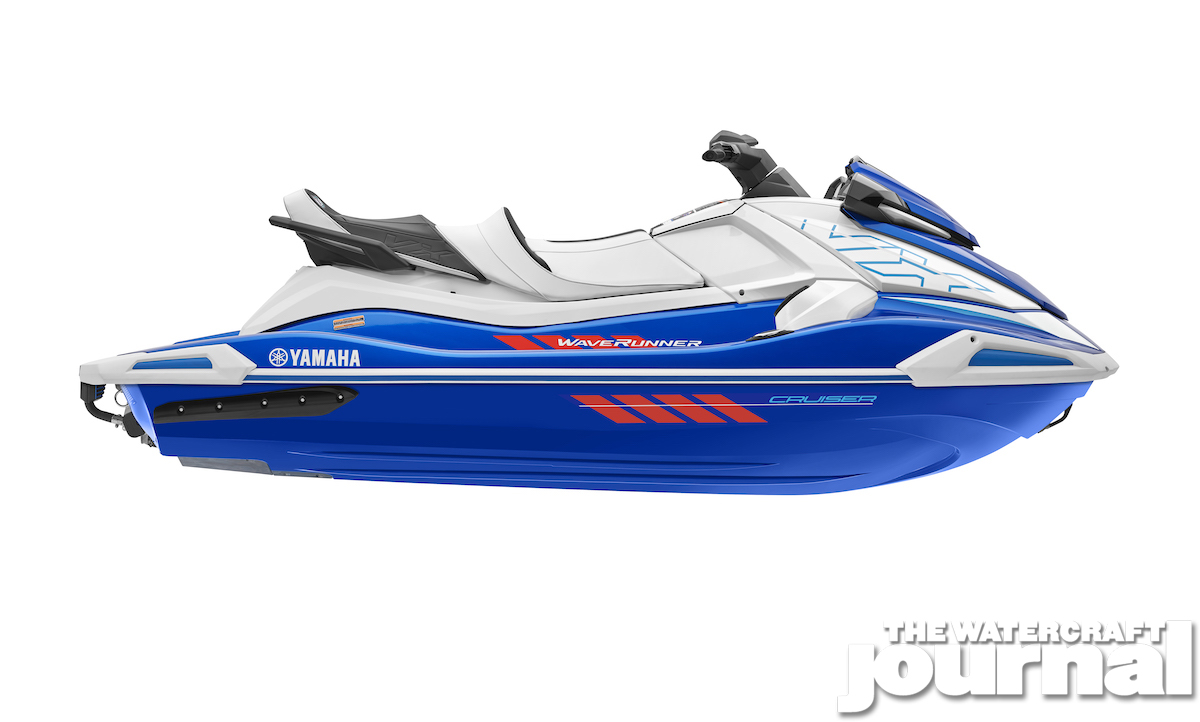
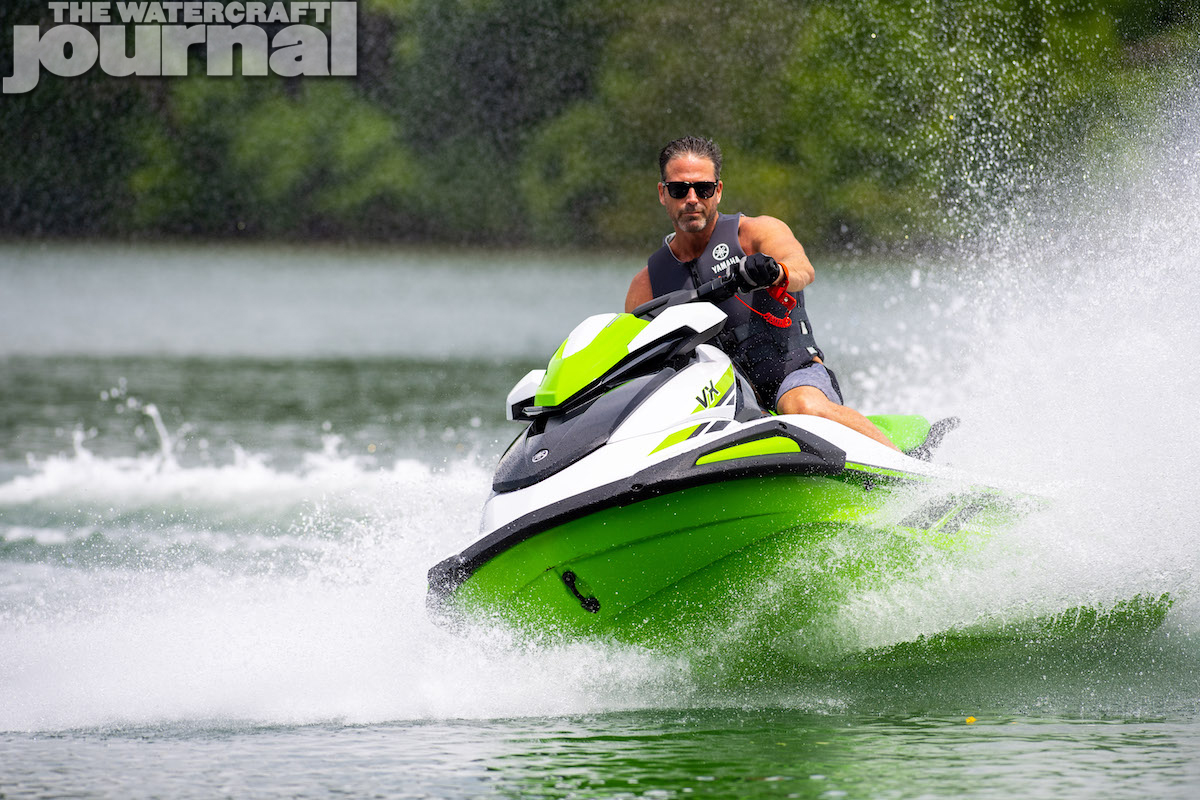
Above: Being recently redesigned, the VX models received only new paint and graphics as well as some price increases: VX-C (MSRP $9,449 –up $300); VX (MSRP $10,449 – up $400); VX Deluxe (MSRP $11,249 – up $400); VX Cruiser (MSRP $11,549 – up $400); VX Limited (MSRP $12,849 – up $400); VX Cruiser HO (MSRP $12,449 – up $400); VX Limited HO (MSRP $14,049 – up $500)
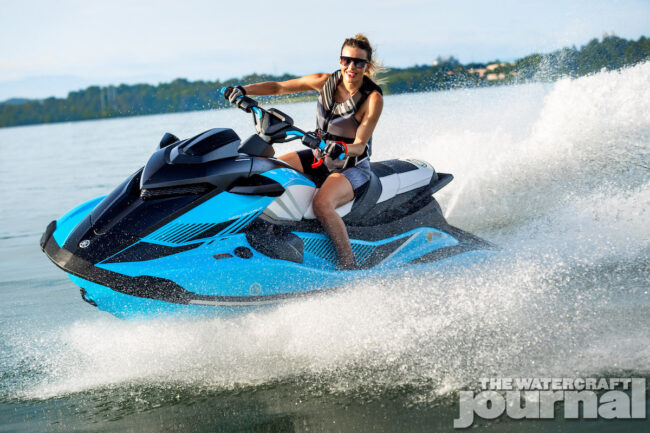
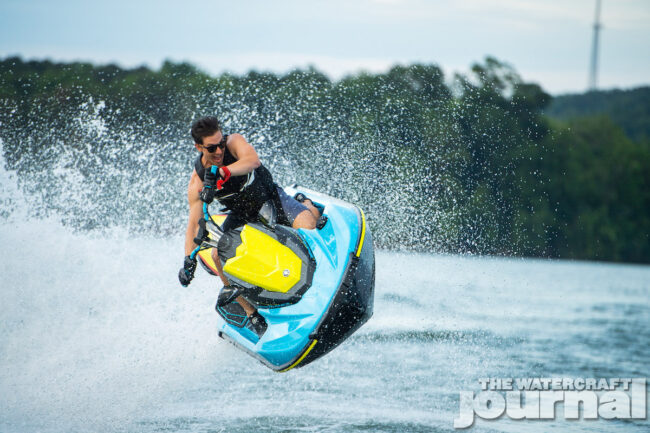
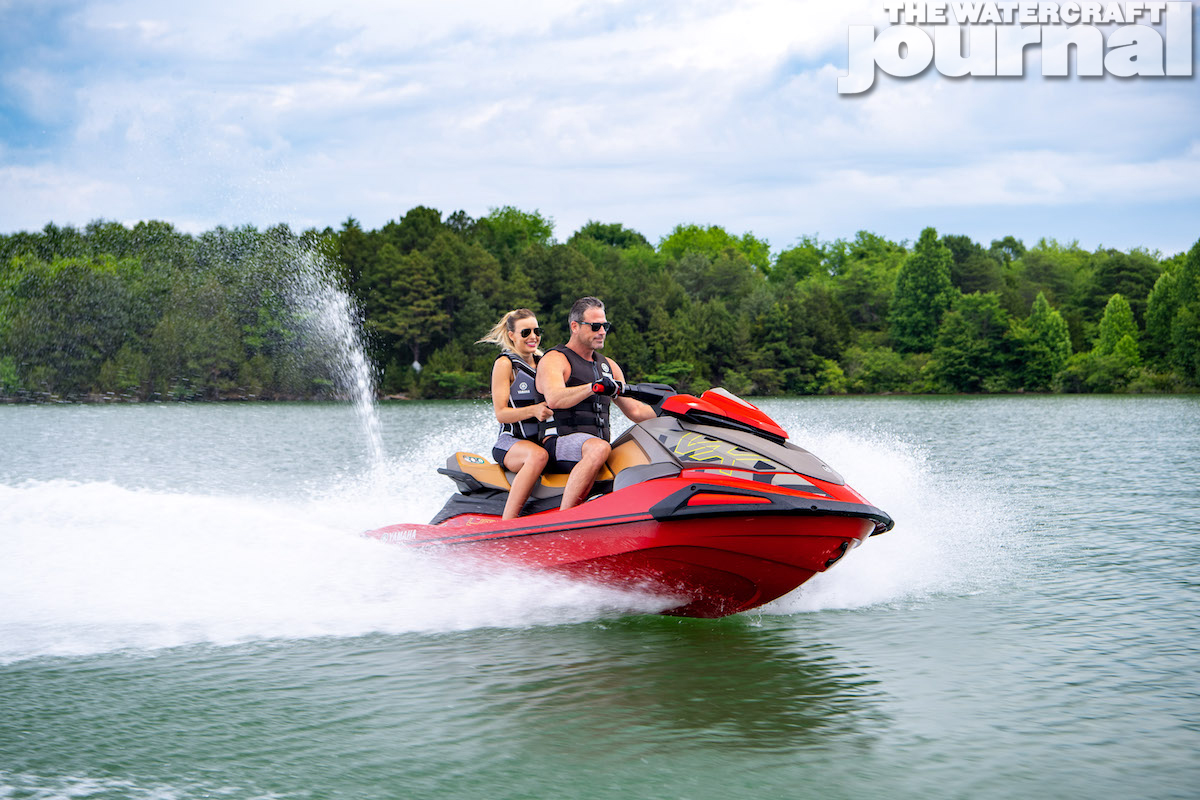
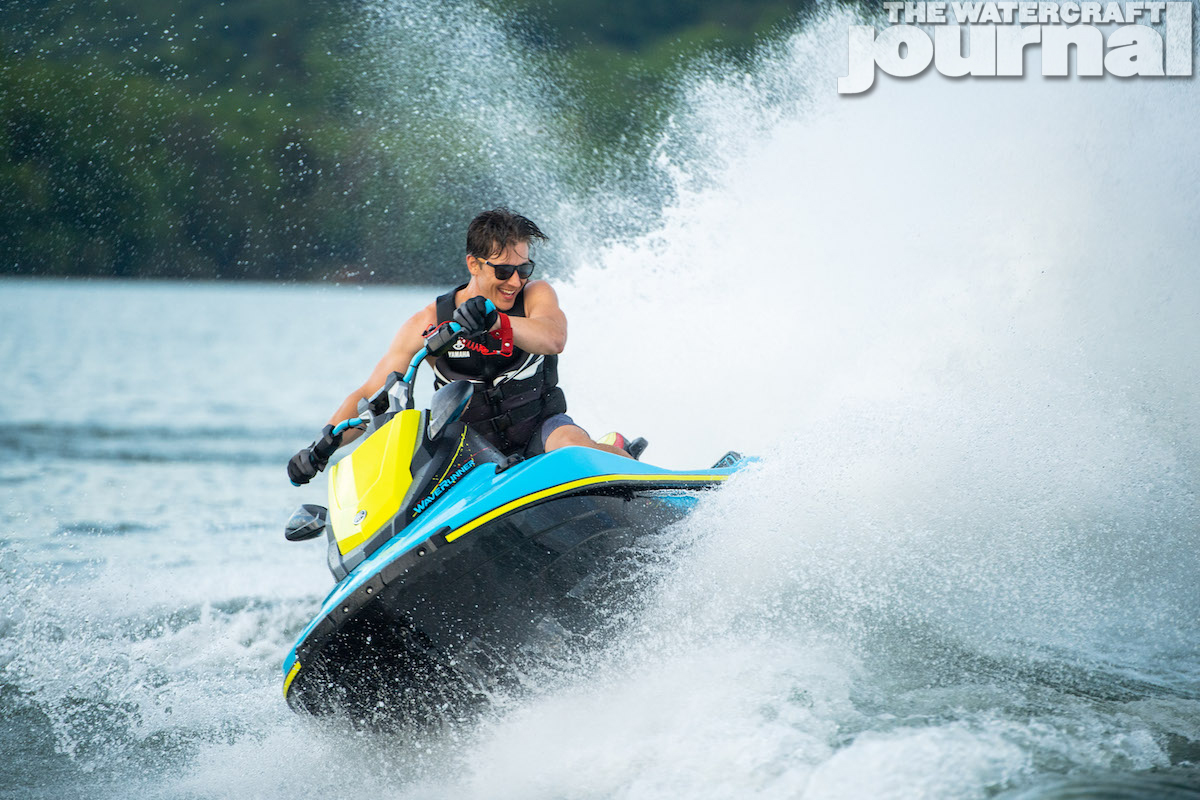
Above left: Changes to Yamaha aren’t immediately visible from even a few feet away, but when seen in person are demonstrative. Above right: Part gokart and part stunt craft, Yamaha’s newest addition to the WaveRunner lineup is an absolute riot.
“Consumers are looking to use their WaveRunners in all new ways on the water, whether it’s a touring adventure, all day cruising and lounging, watersports, or fishing,” said Bryan Seti, general manager of Yamaha’s Watercraft Group.
He continues, “We wanted to create a WaveRunner line and related accessories that power our consumers’ passion for the water. […] Our new FX Series pushes the bounds of luxury, tech and performance. And our all new RecDeck offers a new level of customization for anything our customers can dream of doing on the water.”
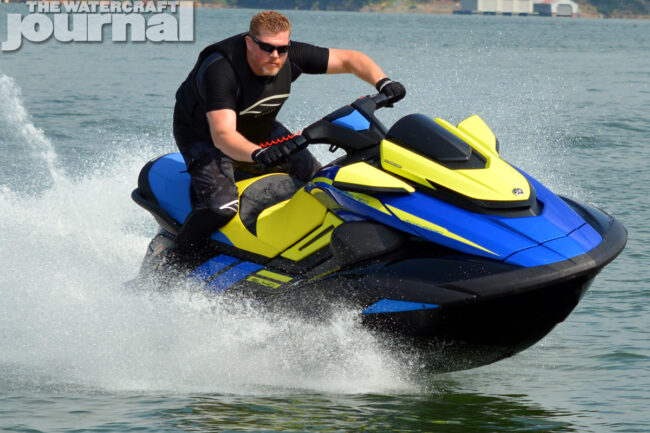
Above left: Yamaha expanded its accessory offerings in a big way for 2022; new are the detachable, floating speakers for the EX Series. Above right: The GP1800R racecraft continue for 2022 in new eye-catching hues. Prices for the GP1800R HO (MSRP $13,149) and GP1800R SVHO (MSRP $15,349) increased $600 each.
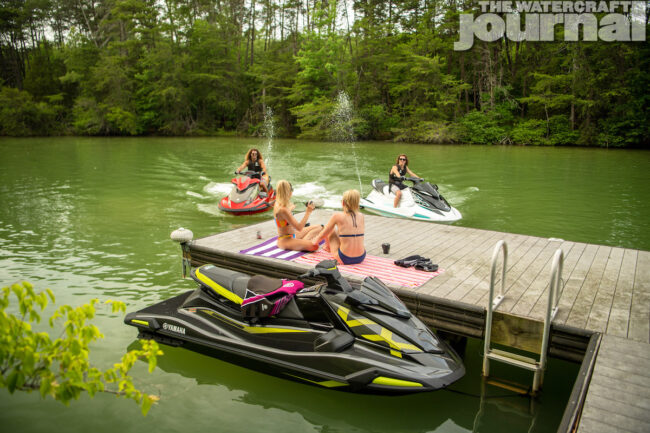
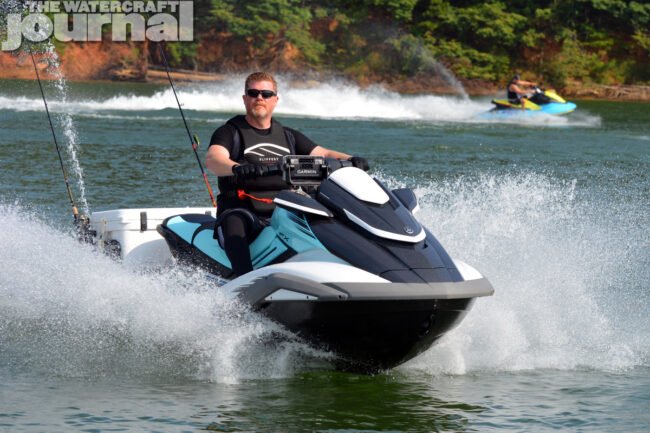
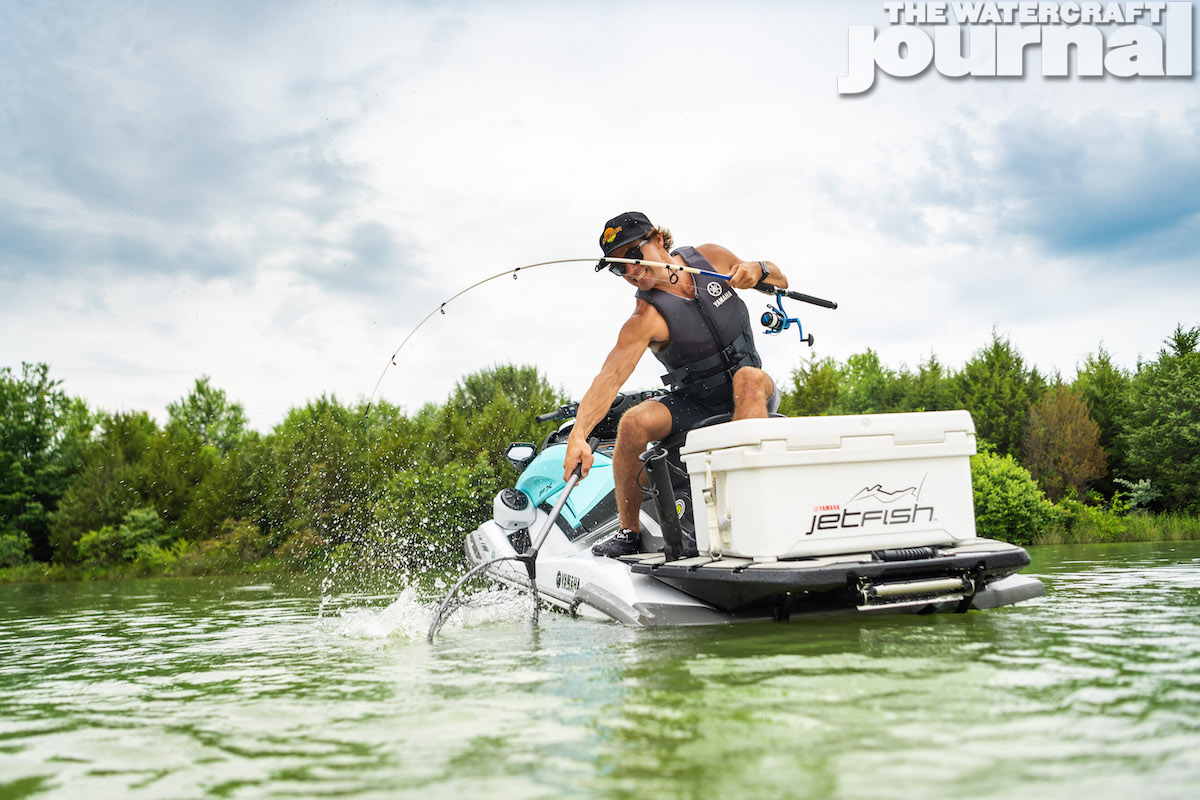
Yup, you heard that right. Yamaha is going fishing. As we at The Watercraft Journal rightly predicted, Yamaha wouldn’t solely dedicate a single runabout to fishing. Rather, the option was to allow the entire range of redesigned FX WaveRunners access to the same accessories needed to enable any customer to custom-fit one-of-two JetFish packages, each using Yamaha’s all-new multi-function RecDeck platform.
Sold as its own accessory, the RecDeck ($999.99 USD) is a 6 sq.-foot flat platform featuring integrated tracks and four built-in, fold-flat cleats designed to accept a vast array of accessories with nearly limitless arrangement possibilities. Covered in CNC-cut MarineMat carpeting, the RecDeck also features a stellar full-length reboarding ladder that tucks up beneath the platform.
Above: Yamaha’s new RecDeck is versatile, modular and useful in as many ways as you can think of.
The RecDeck can be mounted to any 2019-and-up FX WaveRunner, and surprisingly, can be removed to return the FX to normal use in a few minutes. (Support struts replace the factory swim step, and two small receivers permanently mount to the footwells.) A separate Multi-Use Rack ($599.99 USD) is used to rigid-mount the Premium JetFish package, as well as the Lounging Package’s folding 25″ wide rear-facing Folding Bench chair, cup holders and saddle bags ($499.99).
The lower-tier JetFish package forgoes the Multi-Use Rack, strapping the cooler down with motorcycle-style straps, but includes the same Engel 45 JetFish-branded cooler, rod holders, cup holders, and tow eyes. Although part of the accessory group, the massive Garmin ECHOMAP UHD 63cv 6” Fishfinder/GPS (with an Ultra High-Definition Scanning Transducer), and extra rod holders are separate from the two JetFish packages.
Above left: Equipped with Yamaha’s Premier JetFish package atop the new RecDeck, this 2022 FX HO can be stripped of its rearward accessories within minutes, or reconfigured to carry a near limitless array of accessories. Above right: The Tow Package and the RecDeck make for a perfect pairing.
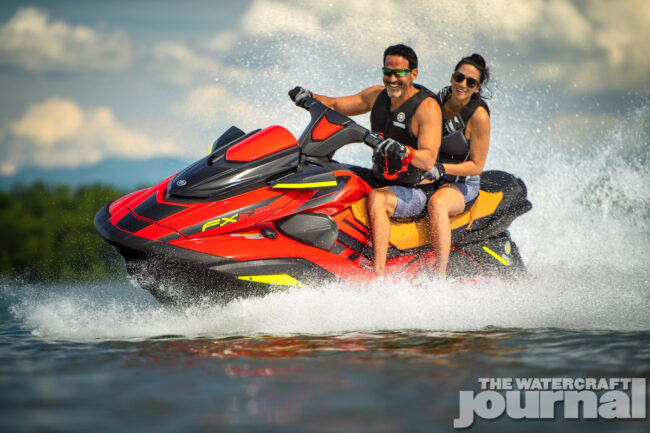
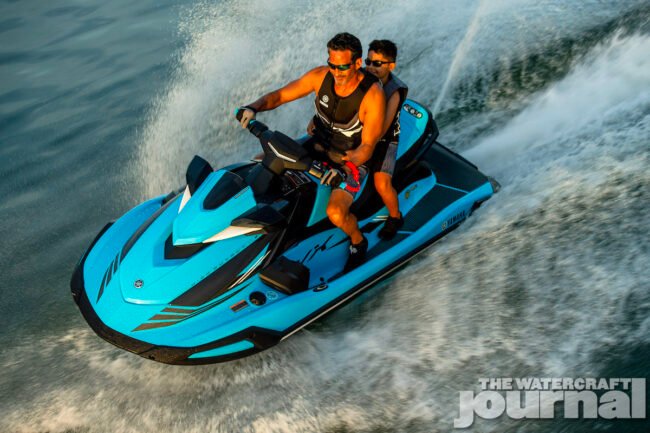
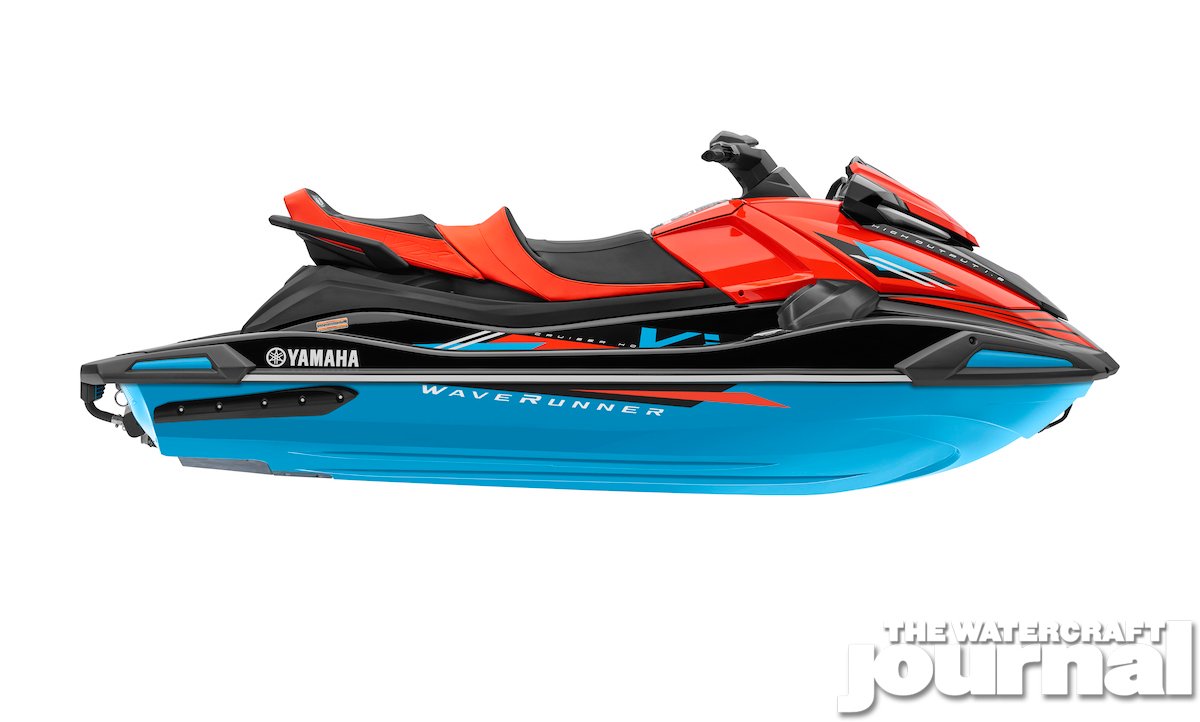
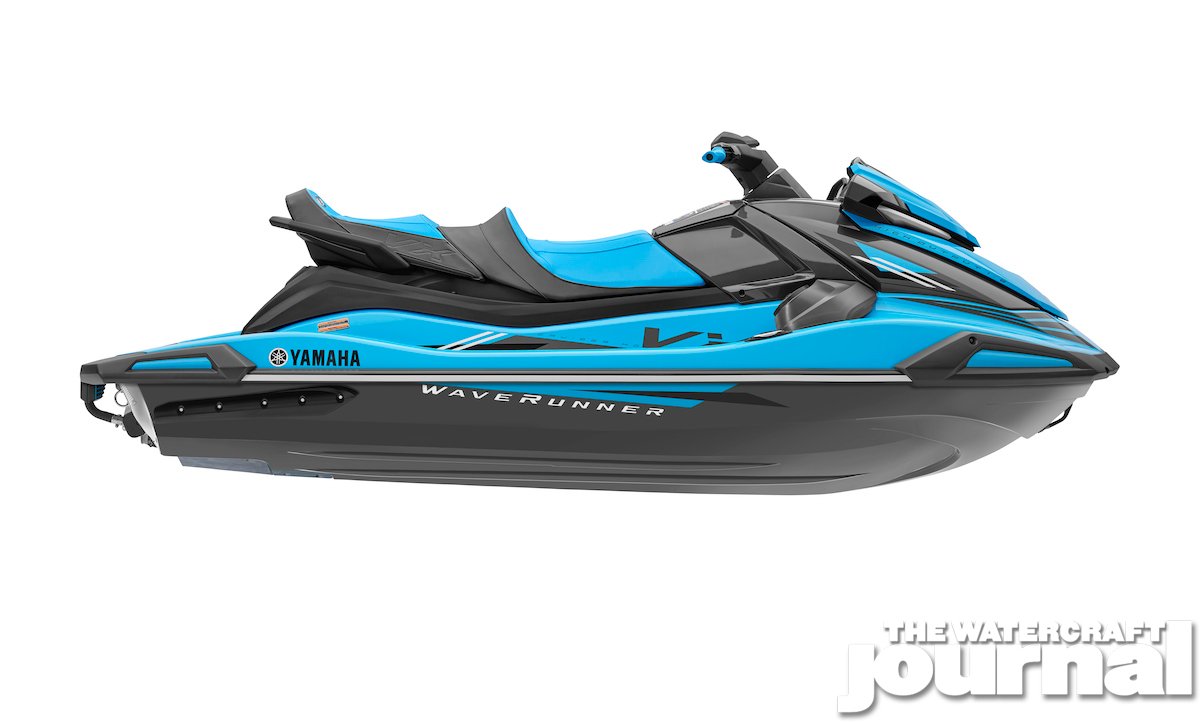
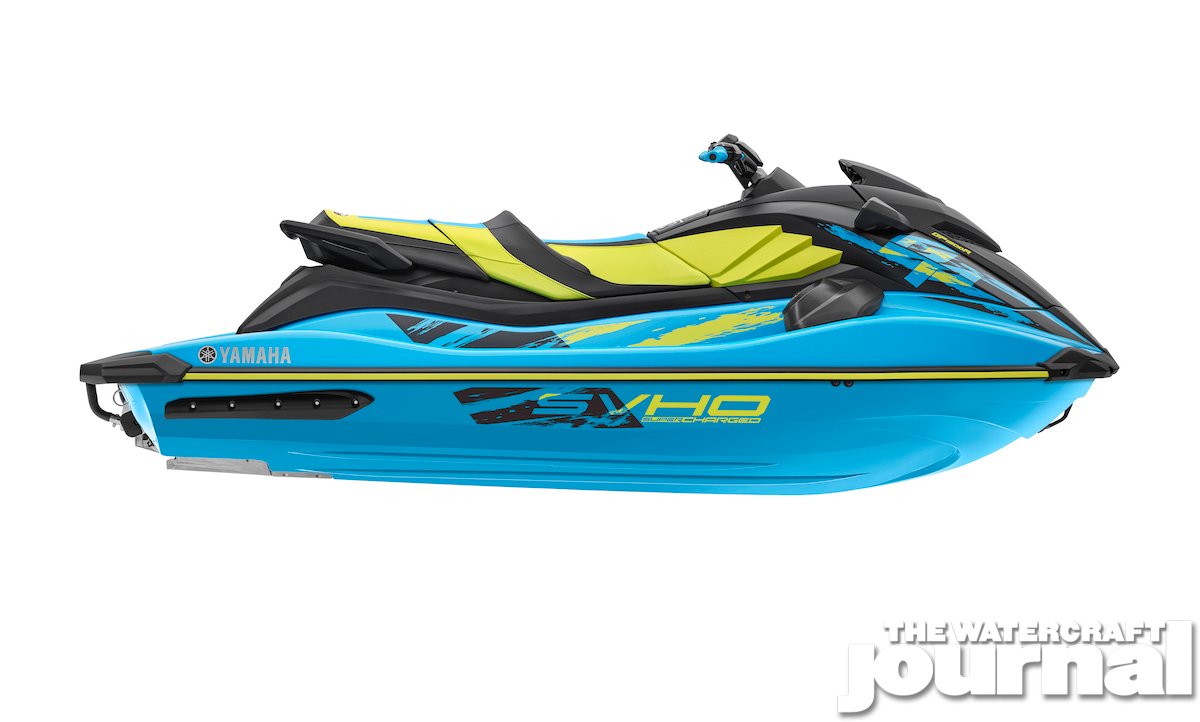
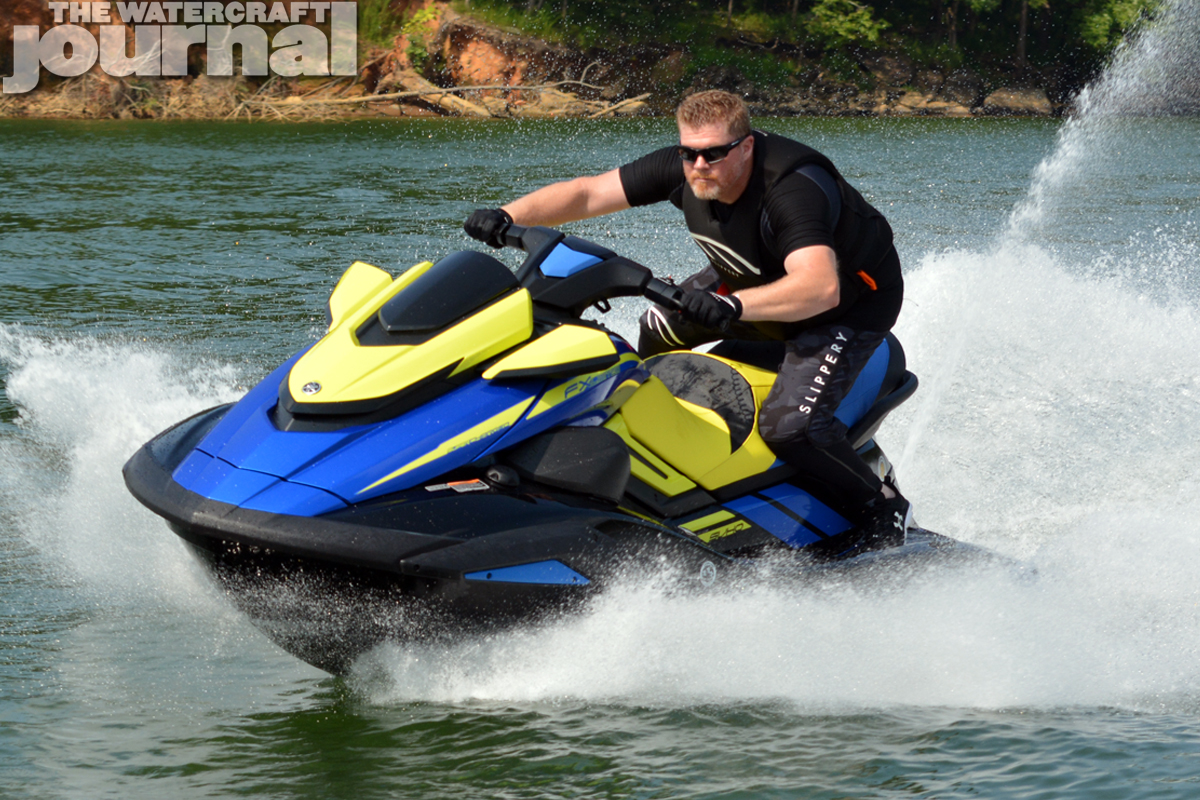
Above: Changes to the FX Series also include some considerable price increases for 2022 compared to 2021: the FX HO (MSRP $14,299 – up $500), FX Cruiser HO (MSRP $14,799 – up $500), FX SVHO (MSRP $16,799 – up $1,000), FX Cruiser SVHO (MSRP $17,499 – up $1,000) and FX Limited SVHO (MSRP $19,099 – up $1,400).
Lastly, the Towing Package includes a single-rider tube (yellow or grey), a 12V pump, towrope and bungee hold-down ($199.99). In testing it, we found it more fun to simply dive from the RecDeck and reboard using the 3-rung ladder very obviously taken directly from Yamaha’s boat division. The fold-flat cleats will receive any number of bungees or straps to tie down extra fuel, a cooler full of drinks, or a small camping grill (don’t think we haven’t thought of it).
Of course, all of these will work great for Yamaha’s refreshed FX lineup. Changes to the full-sized segment are so significant that it’s sure to upset those who waited extra long for their 2021 model to show up. From 10-feet away, most won’t notice the changes as few are so drastic; but upon closer approach they reveal themselves in a big way – in a big, 7-inch wide way.
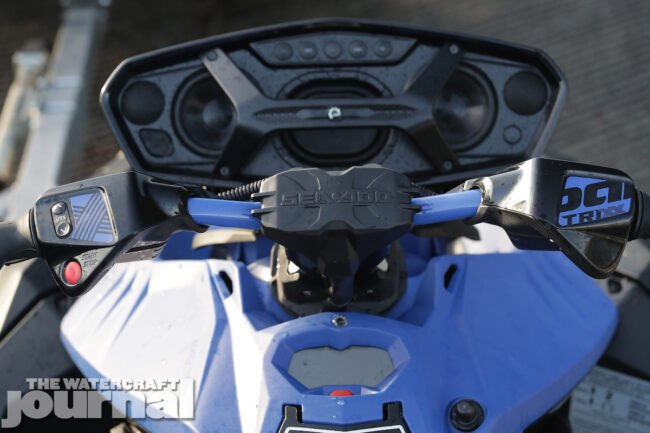
Above: Changes to the FX lineup are dramatic – even without the massive upgrade to the infotainment system. The reshaped ride plate brings the FX to plane quicker; the relocated sponsons bite stronger in a hard lean-in turns. The SMC fiberglass hull absorbs the surface chatter, mutes the bumps and reduces vibration in a big way. All stellar changes.
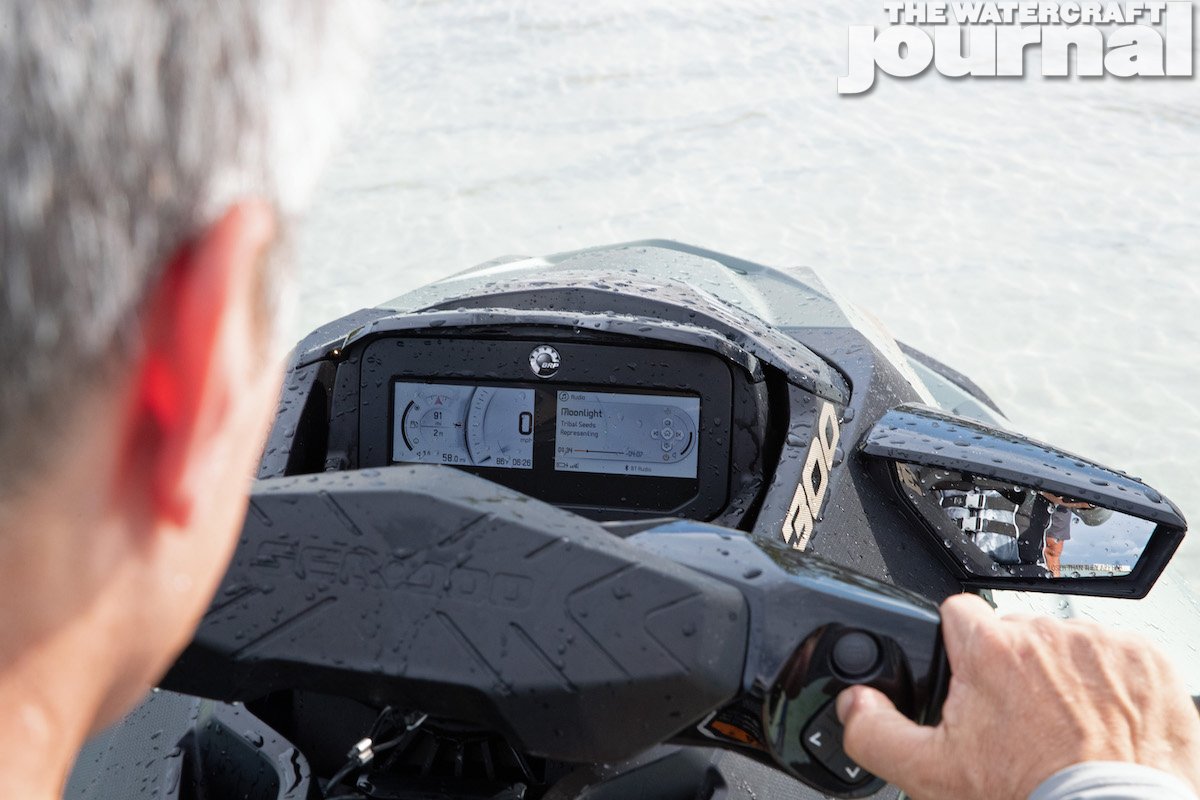
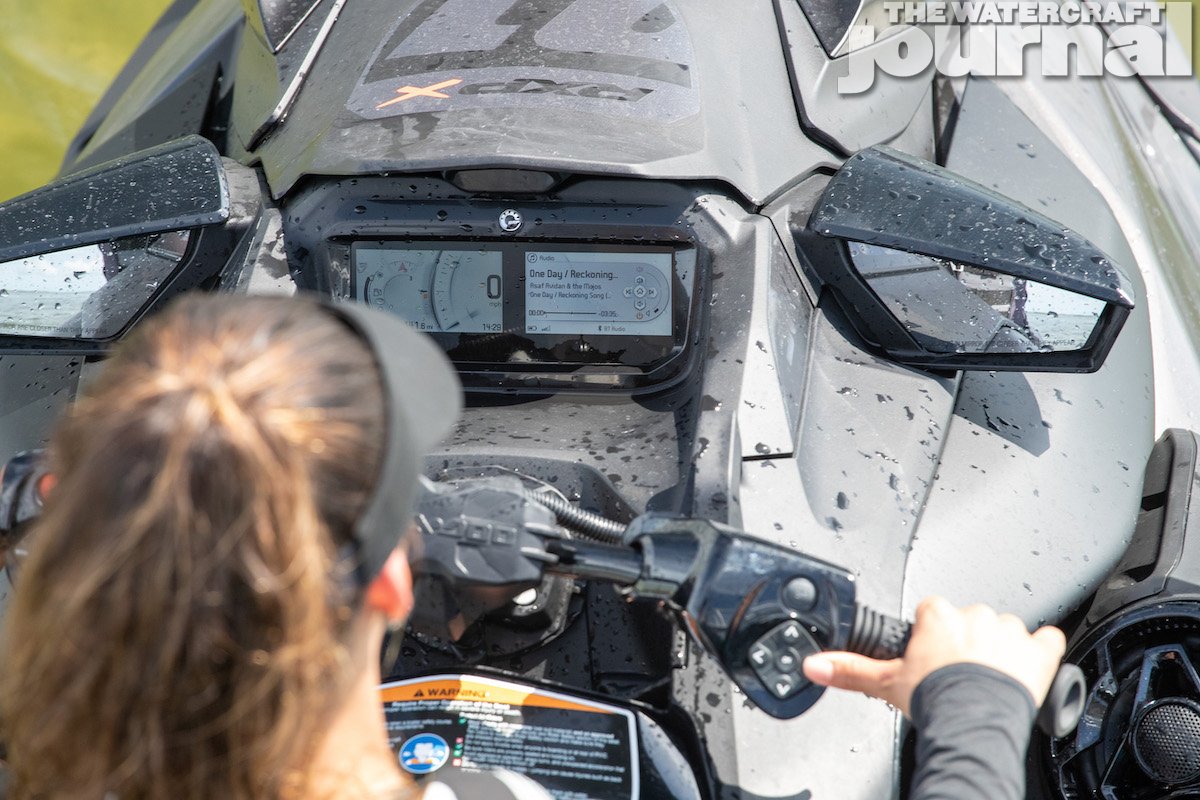
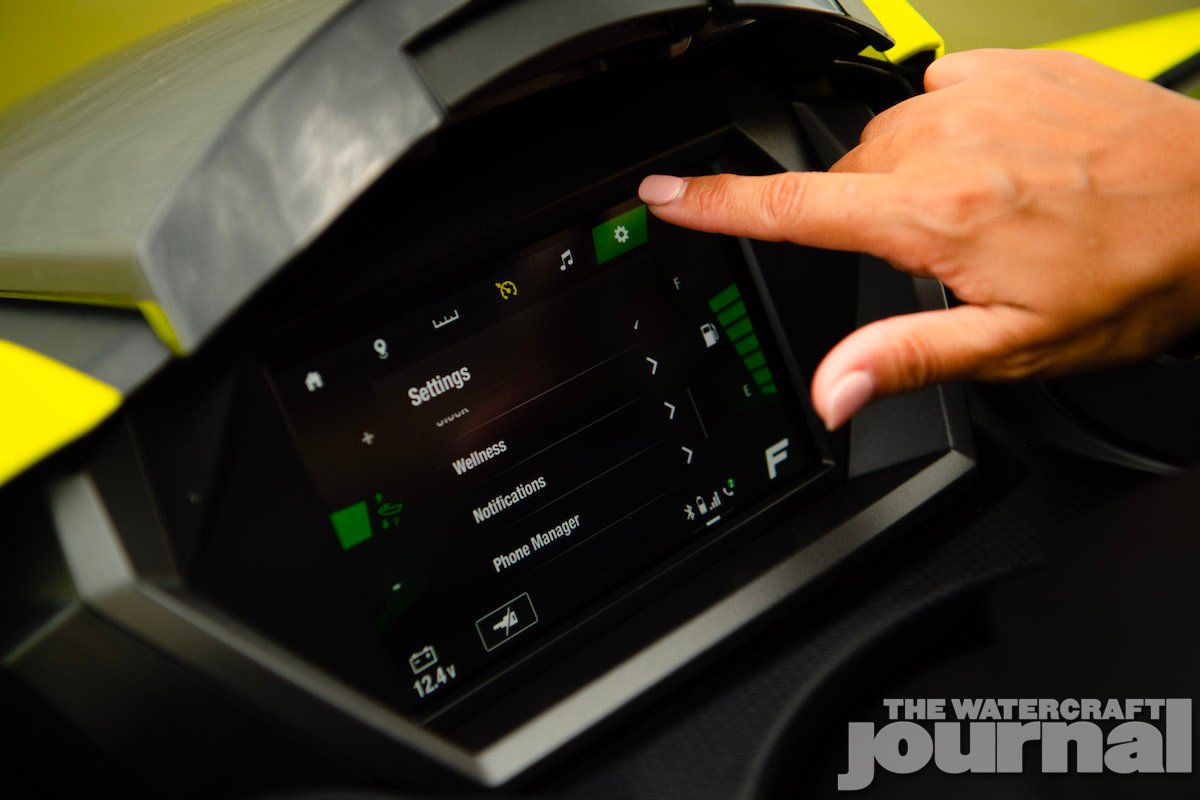
For all SVHO-equipped (Super Vortex High Output) FX WaveRunners, Yamaha has upgraded the touchscreen dashboard with a high-response, glare-resistant glass 7-inch display. This full-color touchscreen dashboard provides audio controls, phone and text notifications (when synced via Bluetooth to your smartphone), GPS mapping and Yamaha’s Drive Control functions (first featured on the 2021 GP1800R models). All standard High Output models receive all of the same functions but with a smaller 5-inch display.
Both the 5 and 7-inch systems feature GPS mapping with geo-fencing. This means that with the optional GPS map card installed (each card is sold separately for a $199 one-time fee), the operator can input GPS waypoints, follow tracks, and “geofence” a riding area where the watercraft can be operate. With geofencing activated, a virtual fence is created and will sound an alarm telling the operator that they have ridden too far – ideal for young or first-time riders. …and it also means a true GPS speedometer.
Above left: The EX Series continues unchanged except for new accessory offerings. Above right: Both the HO and SVHO-powered GP1800R WaveRunners remain some of Yamaha’s most popular.
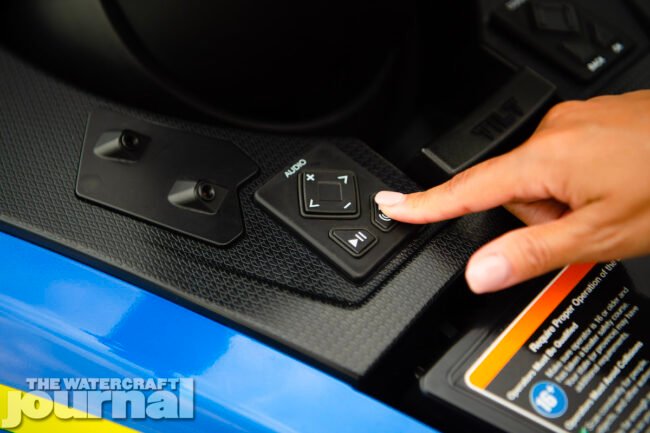
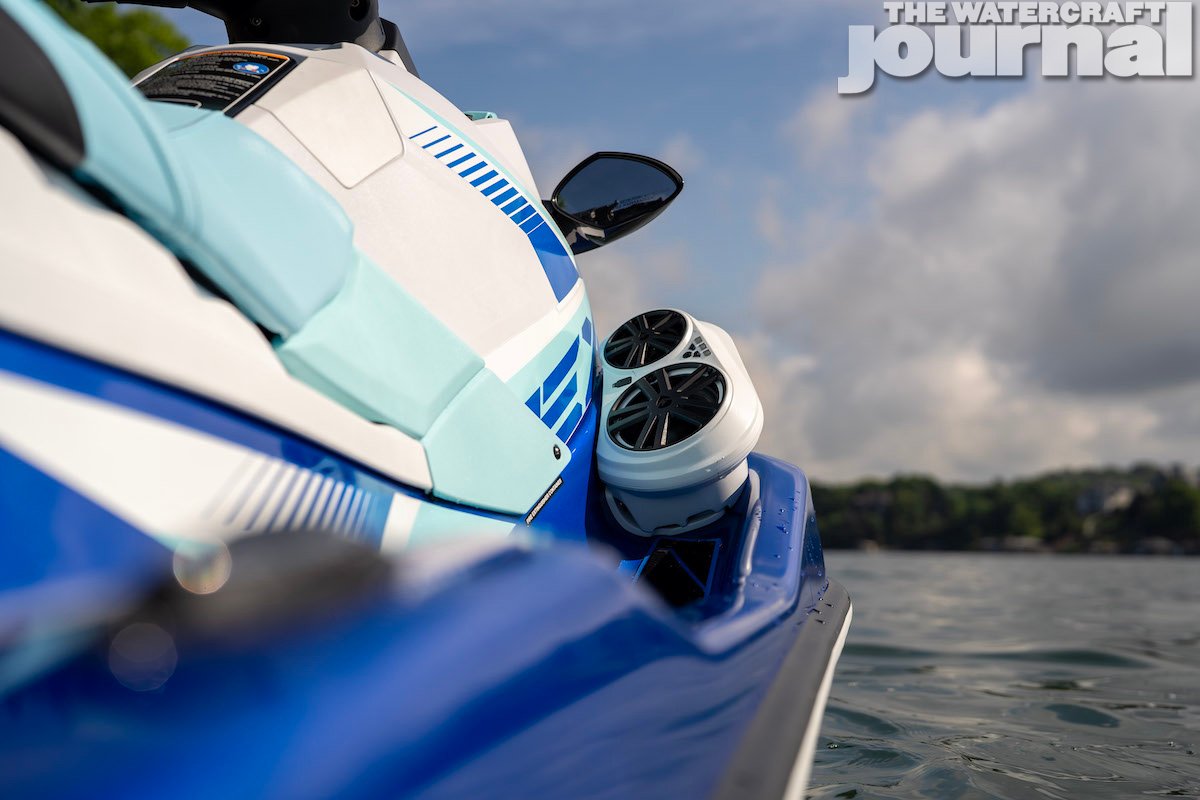
Sharing with last year’s redesigned VX and GP series, the FX is available with a factory-installed, digitally-integrated audio system. Featuring twin 4.5-inch 50-watt waterproof marine speakers, an integrated two-channel amplifier, and a low-voltage regulator to protect the battery. Like the VX and GP, the system is operated through a control pad, found beneath the steering column. When synced, a visual prompt will appear on the the Connext touchscreen.
Equally, you can now receive incoming calls and view incoming text message notifications on the Connext screen. There’s even a noise-reducing microphone (found above the audio controls) allowing you to make phone calls using the voice command button and your phone’s AI assistant (be it Siri, Alexa, HAL, SkyNet, etc.). Note that the audio package comes standard on the FX Limited SVHO, and as a factory-installed option on all the other FX series models ($800 USD) – it can’t be added later by the dealer.
Above left: The switch from NanoXcel2 to SMC fiberglass adds 40-pounds to all SVHO-powered FX runabouts. The added weight isn’t a deterrent though, as the extra heft improves the hull’s engagement with the water and straight-line tracking in chop. Above right: The VX, GP and FX all share the same sound system.
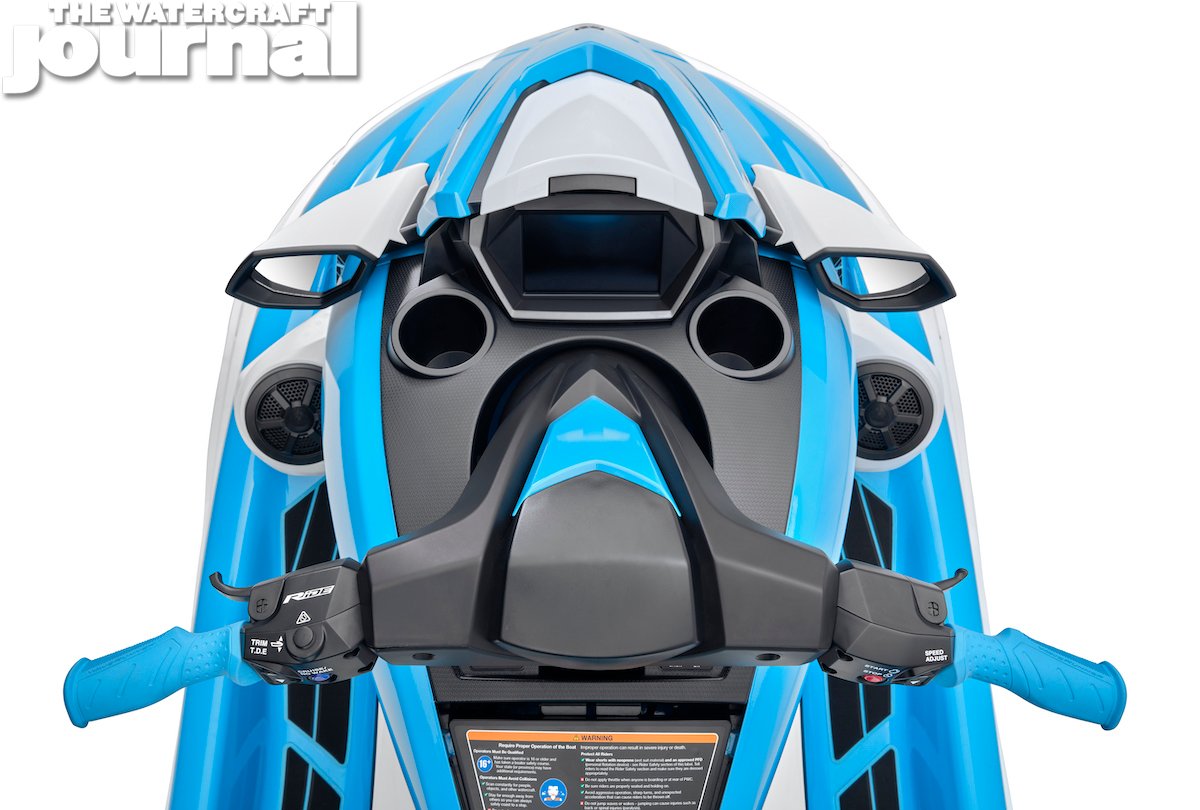
The entire control console has been redesigned for 2022, including the return of cast-in cup holders – the RAM mounts are now fixed to each bottom. The FX Series also inherit similar sleeker adjustable handlebars and control pods from the GP series, including the single On/Off button and relocated Cruise Assist control. This time, Yamaha has integrated dual hoops into the steering neck, making tying up at the dock easier.
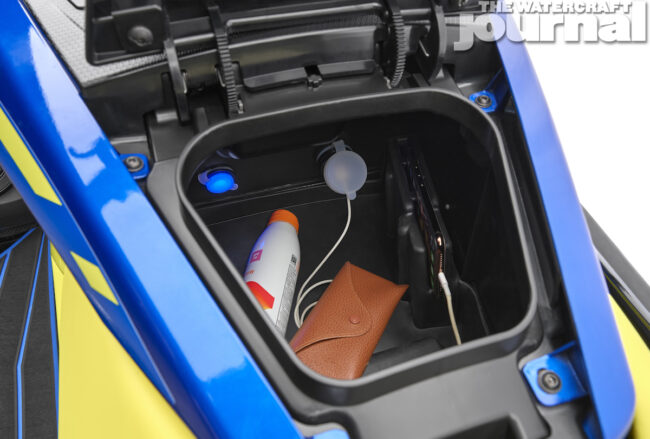
The FX also receives a new glovebox. Dimensionally, it’s the same as before, but the lid is spring-loaded, rising up on its own. Gone is the rubberized latch, now with a sturdy plastic one instead; and inside the FX receives the same LED lights, 12V socket and USB port, as well as the cell phone pocket as the aforementioned VX and GP models.
Above left: Yamaha made several changes to the FX glove box; the door is spring-loaded, the latch is made of durable plastic (not rubber). Inside are LED lights to illuminate a cell phone holder, as well as a 12V socket and USB port. Above right: Yamaha resculpted the center console to bring back the molded-in cup holders. The RAM mounts are found at the bottom of each cup holder.
But if you think that’s it for the FX Series, you’d be waaay off. Below the bondline is where things get really interesting. First, Yamaha looked very closely at what aftermarket tuners were doing and radically tweaked the ride plate. The center surface is angled up 3º on an extended runner, raising the bow up reducing drag and that wet ride. The plate’s flanks were shaved down with deep skegs that provide knife-like rails for added tracking.
On the sides, Yamaha moved the sponsons forward 50mm (nearly 2-inches) to reduce hull packing, particularly in corners. But the biggest change goes completely unsung: no more NanoXcel hulls. That’s right, all FX WaveRunners now have SMC fiberglass hulls. While NanoXcel and NanoXcel 2 will continue in Yamaha’s decks, all full-sized runabouts will ride on thicker, traditional fiberglass hulls, as explained to The Watercraft Journal by Product Development Manager, Martino Ruggiero.
Above:Colorations for 2022 are vivid, and welcome a warm, summertime feeling.
As SMC far outweighs Yamaha’s Nano materials, the development team created a lighter inner liner to stave off a bit of the weight gain. Regardless, all FX HO models increased by 4-pounds (for example, the 2021 FX HO weighs 836lbs.; 2022 FX HO weighs 840lbs.) while those SVHO-equipped FX models gained 40-pounds across the board (ex. 2021 FX Cruiser SVHO 820lbs.; 2022 FX Cruiser SVHO 860lbs.).
While some might decry the switch to SMC, the decision – at least, in our view – is brilliant. SMC fiberglass is denser, which absorbs vibration and chatter better. It distributes the force of impact with far less damage. There’s less flexing, cracking and overall failure to boot. And more importantly, it’s easier (and cheaper) to repair – all things which the long-term owner will appreciate.
Above:The GP1800R HO is all the lightweight, race-inspired raucous fun of the SVHO but without the high-octane requirement of the supercharged engine.
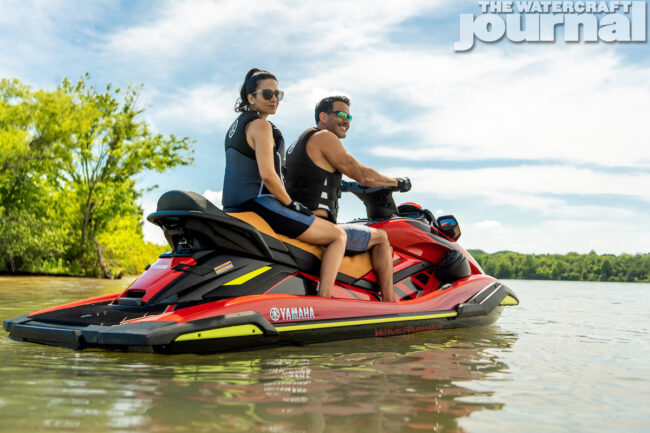
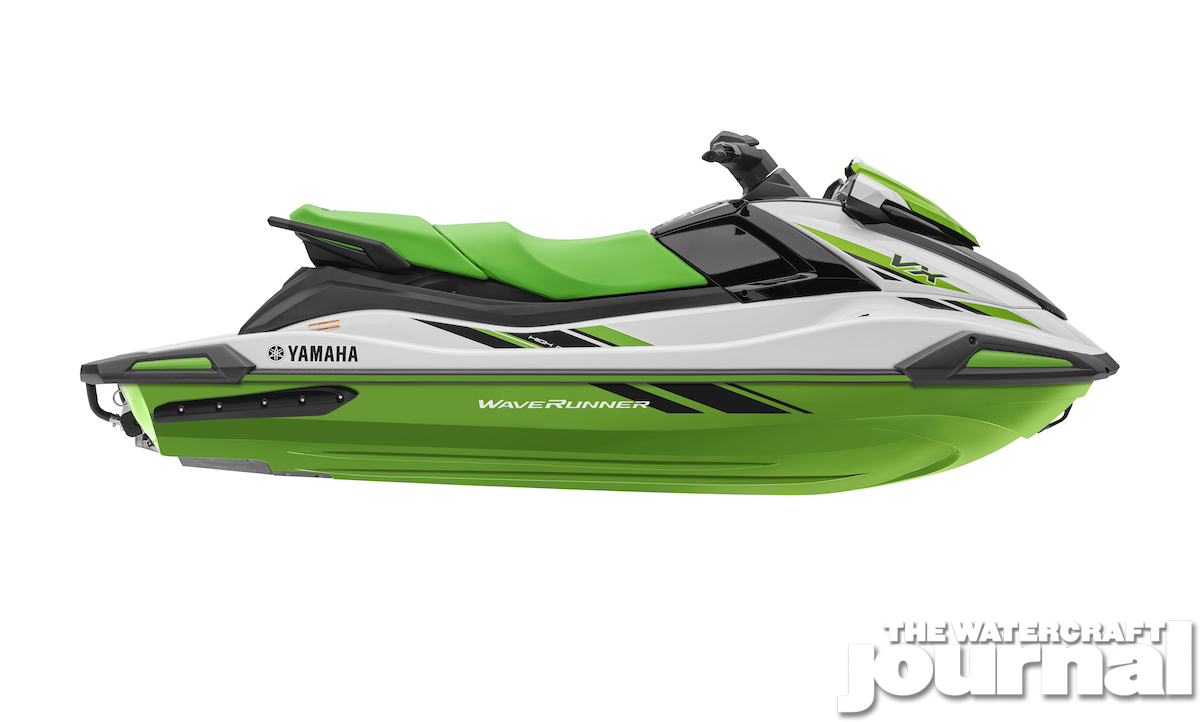
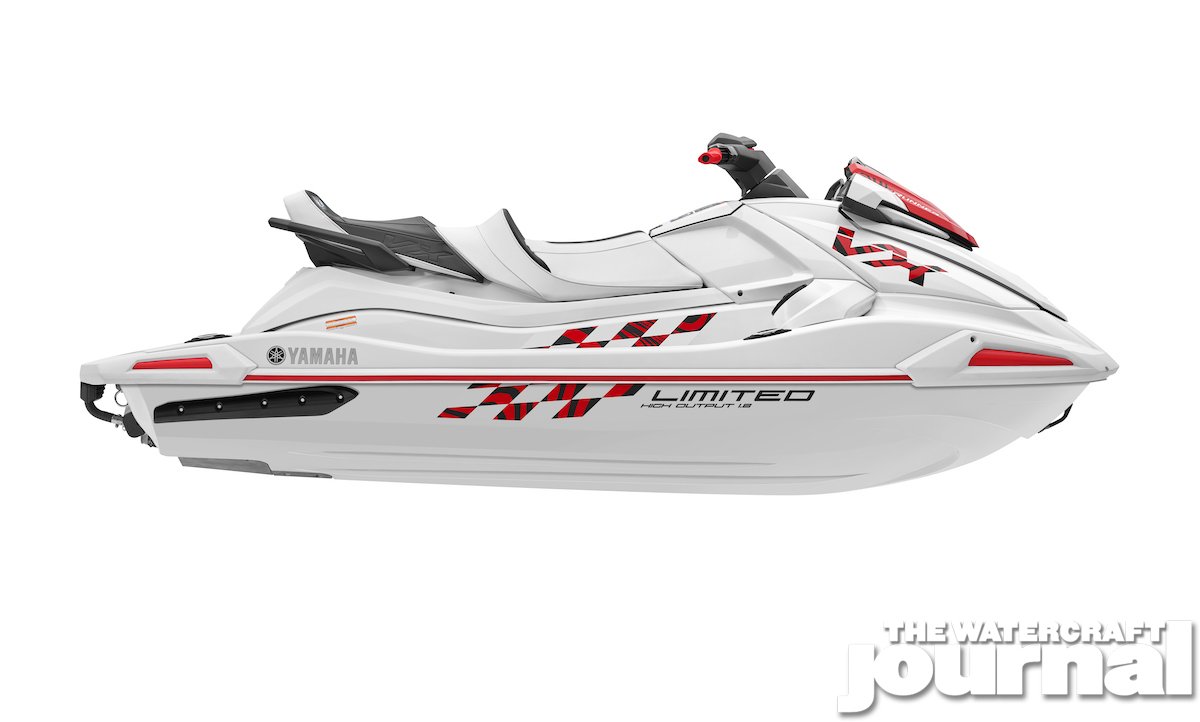
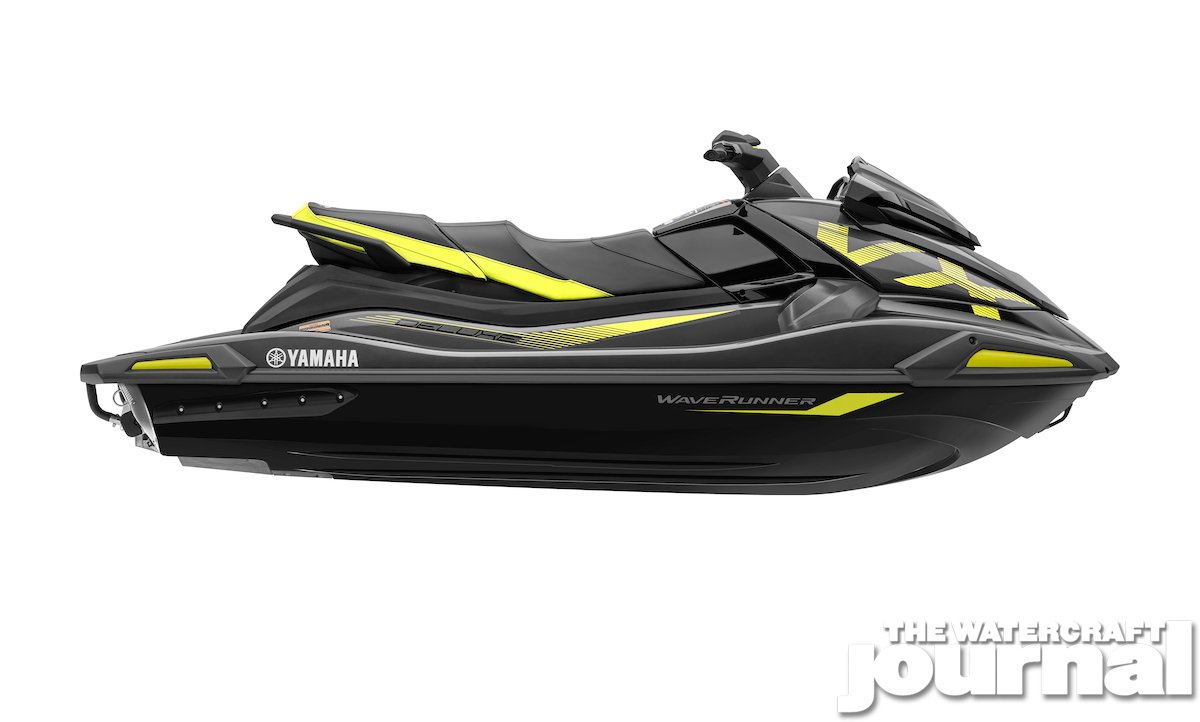
With the new year also come new colorations and prices: FX Limited SVHO (MSRP $19,099) in Black with Lime Yellow; FX Cruiser SVHO (MSRP $18,299 with sound; $17,499 without) in Torch Red or Black with Titan Gray; FX SVHO (MSRP $17,599 with sound; $16,799 without) in Cyan; FX Cruiser HO (MSRP $15,599 with sound; $14,799 without) in Carbon with Mint or Lime Yellow; FX HO (MSRP $15,099 with sound; $14,299 without) in White with Mint.
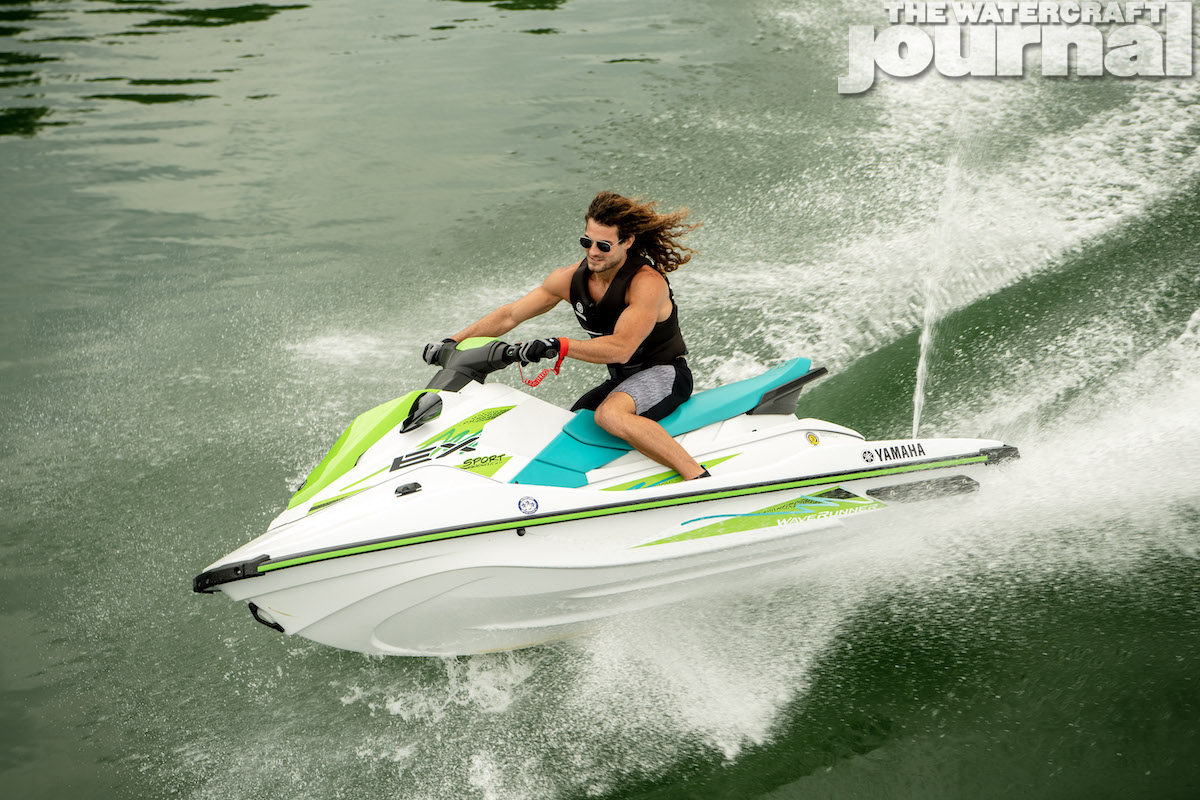
For those concerned about the sportier models, the GP1800R SVHO and its naturally-aspirated sibling, the GP1800R High Output do not change in weight or power output – only their colors, namely the SVHO being offered in either Cyan or Black with Titan Gray, and the HO in Cyan or Black with Lime Yellow. Equal too are the VX and the EX Series…well, except for one major change.
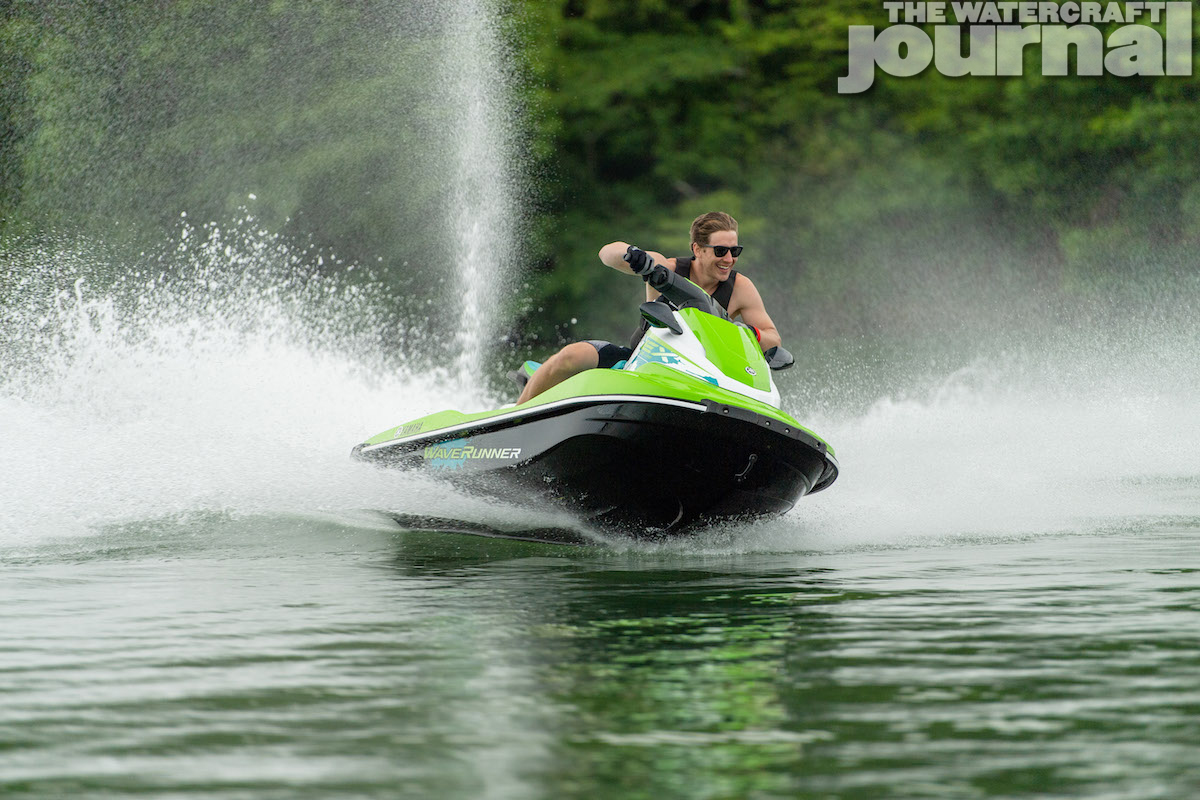
Above left: Just because the EXR left the lineup doesn’t mean you can’t push the EX to its limit. Above right: The JetBlaster enjoys the same TR-1 HO producing 110 and NanoXcel2 hull and deck as the outgoing EXR.
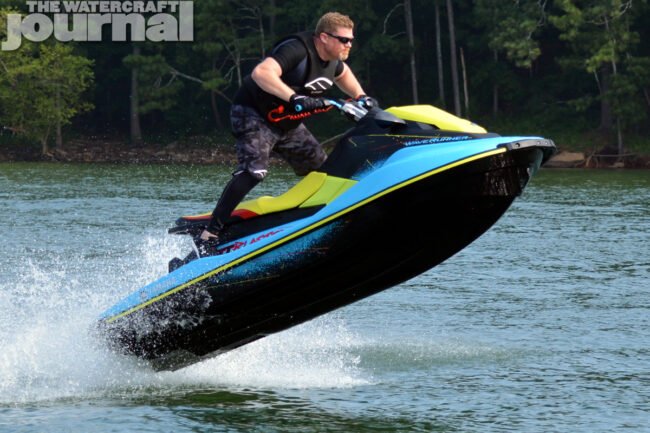
Gone is the EXR, the lightweight 110-horsepower, NanoXcel 2-hewn Rec-Lite rocket. Instead, Yamaha has rechristened our favorite little EX the JetBlaster (MSRP $9,999). Bathed in Cyan with Lime Yellow splatter-paint graphics, the new 2022 ‘Blaster takes the fight to its competitor with angled, padded foot chocks, an open-neck steering system with wider handlebars; and custom-configured electric trim ideal for wake jumping and powerslides.
The TR-1 HO provides plenty of grunt to get the ‘Blaster up to speed, enough to lay the WaveRunner hard on its rail and powerslide its NanoXcel 2 hull 10-to-20 feet across the water. It’s super-squirrelly and hyper responsive to body English. So snapping the tail loose, roosting friends, and spinning 360’s are child’s play – the ‘Blaster makes it easy. Weighing in at 549-pounds, the JetBlaster joins the 4-stroke SuperJet in Yamaha’s new “Freestyle” category.
Above left: The JetBlaster is perfectly capable of submarines, power slides and sloppy 360s. Above right: Remember all that talk about not jumping wakes? Yeah, forget that.
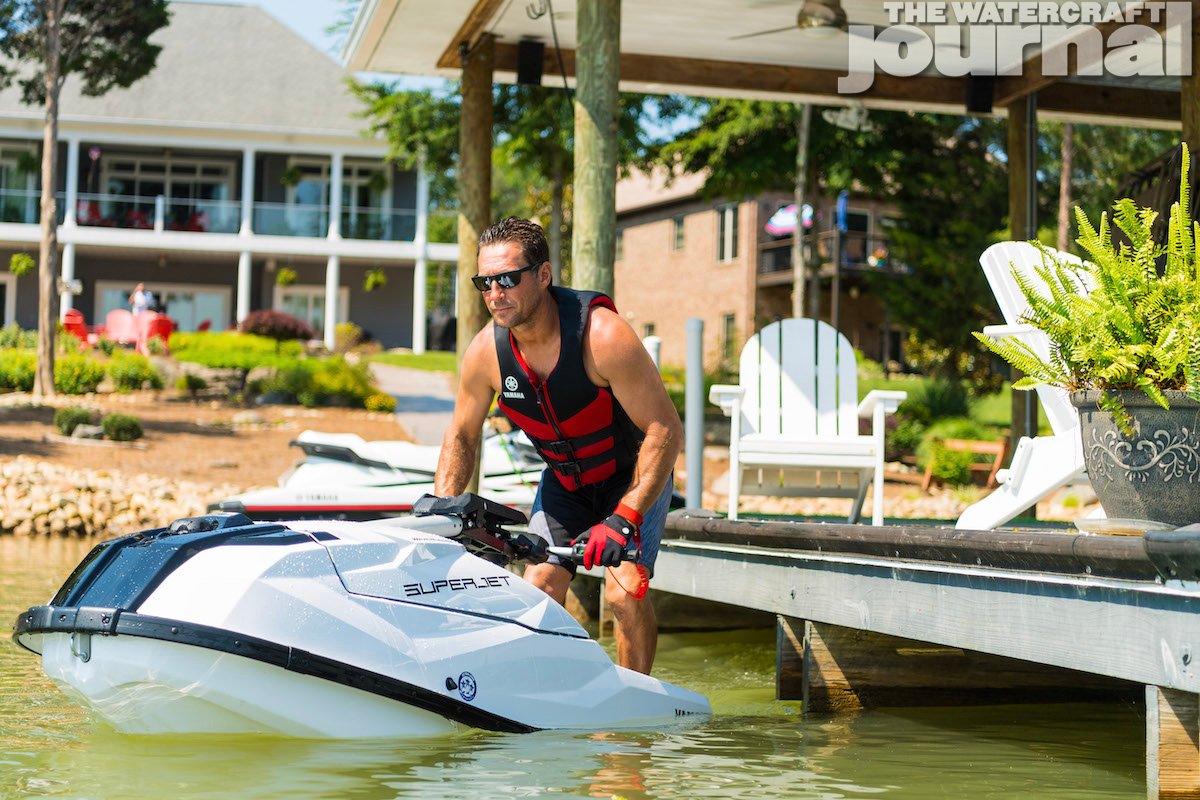
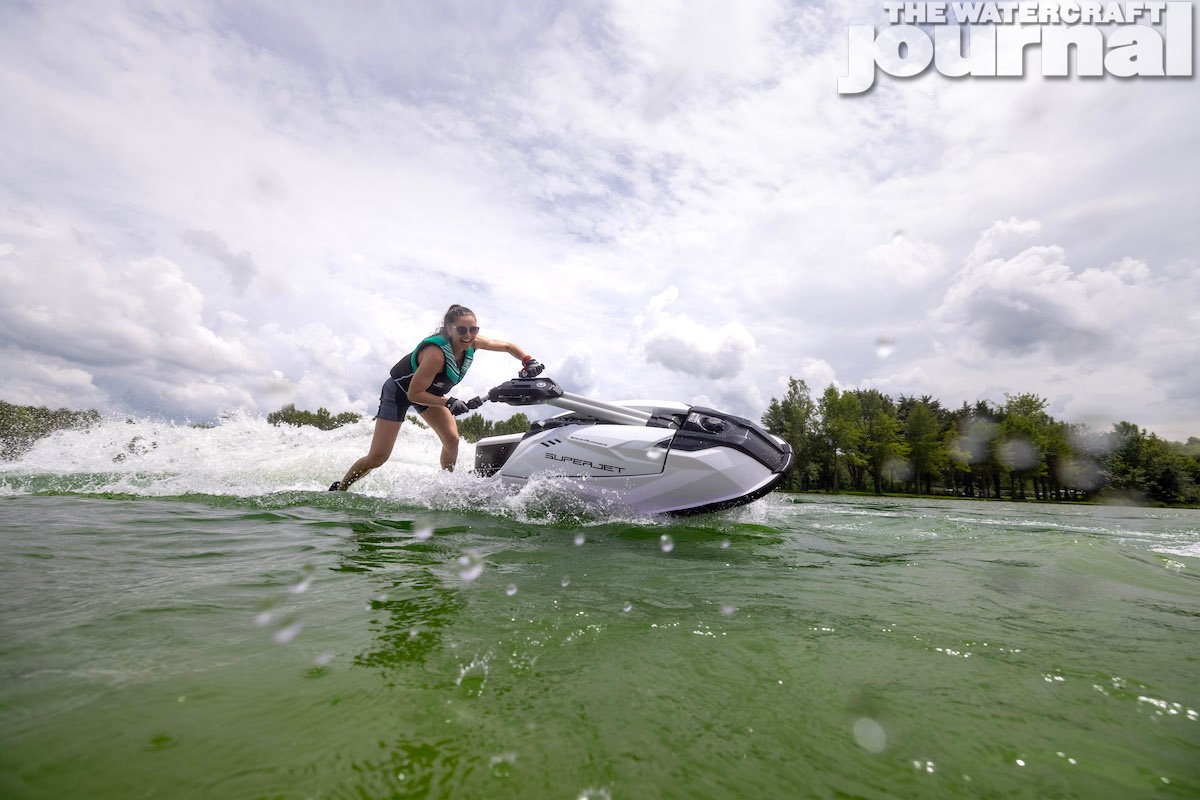
Above: The SuperJet sees a small price increase of $300, from $9,499 to $9,799. No changes apart from some optional storage accessories and an adaptive bracket to fit two small EcoXgear speakers were made for 2022.
Again, when you sorta wouldn’t blame Yamaha if they chose to take it easy this year and just to let the dust settle, they go and totally surprise the market with some major upgrades to its full-sized FX runabouts, threw in a ton of new accessories and features, and even introduced a new freestyle WaveRunner. So yeah, you can kinda forget that whole “taking it easy” thing – Yamaha’s charging hard into 2022 with a full arsenal of killer watercraft…not like you needed a reason to camp out in front of your dealership already.
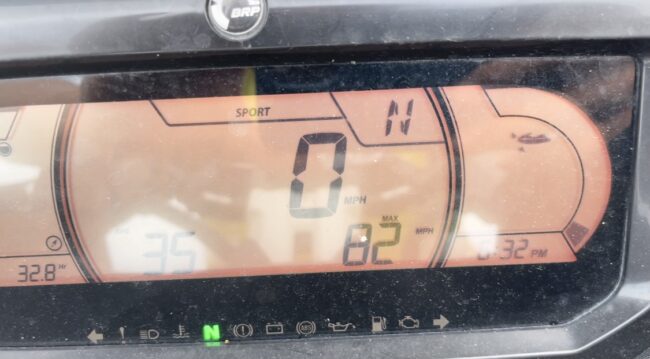
Initially, we had some complications trying to get speed results from the 2021 Sea-Doo RXP-X Stage 1 kit; blowing a cooling line on test day ruined the fun! Luckily it was a quick fix and didn’t take long for us to get back on the water to see what the kit was capable of! We wanted to offer a kit that not only increased performance, but also reliability in the cheapest way possible. Doing so we had to test both the stock impeller and the Solas 13/18 to see which one would come out ahead; we did not want to waste customer’s hard-earned money on parts they did not need!
In the testing process we achieved very interesting results! The stock impeller managed an 81 MPH dash speed and a 79.1 MPH GPS speed at 8300 RPMs in the Louisiana heat. After swapping out to the Solas 13/18 impeller, we immediately went straight back to the water for back to back testing. The Solas impeller squeezed out 82 MPH on the dash and 79.0 MPH GPS speed at 8200 RPMs. Unfortunately, the factory dash speed just isn’t accurate; the dash often reads higher than actual GPS speed and not consistently at that!
If we take a look at the GPS speed, the stock impeller proved to be one-tenth of a mile-per-hour faster than the Solas impeller. However, the results are not that simple. The stock impeller was turning 100 more RPMs than the Solas impeller; after all, higher RPMs typically equates to more speed. By decreasing the pitch of the Solas impeller to raise RPMs, we can conclude that it will produce better speed, acceleration, and higher RPMs to be the winner in this kit!
To see the official acceleration and speed results of the fine-tuned GreenHulk Stage 1 kit for the SeaDoo RXPX you will need to be on the lookout for the upcoming video and article of the RXPX versus GP1800R Stage 1 shootout! It is going to be a close match between these two watercraft and will surely be an exhilarating day on the water!
Scott Voelker rides jet skis to raise funds for causes that he supports. His most recent ride was for breast cancer research and to raise funds for the Orlando Sports Foundation and Cure Bowl. He rode his Sea-Doo GTX almost 7,000 miles beginning in Tampa, FL and ending in Chicago, finishing the Great Loop.
He left his home in Indiana to head to Tampa, Florida on July 11 to complete the last 2,000 miles of his 7,000 mile journey. Voelker rode 251 miles on the first day, stopping in Panama City to fill up his pink and white fuel cans. His plan was to ride 200 miles a day while stopping along the way to raise money and awareness for breast cancer research. Updates on his adventure are available on his Facebook page.
He has a lot of stories, including one with pictures of seeing boats on fire. He had grabbed a ride back to the marina where his PWC was docked and saw smoke billowing.
A couple of boats were on fire and his Sea-Doo was nearby. His ski was okay, the boats not so much. Check out his page for more tales of his ride and future plans.
Voelker began the fundraising rides in 2017 when he rode his WaveRunner 2,030 miles for breast cancer research. He rode through all five Great Lakes. He has continued doing charity rides every year for the Orlando Sports Foundation and Cure Bowl.
The foundation says it takes someone with courage and grit to take a dream and make it a reality. Scott’s vision using this adventure as a tool to raise money for cancer research is their shared vision.
That says a lot about the kind of man Voelker is and with the help of people like him, the Sports Foundation and Cure Bowl team has raised almost $4 million since 2015. He finished this latest journey on July 26th and raised several thousand dollars for The Orlando Sports Foundation and Cure Bowl, so that they can continue their cancer research.
“They did it again!” screamed one commenter as Sea-Doo’s José Boisjoli smiled across the screen. Wednesday’s digital reveal of the brand’s 2022 lineup introduced enthusiasts to several new and exciting products certain to lure in first-time and returning customers; but what caught the ire of this viewer (and definitely several others) was the few-yet-significant tweaks and additions to existing models that had only just been released a year or two before.
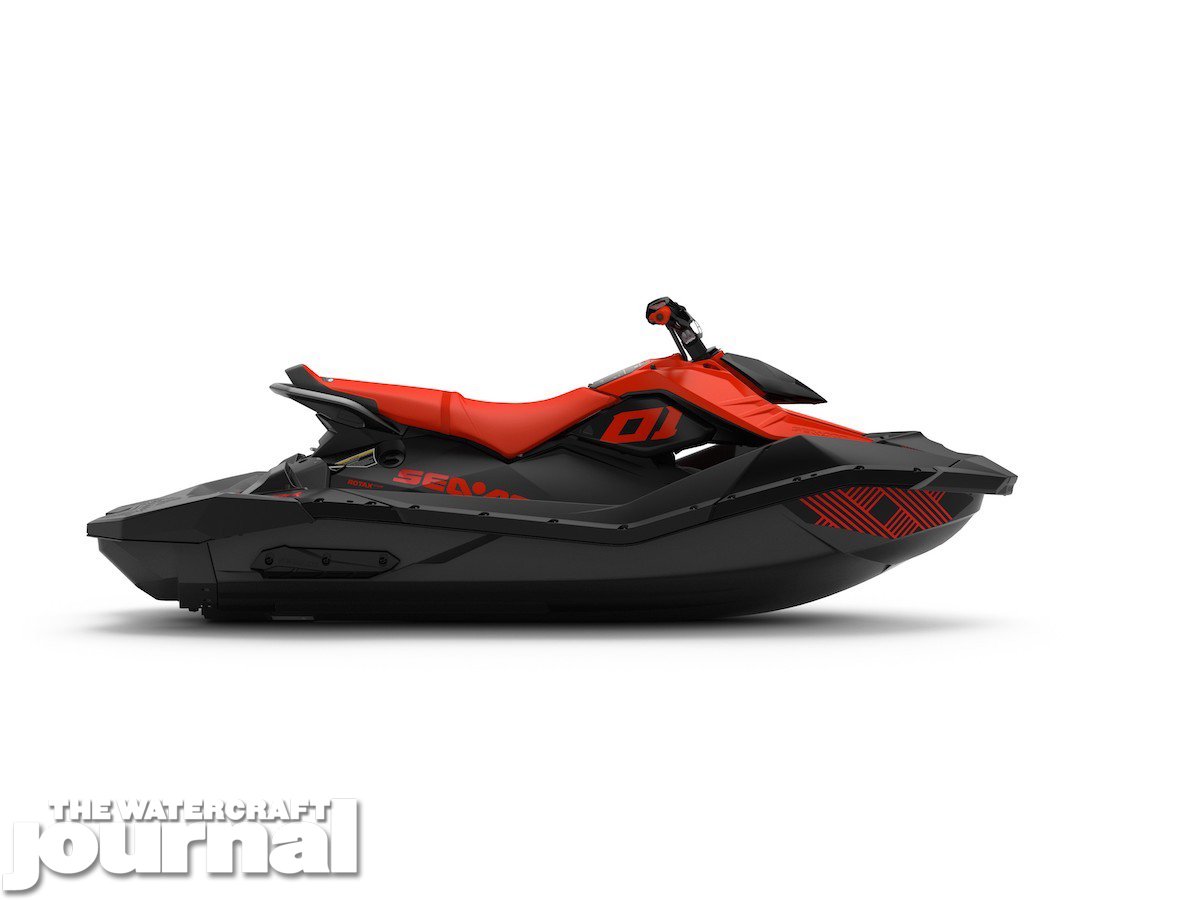
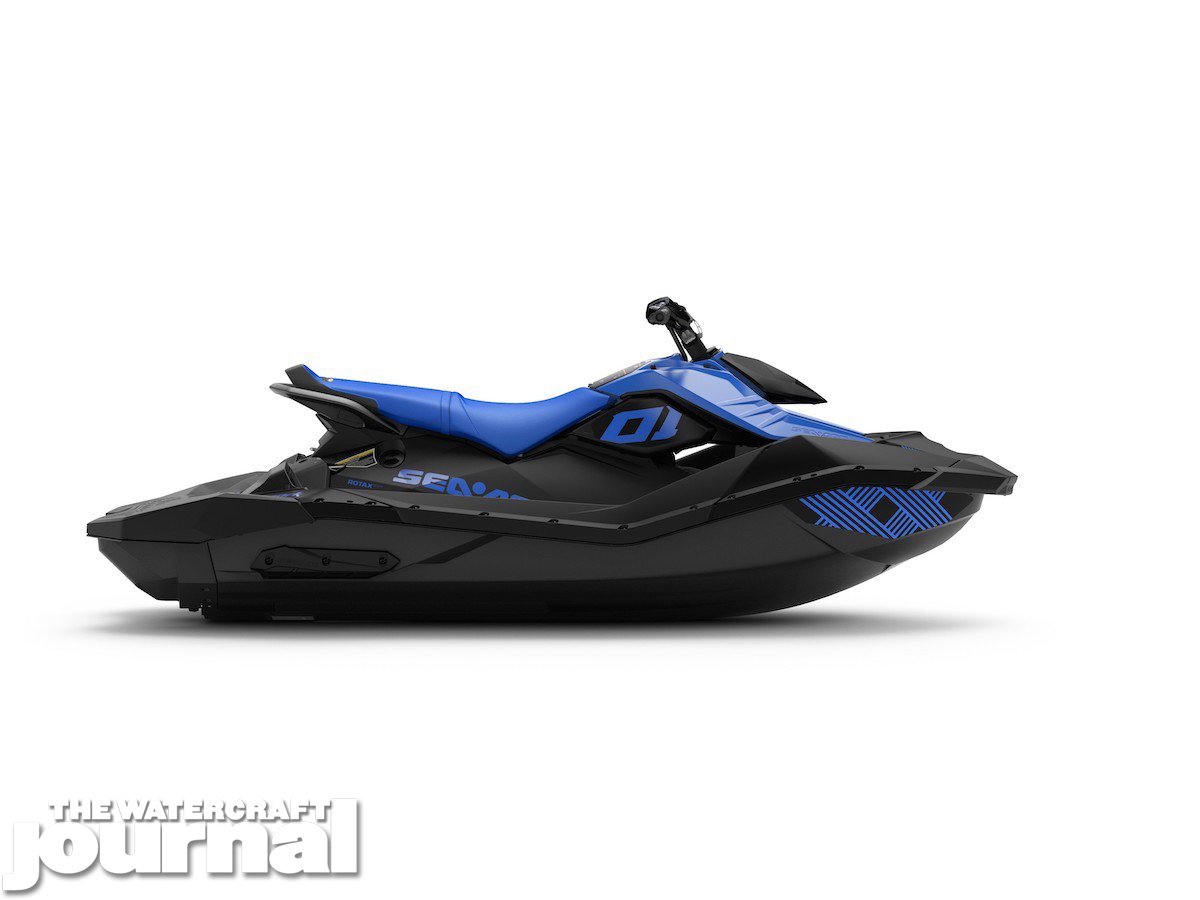
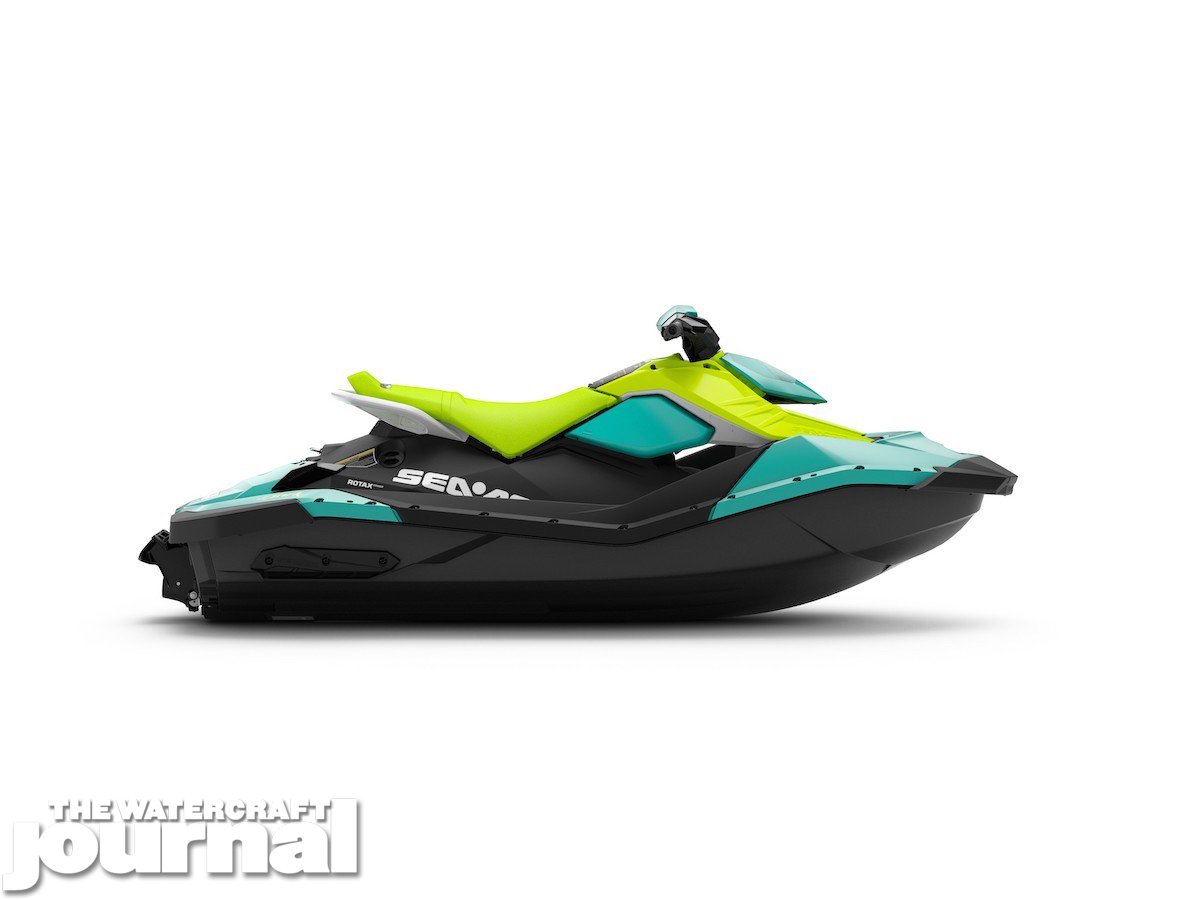
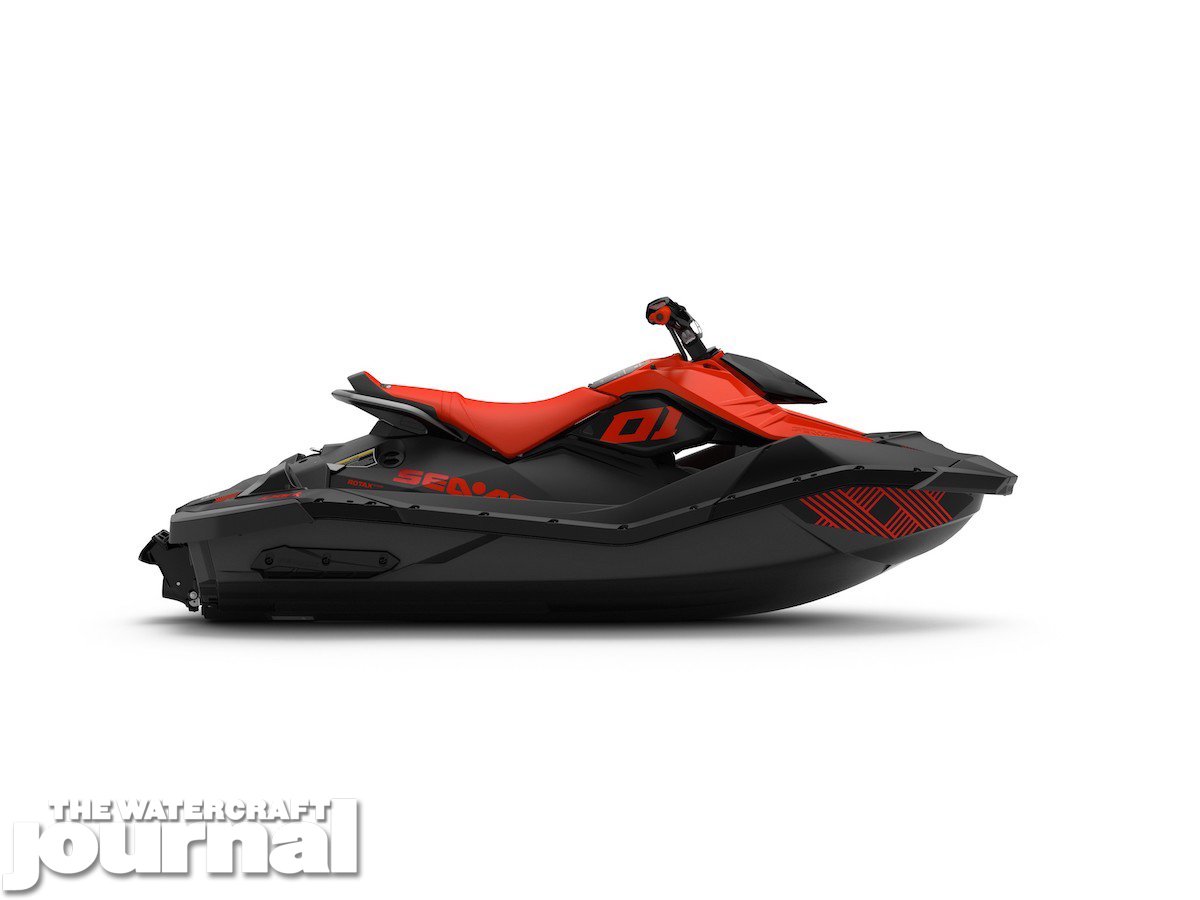
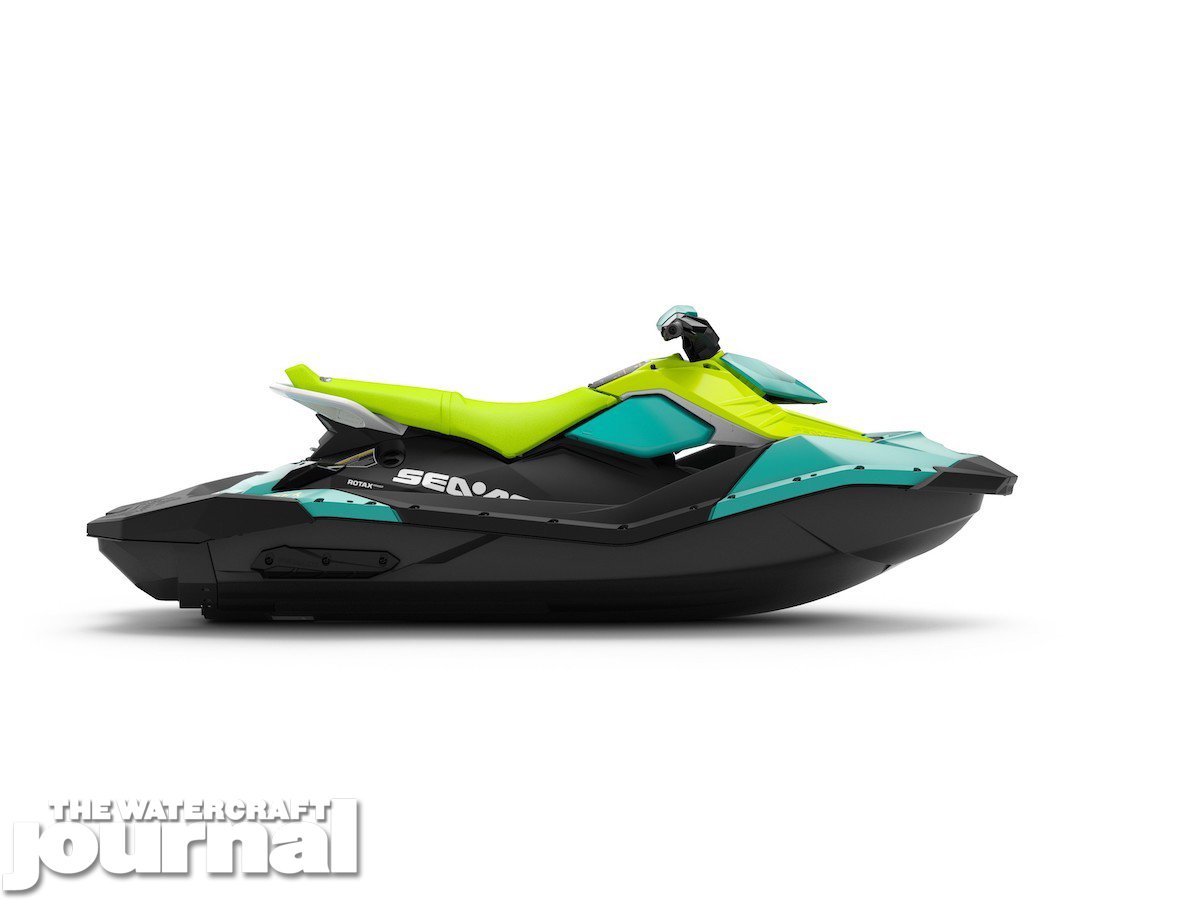
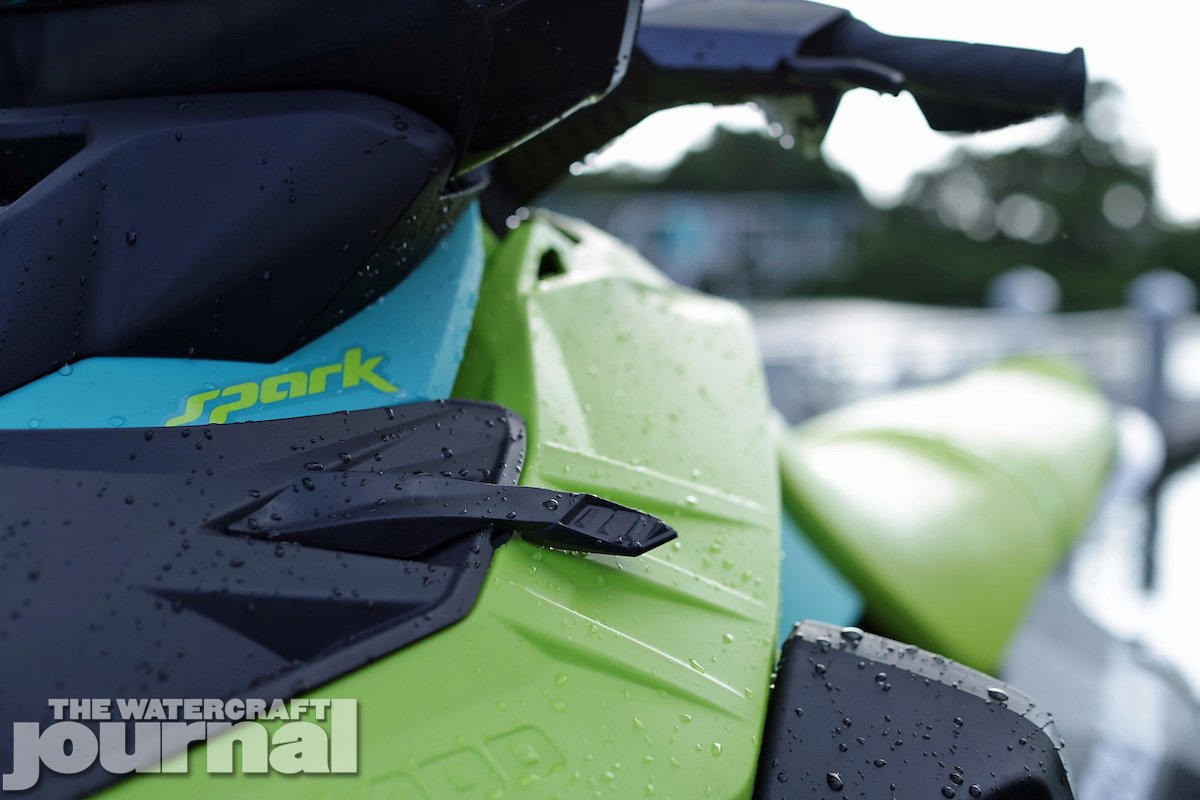
Ranging from the mundane to the magnificent, these improvements were worked into the 2022 batch to better refine and polish the product line. Although chatter speculated on the redesign of the now 8-year-old Sea-Doo Spark (MSRP $5,699), it returned as-is for 2022, save for some smartly reconfigured coloring: Lava Red and Orange Crush or Reef Blue and Manta Green; and a bold Lava Red and Black combination or new Dazzling Blue and Deep Black for the Trixx (MSRP $7,899).
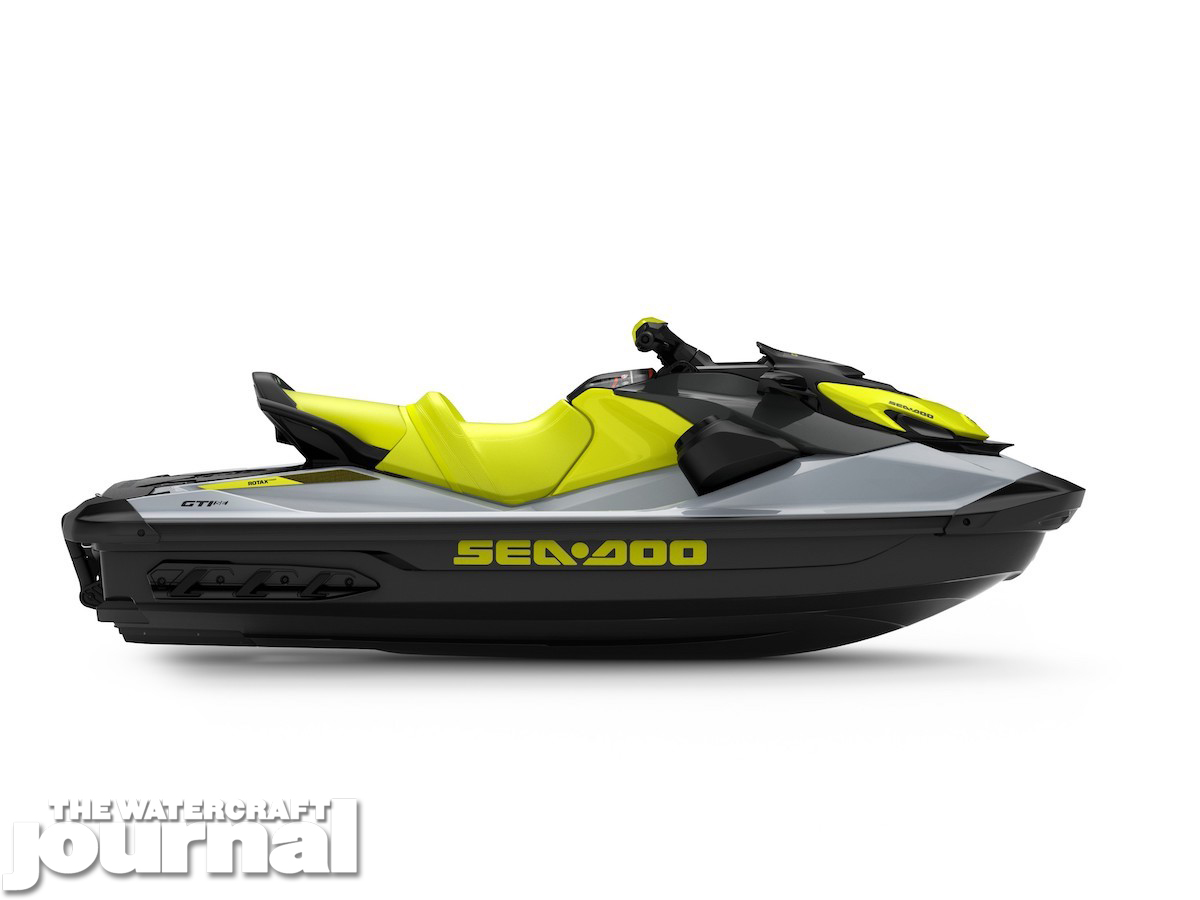
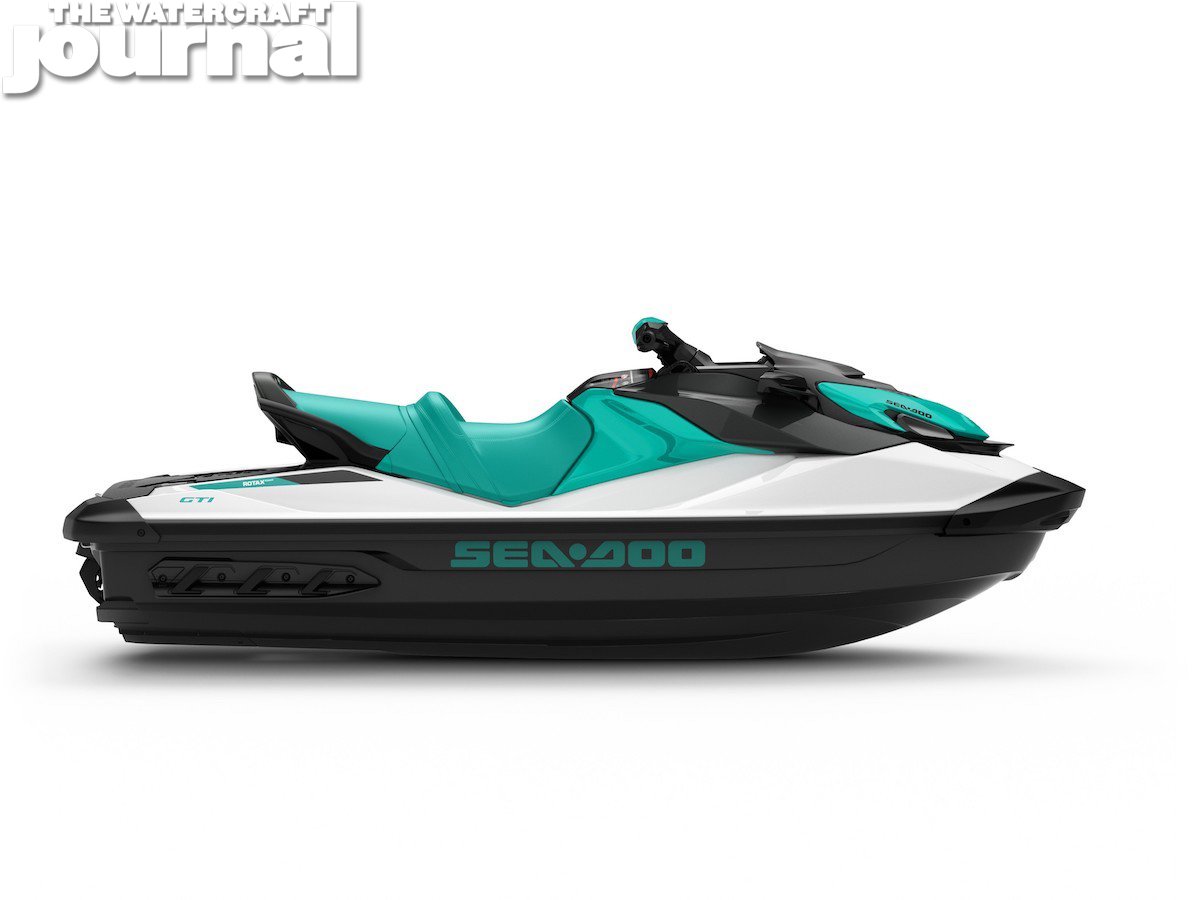
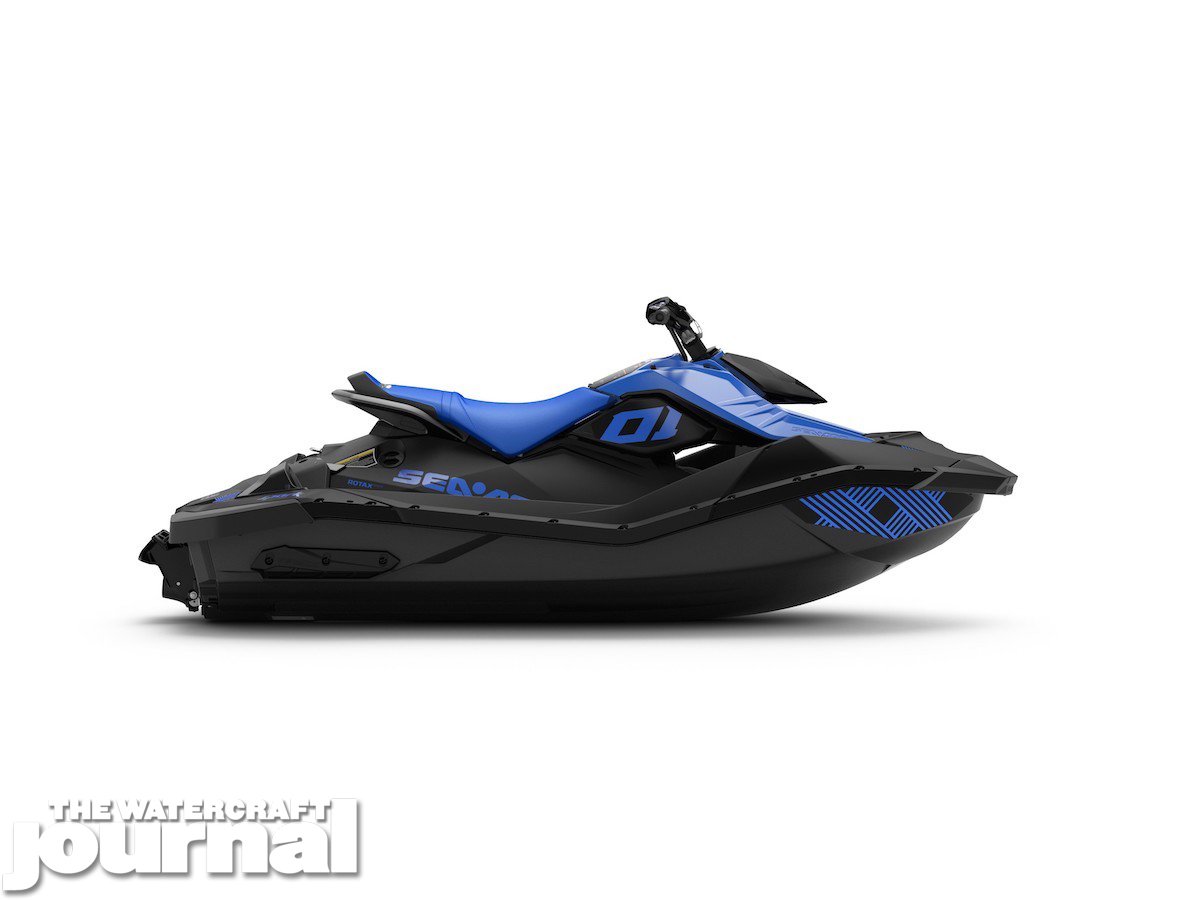
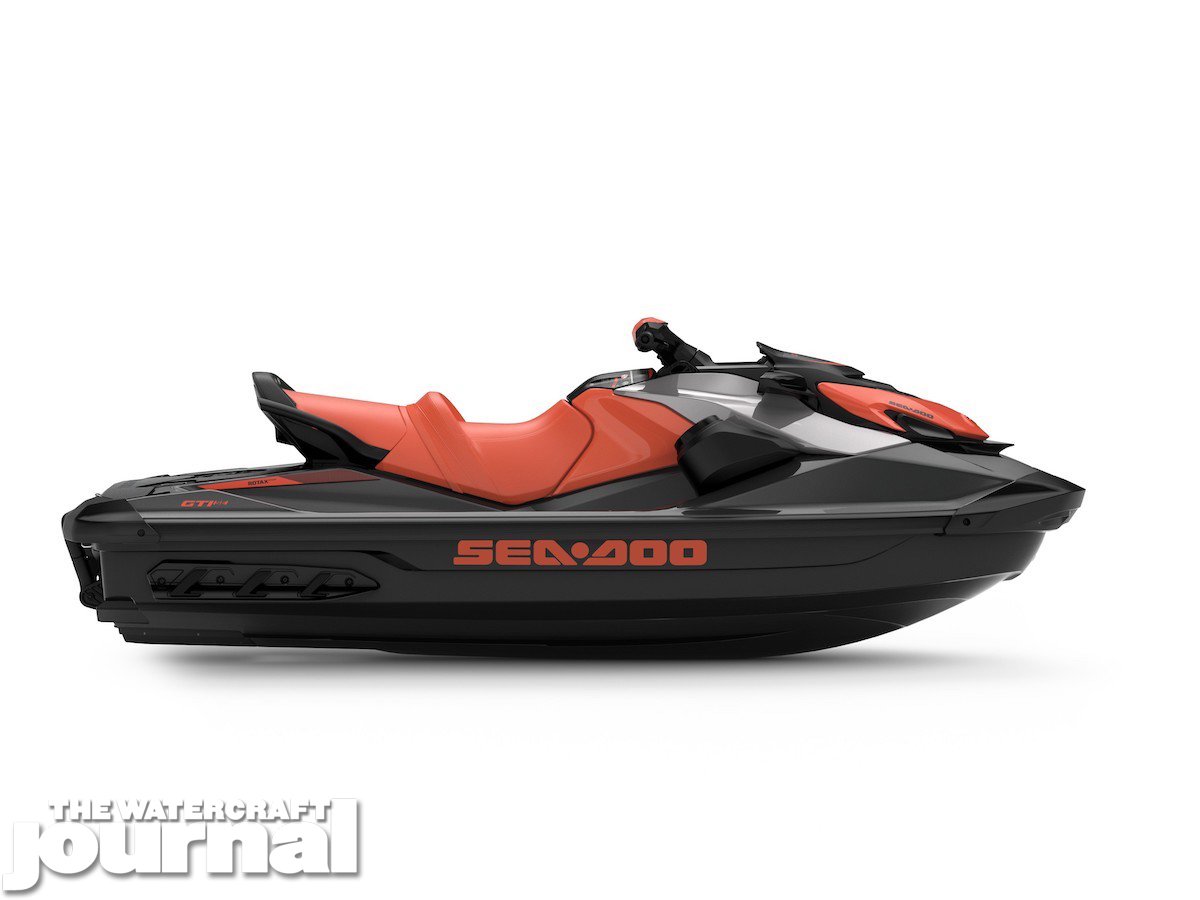
For 2022, the GTI family of Recreation segment watercraft adds to the platform’s already impressive versatility with the addition of the optional iDF (Intelligent Debris Free) system. In fact, the iDF technology, which reverses the pump’s thrust in a 12-second burst in order to clear clogged intakes, has found its way into nearly every Sea-Doo this year (but more on that later). Of course, all 130 and SE-equipped GTI’s can be optioned with the 100-watt BRP Premium Audio system too.
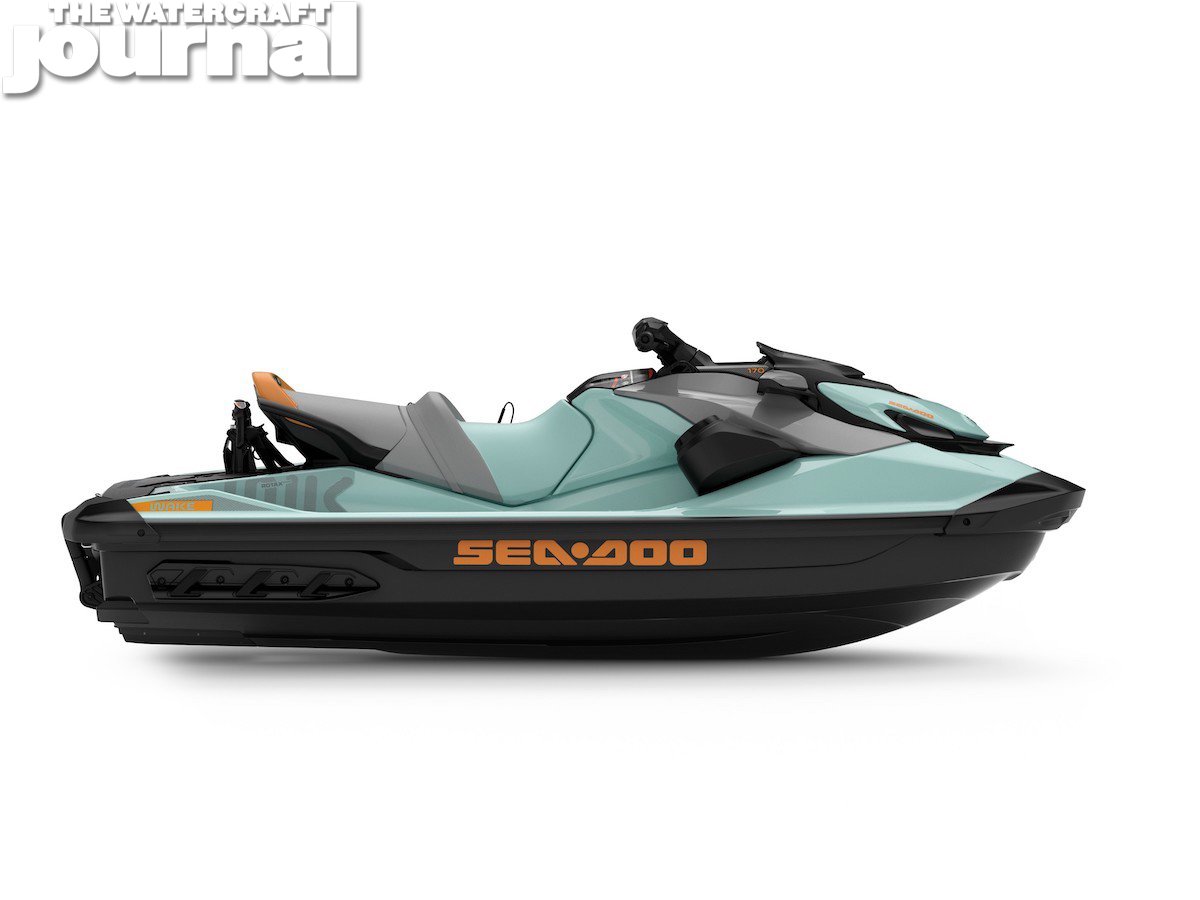
Colorings for the GTI 90 (MSRP $9,299) and base GTI 130 (MSRP $10,299) are Reef Blue on White as the GTI SE 130 (MSRP $11,099) and GTI SE 170 (MSRP $11,699) can be purchased in either Coral Blast and Eclipse Black or bright Neon Yellow. Segueing into the Tow Sports segment, the Wake 170 (MSRP $12,499) returns as-is save for its new Neo Mint livery. Equally, the full-sized Wake Pro 230 (MSRP $16,499) comes in the same hue, but also can be optioned with iDF and the app-compatible 7.8-inch wide full-color display, which can sync to your smart phone via the BRP GO! app.
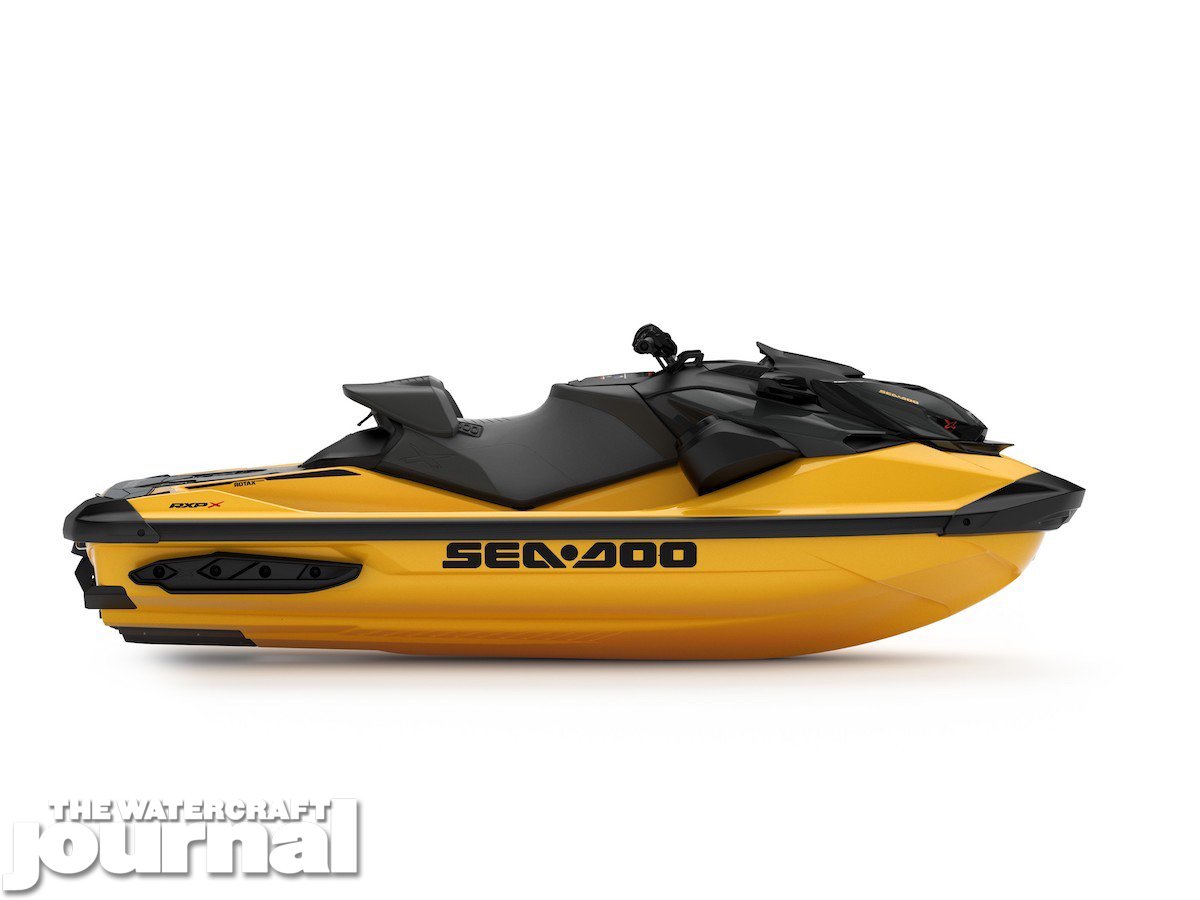
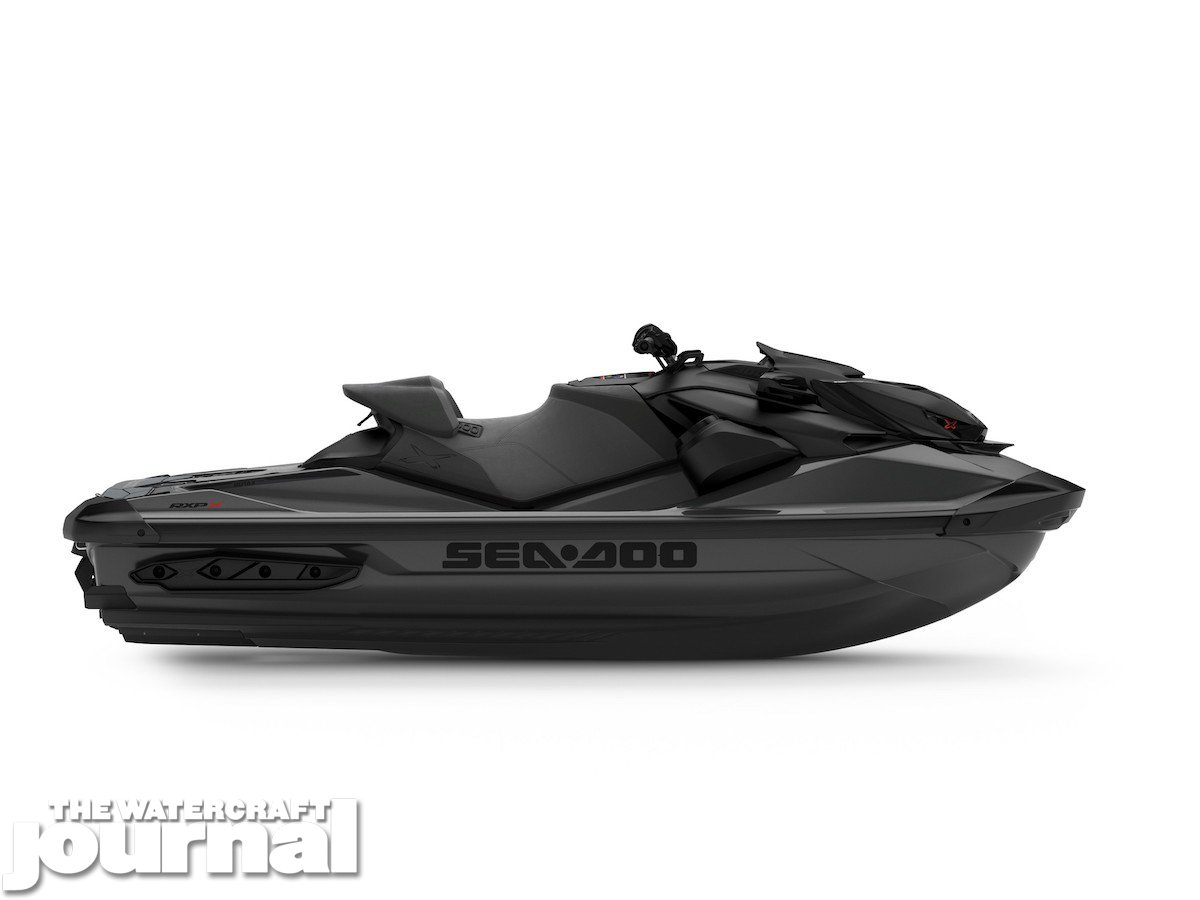
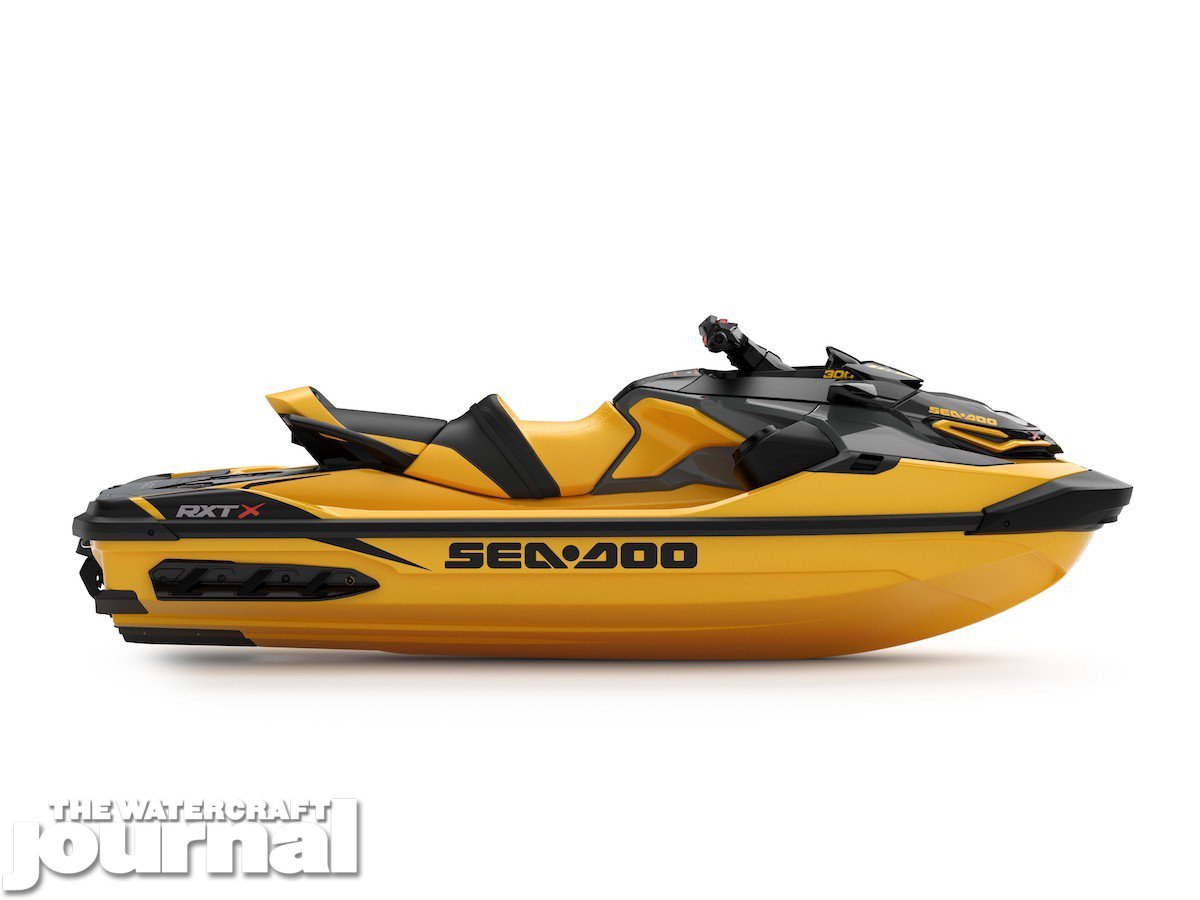
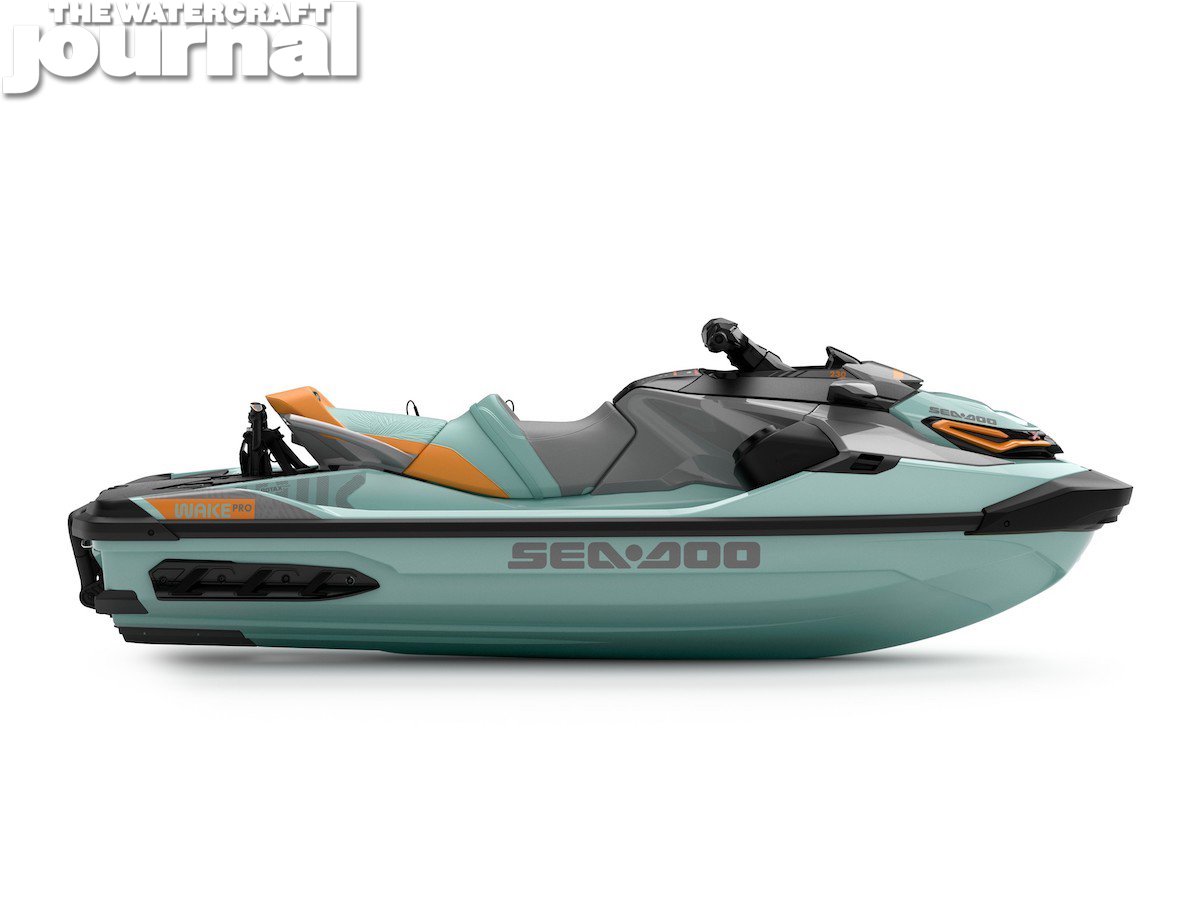
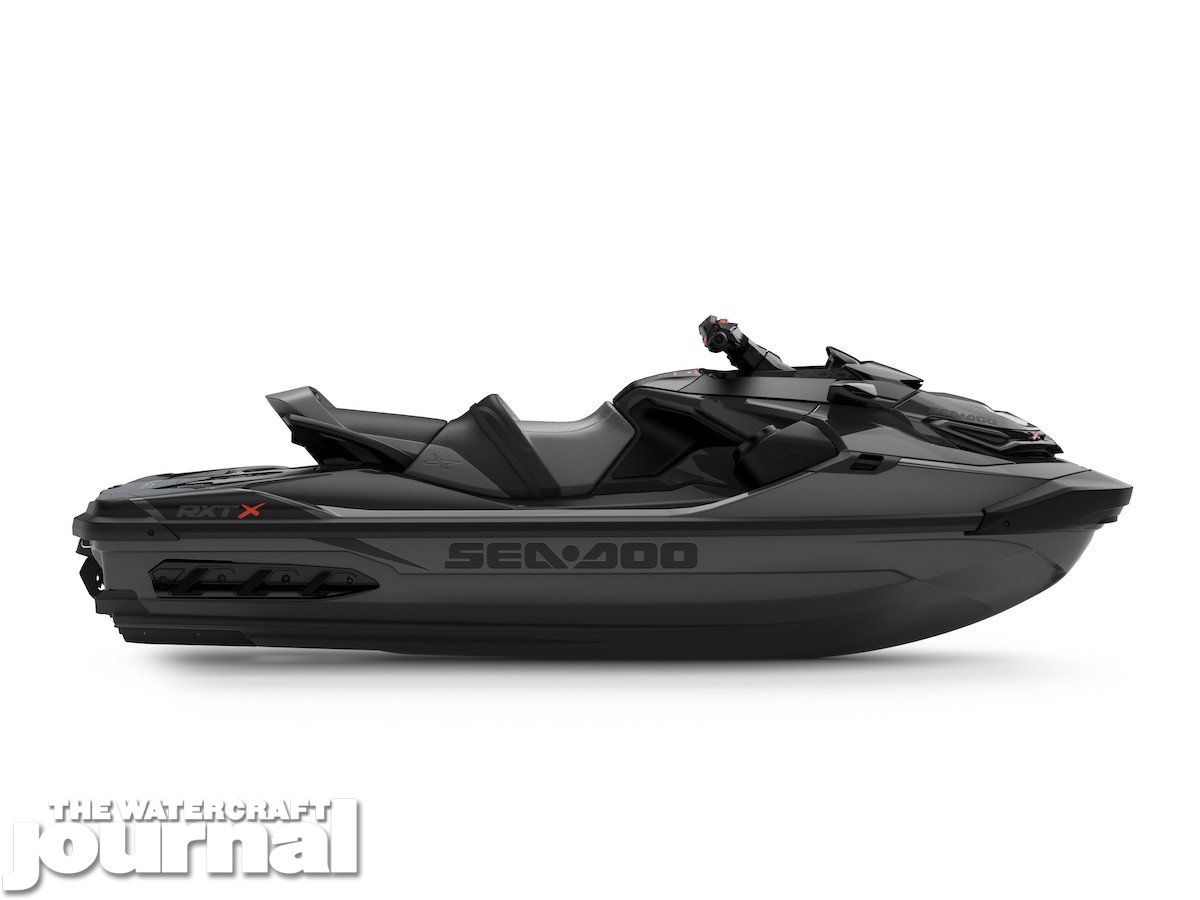
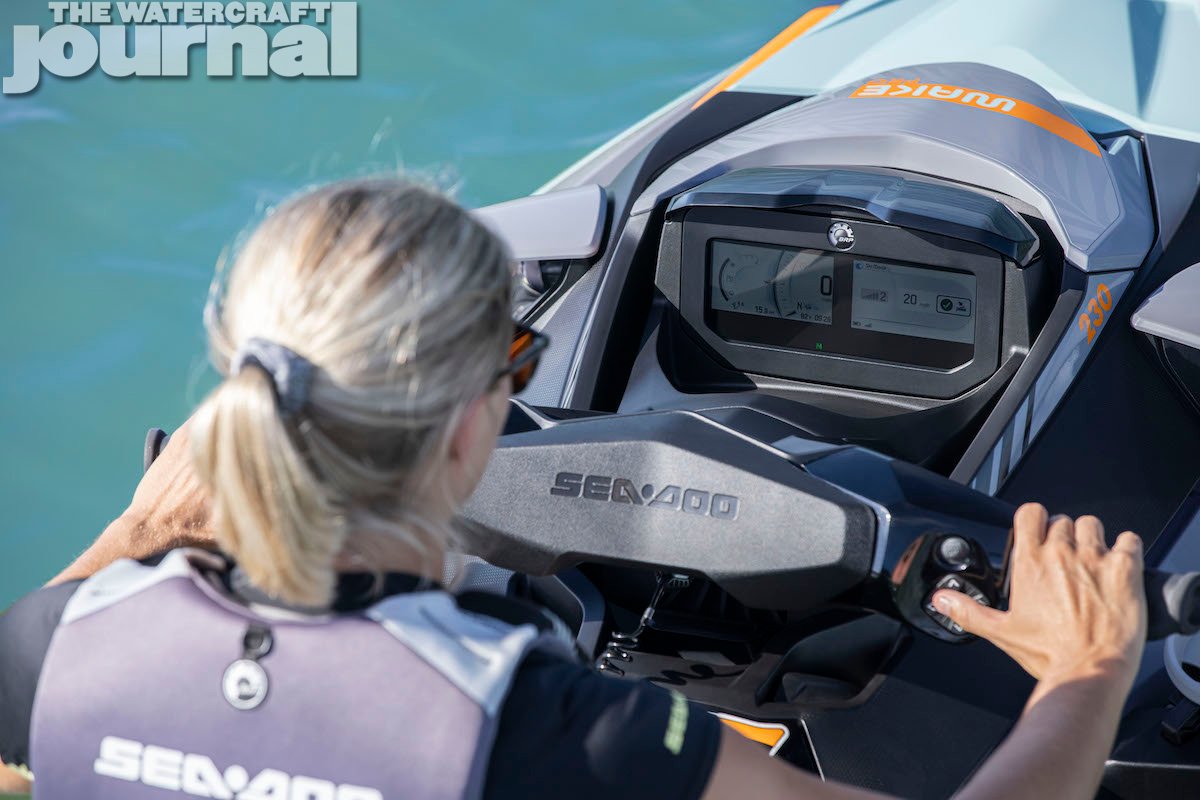
The cause for the initial outburst we witnesses was the announcement of the aforementioned panoramic 7.8-inch wide, full-color LCD display, now optional on all RXT-X 300 (MSRP $17,499) and RXP-X 300s (MSRP $16,099) for 2022. The infotainment dashboard has been highly sought after as a retro-fit for other units, and Sea-Doo’s announcement only rubbed the proverbial salt in the wound. Making matters worse, was the reveal of the absolutely sinister Premium Triple Black color scheme for the two X-series machines.
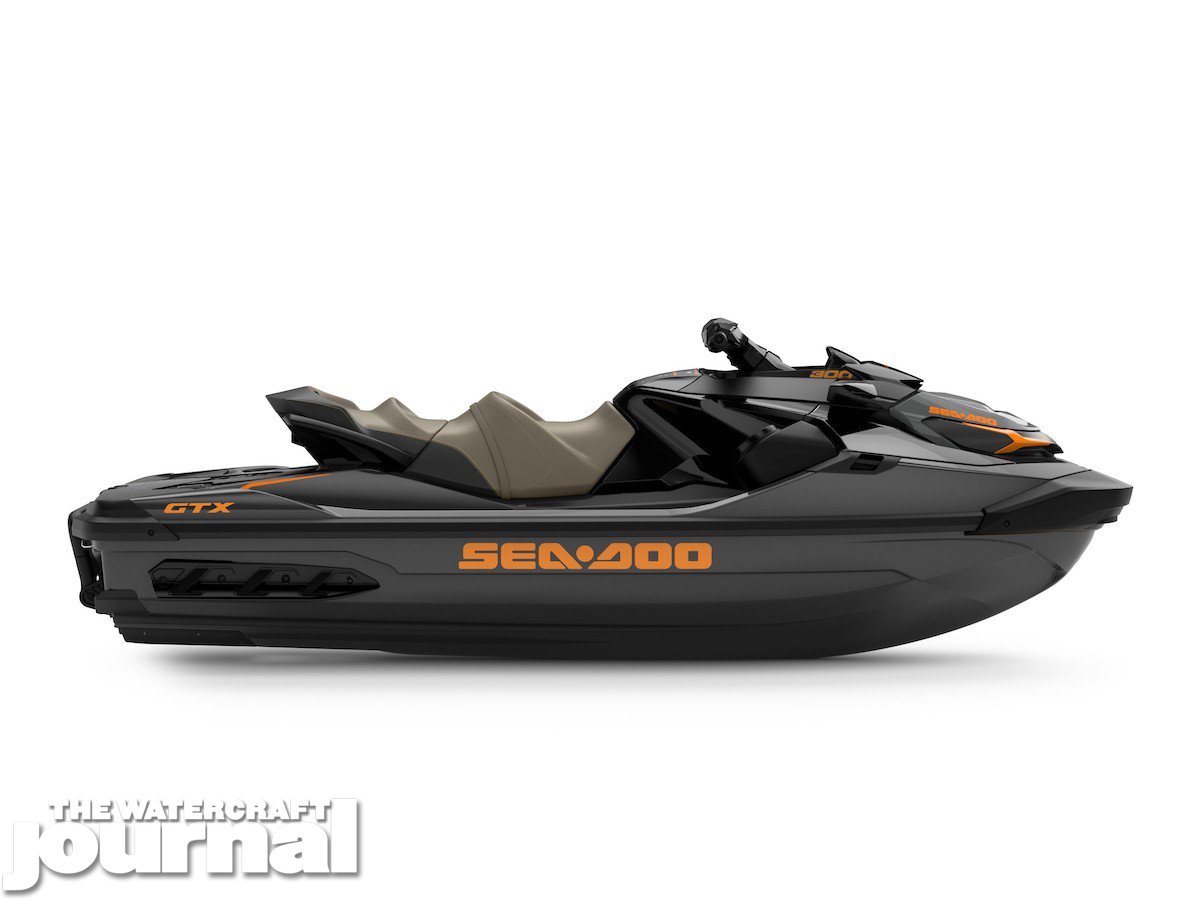
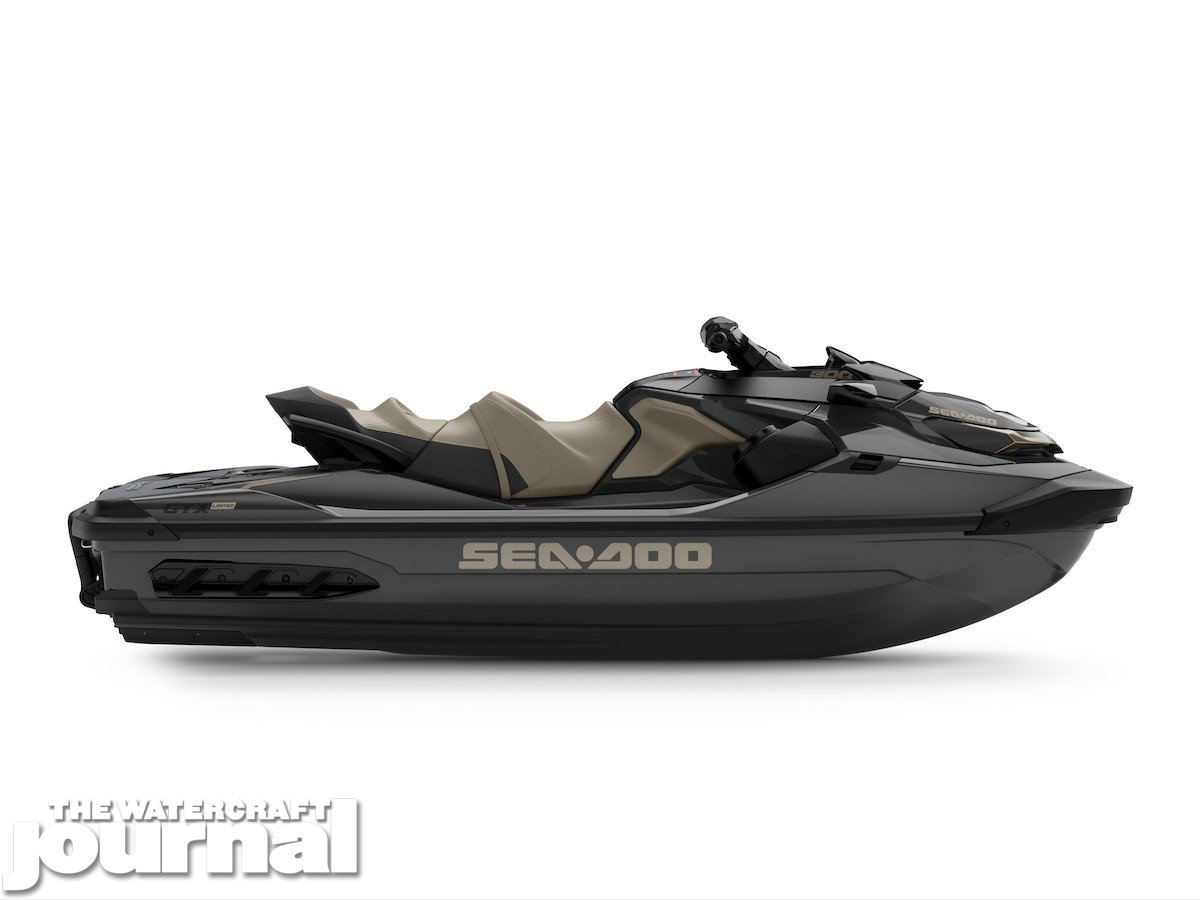
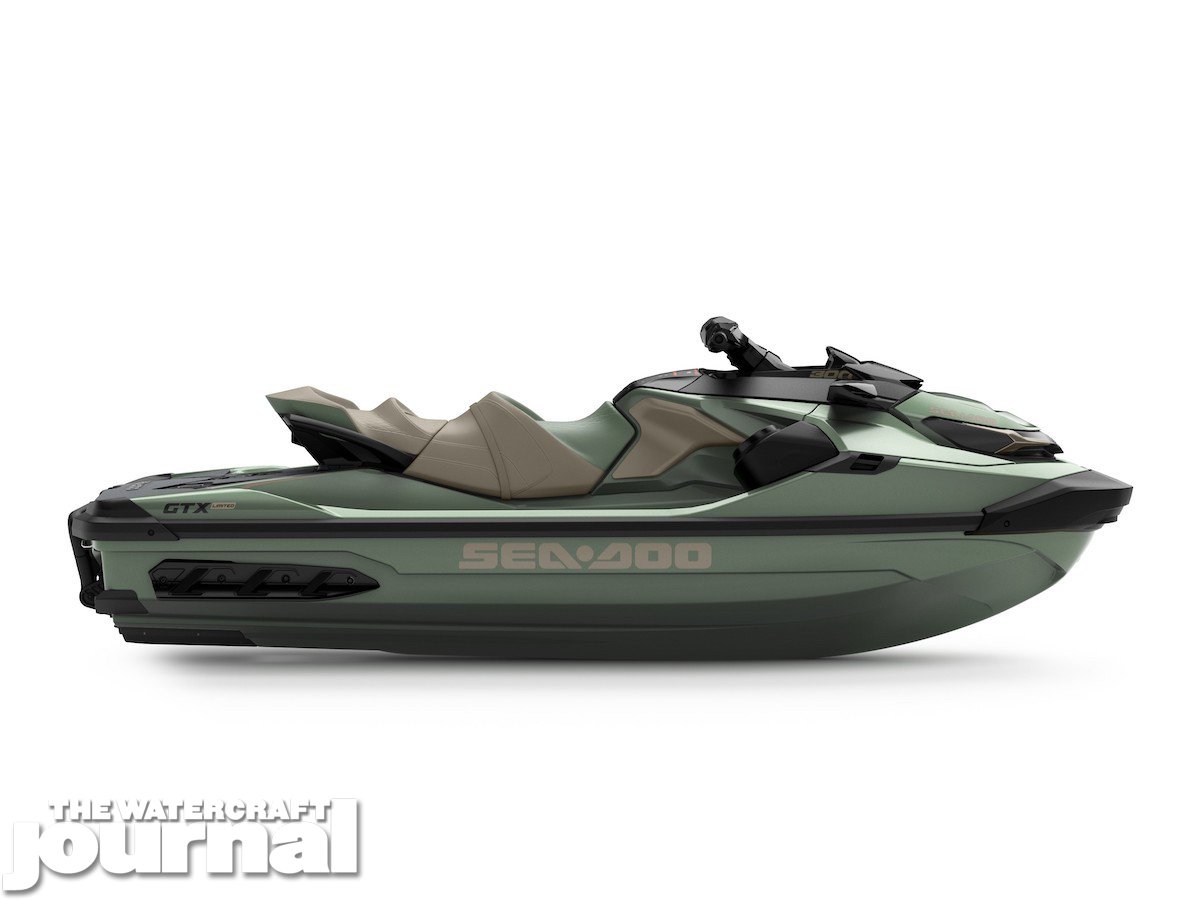
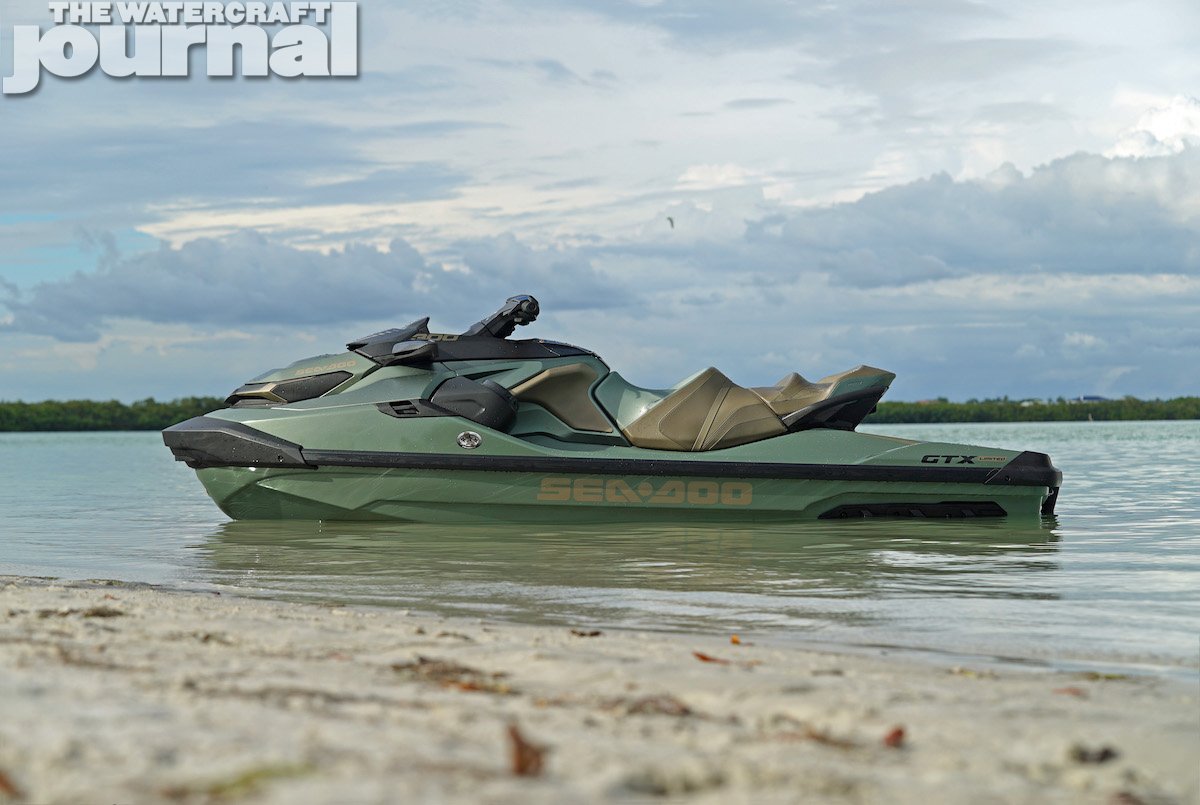
Millennium Yellow does carry over for both models as the standard color as well as being the sole offering for the GTR 230. No other changes were made for 2022, which is fine considering the RXP-X goes 0-50mph in under 3 seconds and the RXT-X still rockets from 0-to-60mph in just 3.6 seconds. Yet, if you want the inked-out look with less frills, Sea-Doo’s GTX lineup returns in Eclipse Black all optional with the BRP Premium Audio sound system and the push-button iDF system.
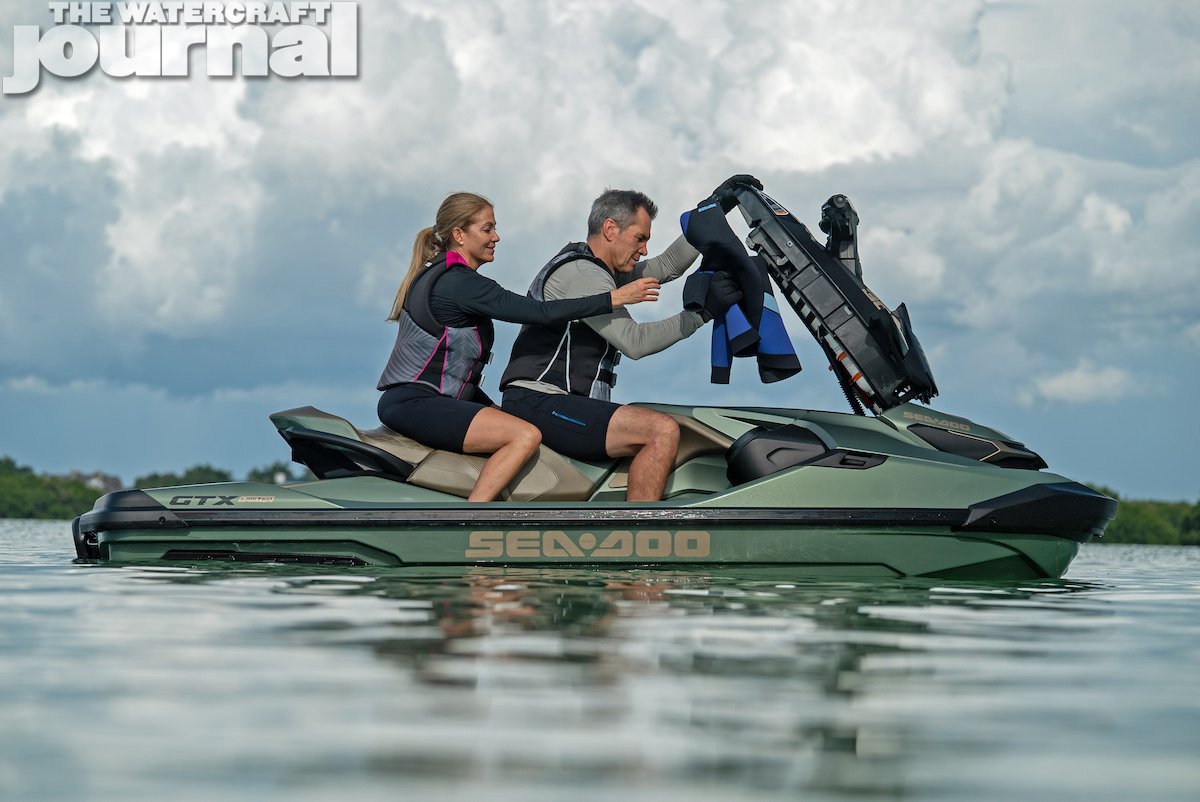
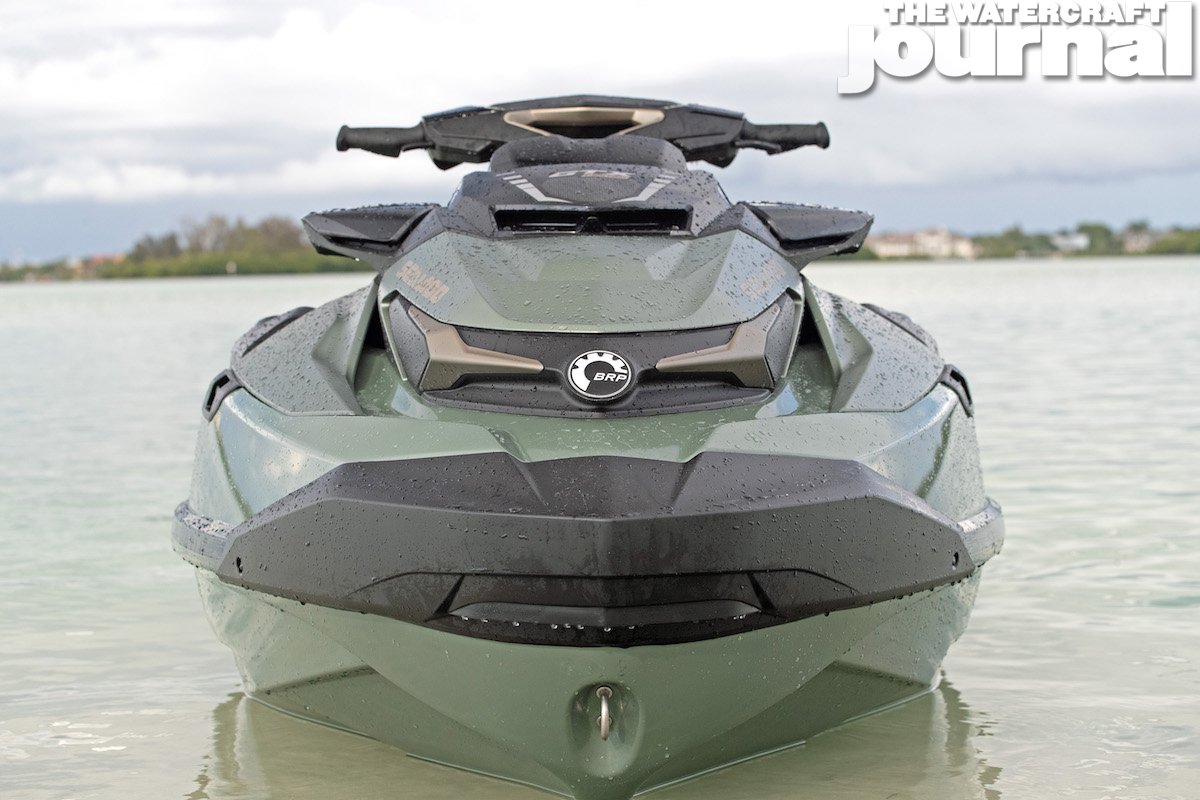
All three iterations – the naturally-aspirated GTX 170 (MSRP $13,399), the supercharged GTX 230 (MSRP $14,399) and the everything-but-an-X-Series GTX 300 (MSRP $16,099) can be dutifully equipped with enough options to make a luxury car blush. But it’s the new GTX Limited 300 (MSRP $18,299) that really gets the king’s ransom with standard features like iDF, the 7.8-inch full color LCD app-ready display, the organizer bins for its 25.3-gallon (96 L) central cargo compartment, and its Metallic Sage and Liquid Titanium coloring.
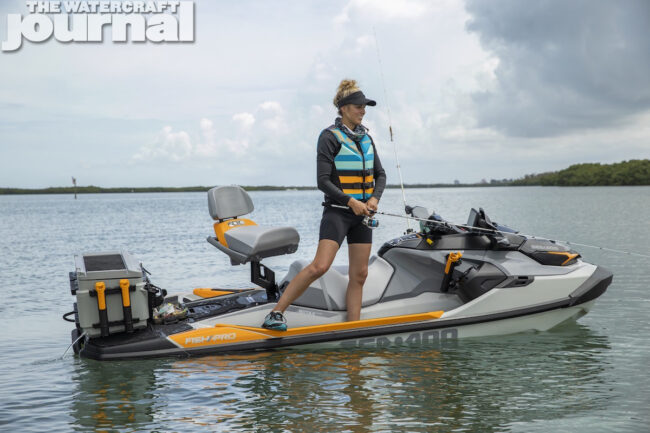
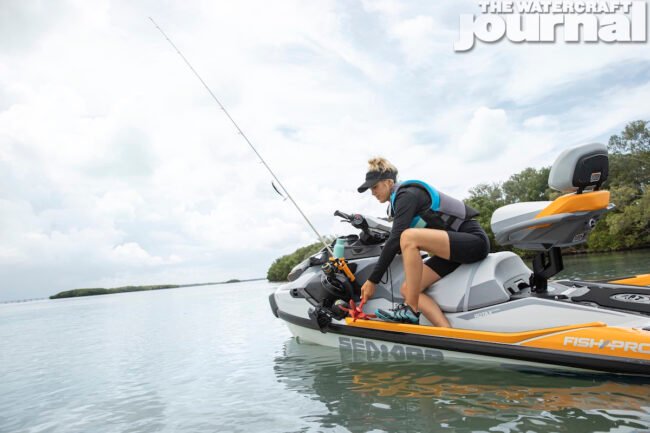
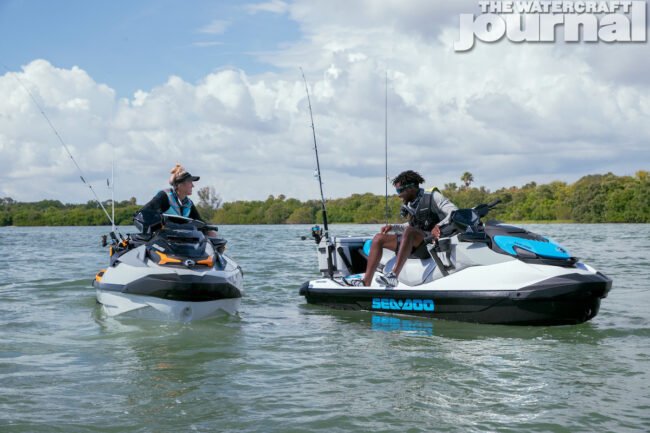
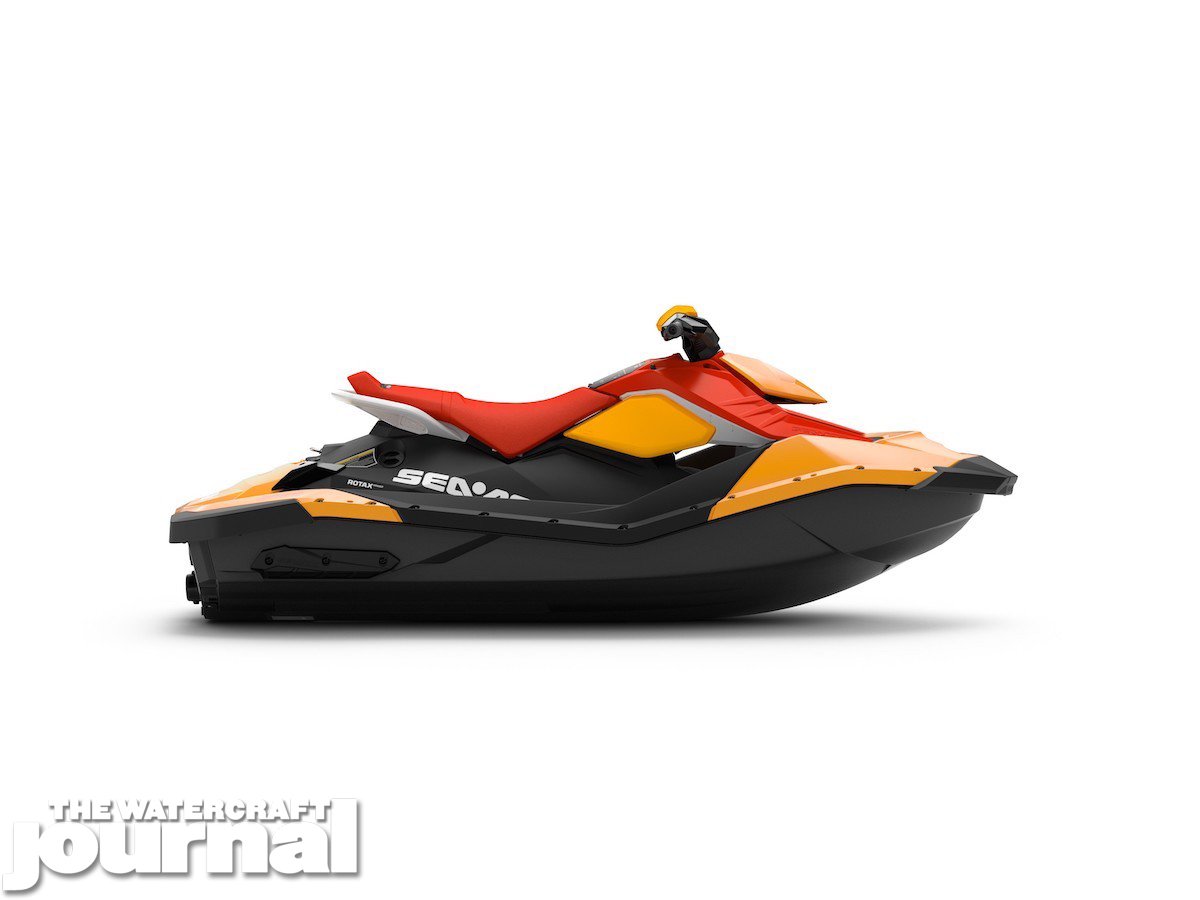
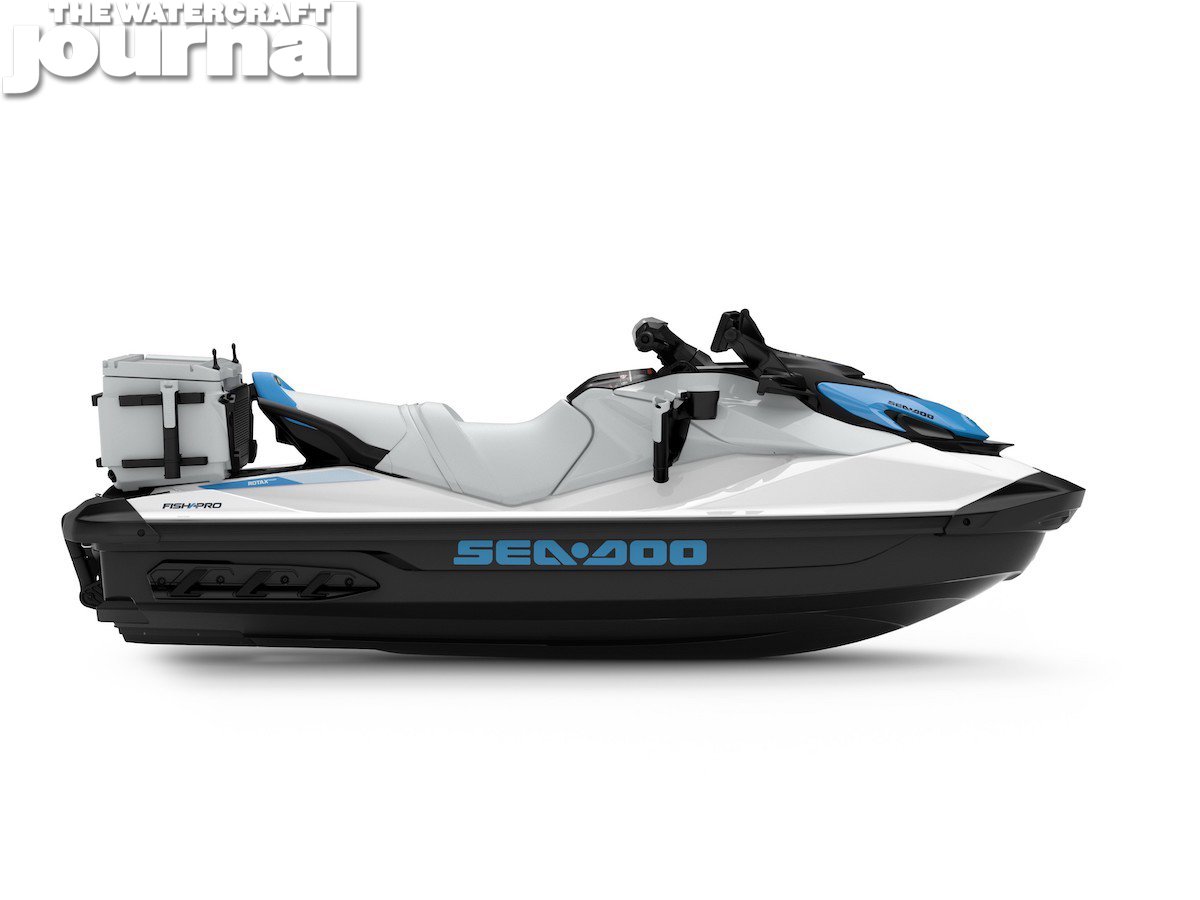
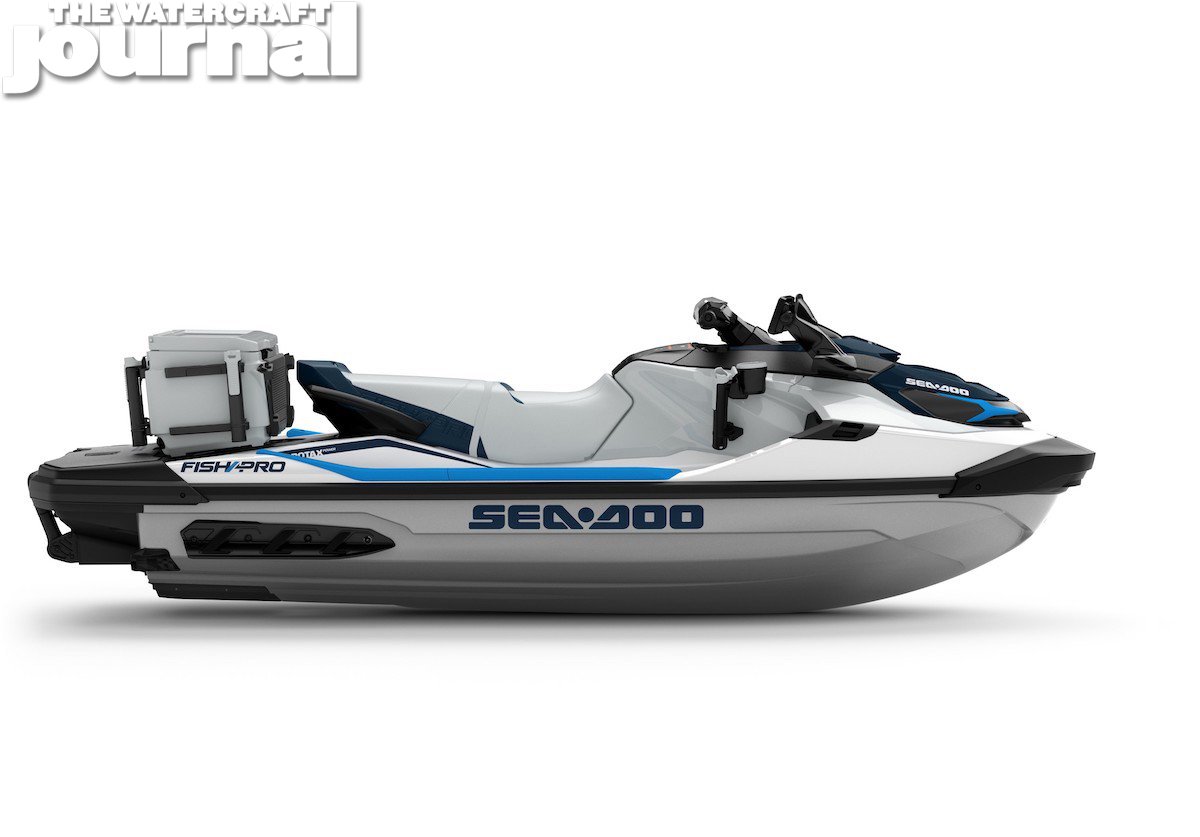
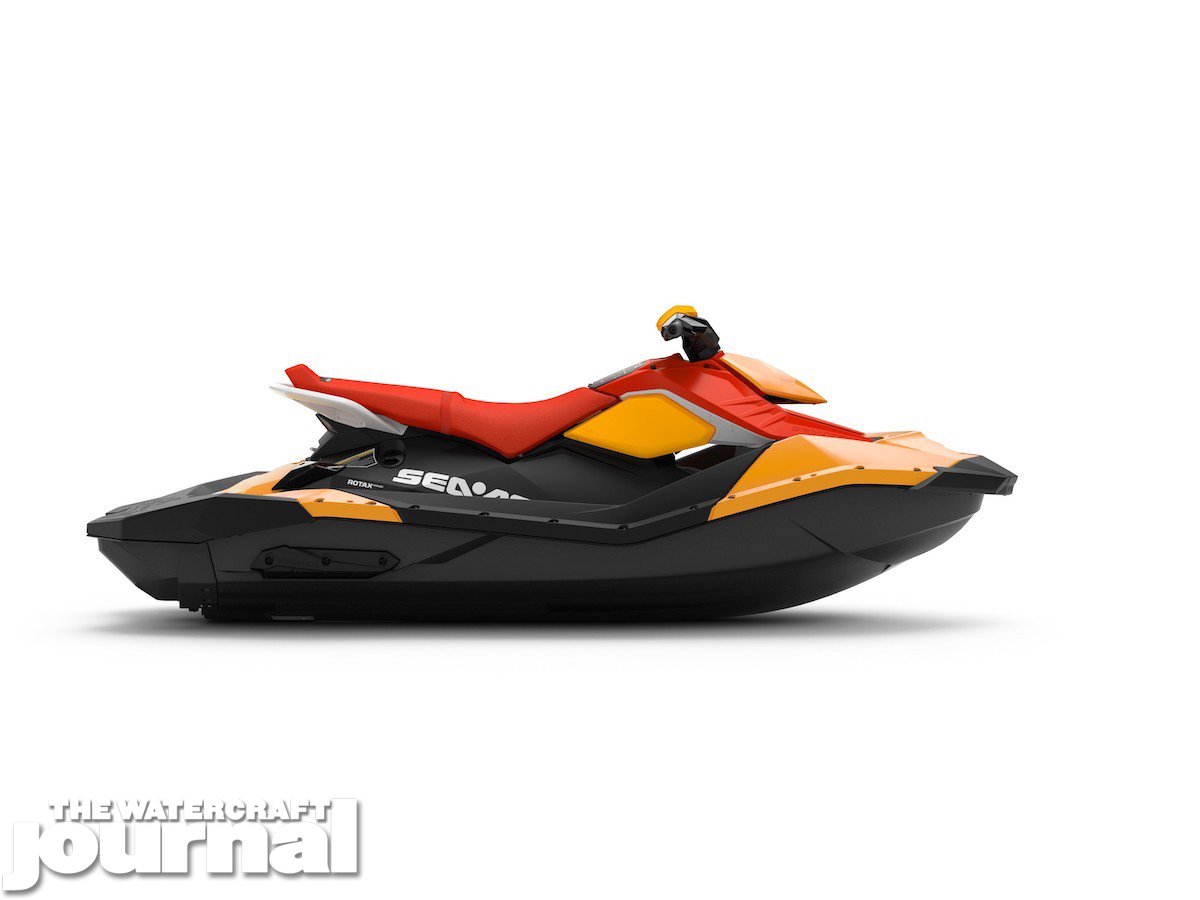
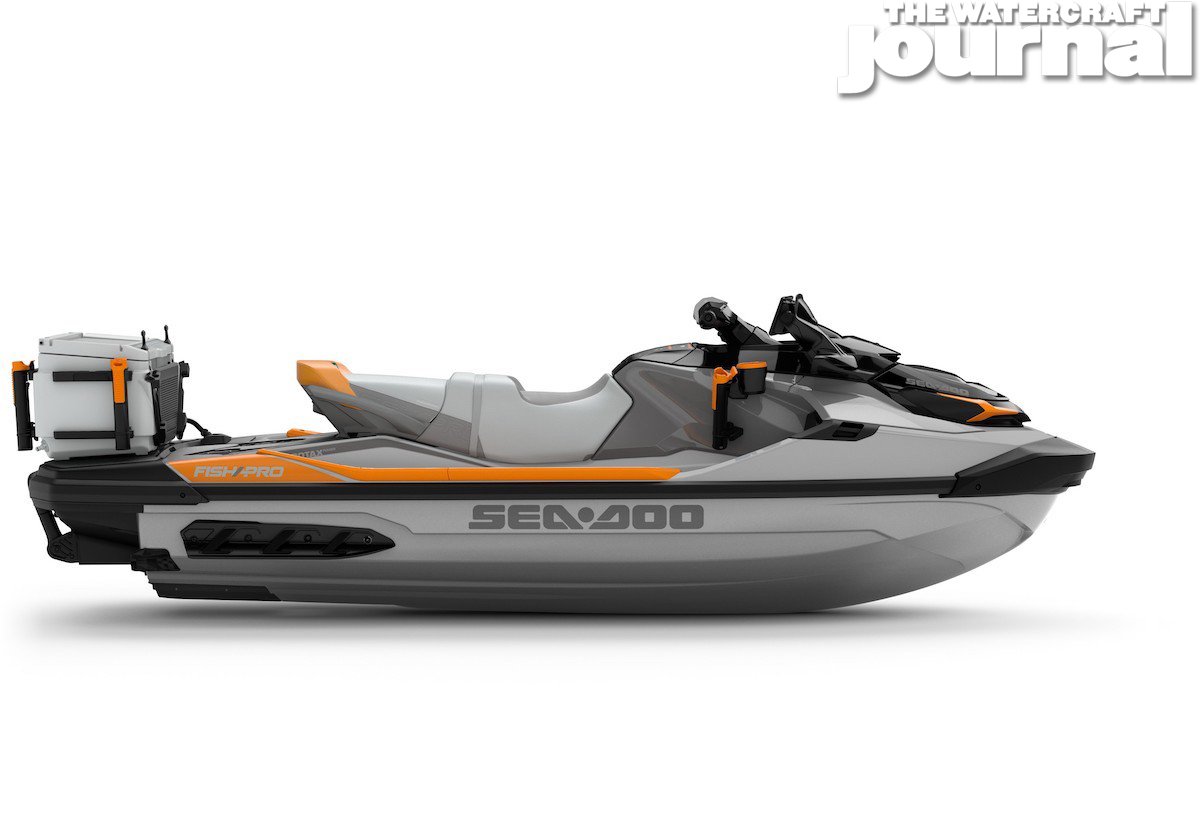
And in a normal world, that would be enough for most folks…but Sea-Doo isn’t like “most folks” and instead chose to create a whole segment from its single Fish Pro. Now there’s three levels of PWC fishing supremacy available to the enthusiast: the 2022 Fish Pro Scout 130 (MSRP $13,899) in White and Gulfstream Blue; the Fish Pro Sport 170 (MSRP $15,899) also in White and Gulfstream Blue; and the top-of-the-line Fish Pro Trophy 170 ($17,799) in Shark Grey and Orange Crush.
Each of these comes standard with the iDF Intelligent Debris Free pump system, a 13.5-gallon cooler, a specially-designed Fishing Bench Seat, a unique “trolling mode” set into the Intelligent Throttle Control software allowing each units to toggle through trolling speeds up to 8mph; and a multifunctional Garmin ECHOMAP GPS & Fish Finder with accurate marine navigation, bright and clear display, mid-CHIRP technology, and more.
While the GTI-based Fish Pro Scout employs a Rotax 1630cc producing 130-horsepower, the larger ST3-based Fish Pro Sport 170 and Trophy 170 also include a few more features, namely angled gunwale footrests; front rod holders and cup holders; and an extended rear platform providing another 11.5 inches of length and a second set of LinQ attachment points. The Trophy 170 comes with all FishPro Sport 170 features, as well as a quick-connect live well and integrated washdown, an all-new Modular Swivel Seat, an anchoring system, a new advanced battery system, and the 7.8-inch full-color LCD display (optional).
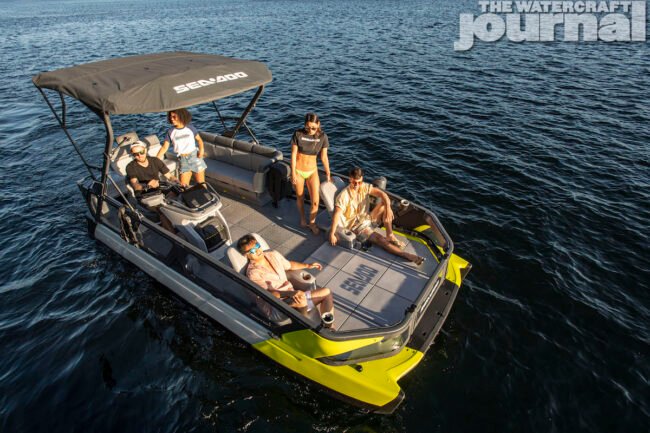
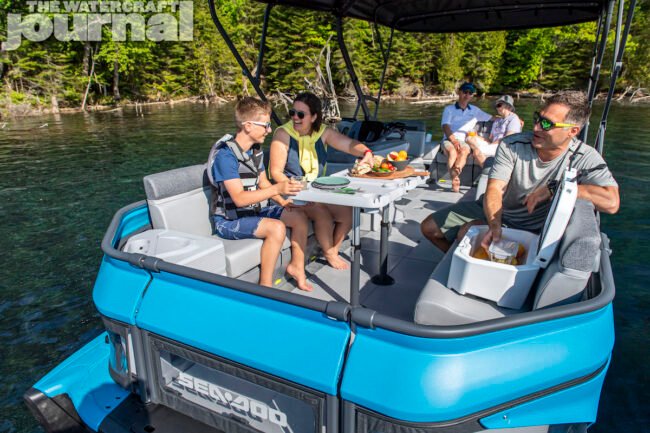
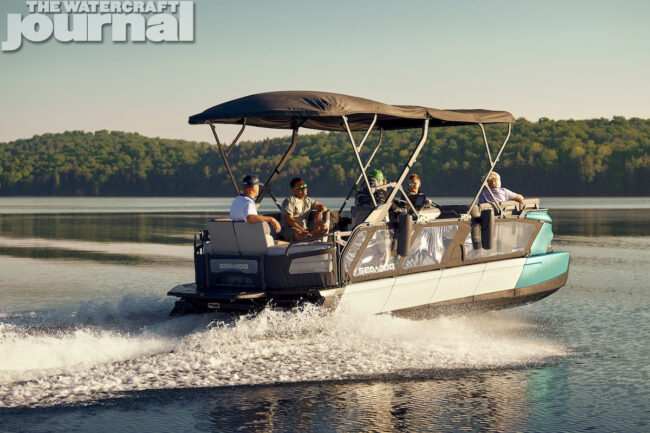
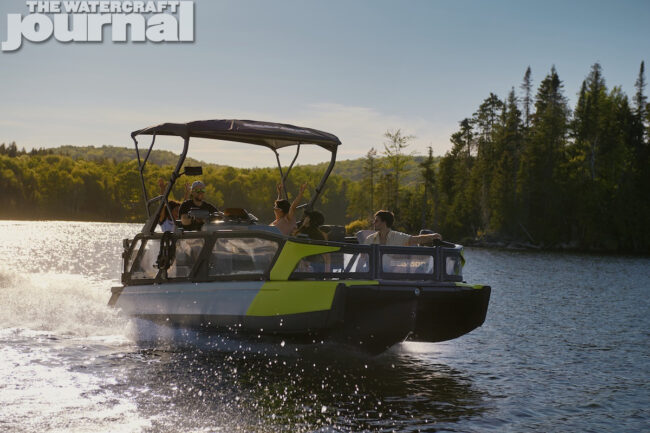
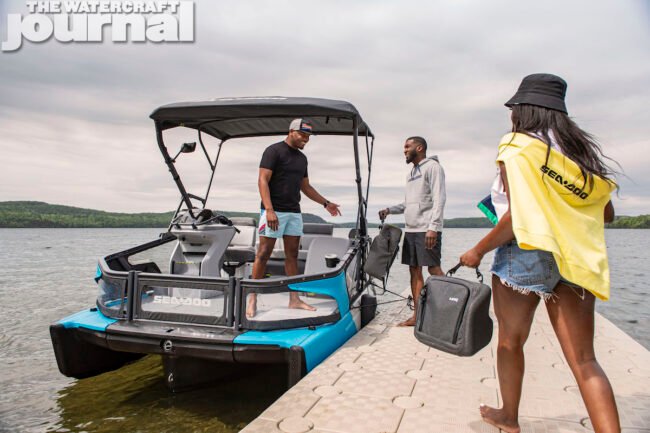
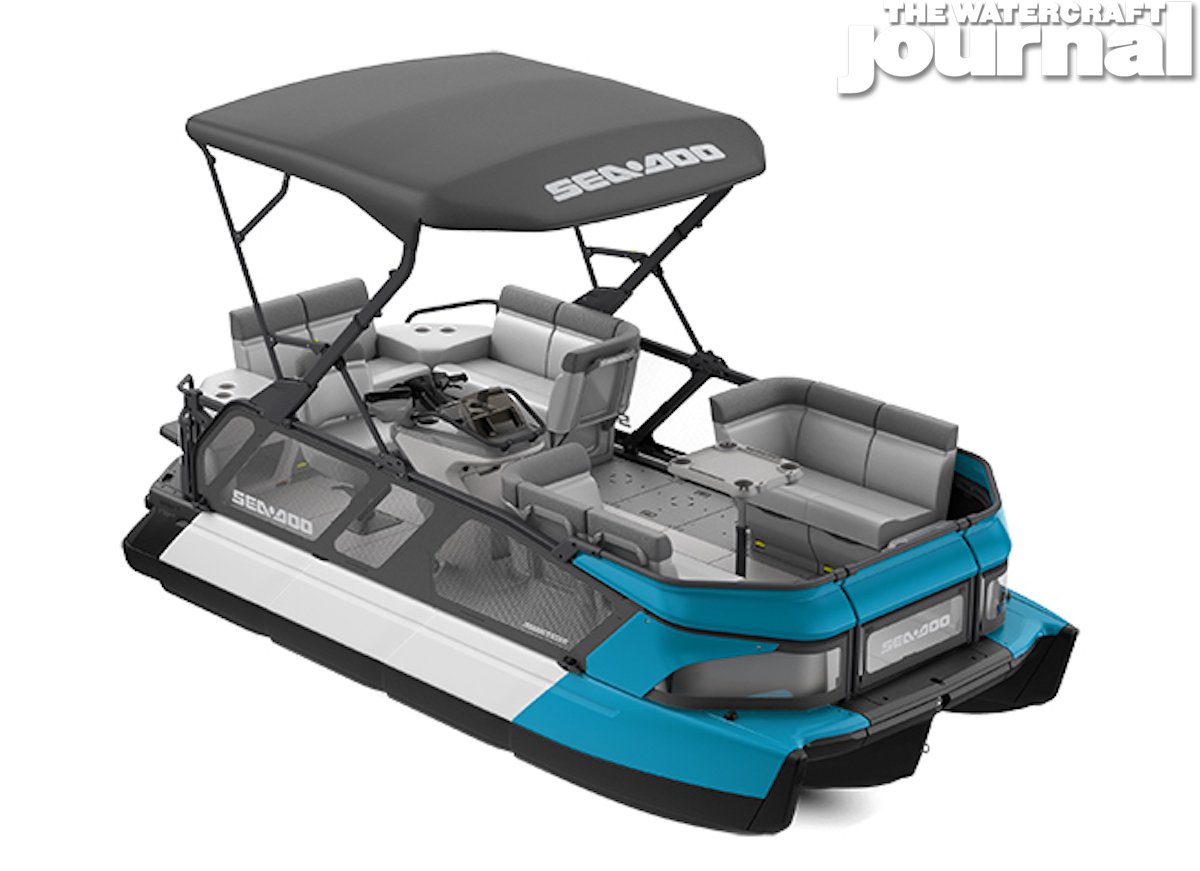
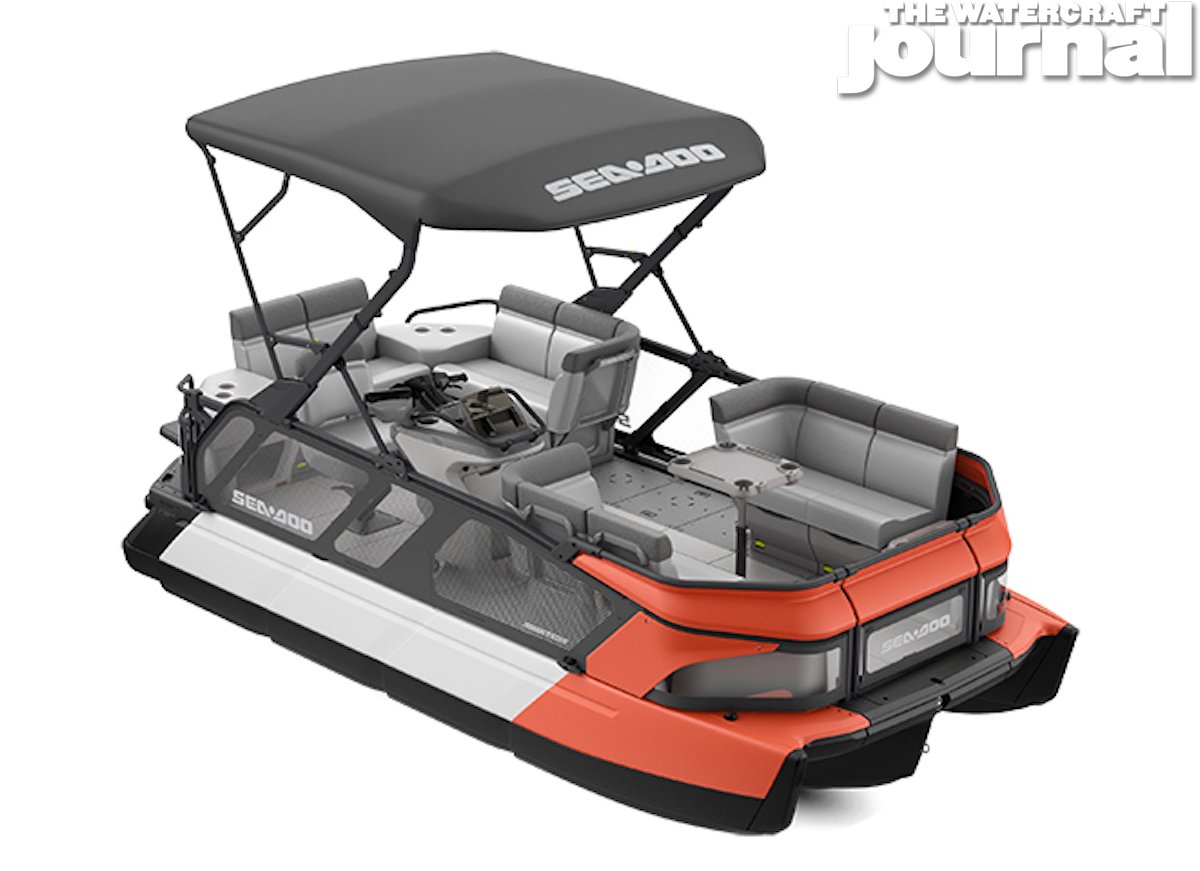
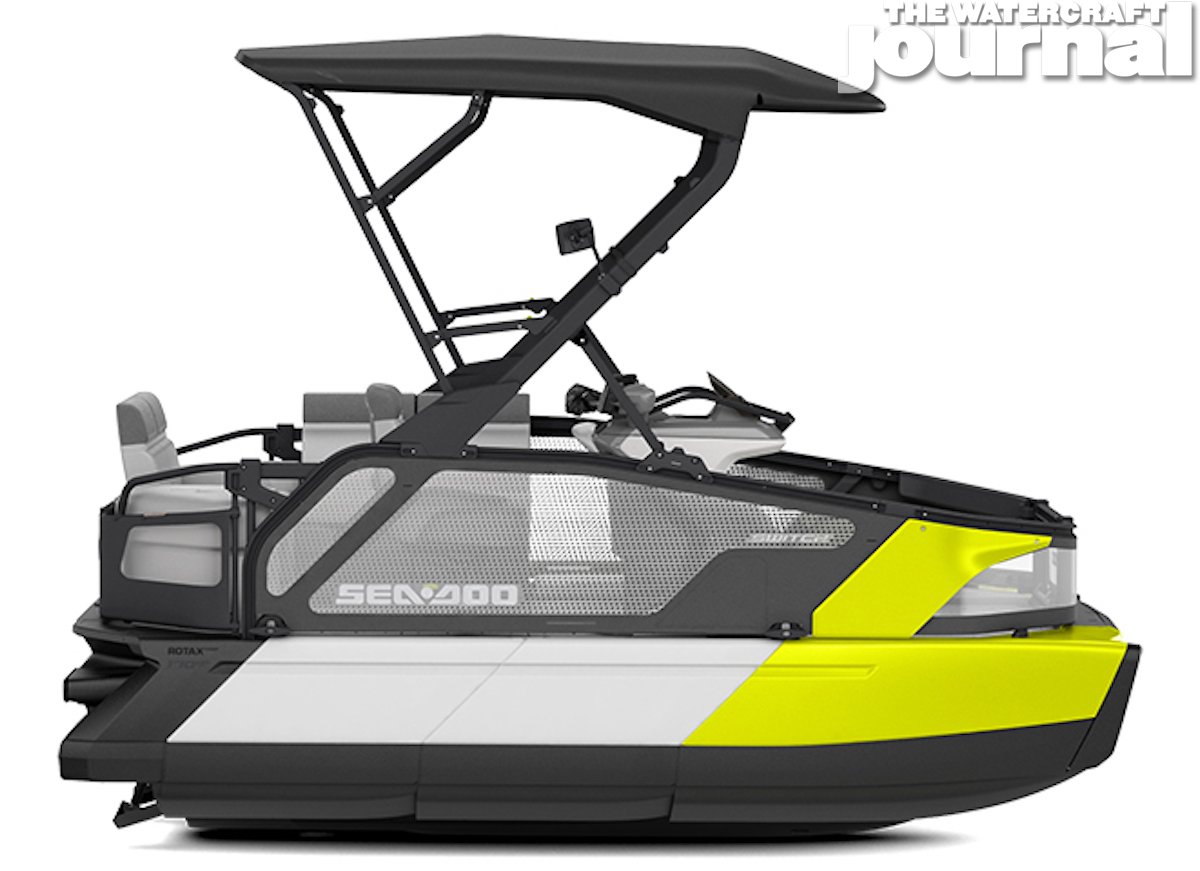
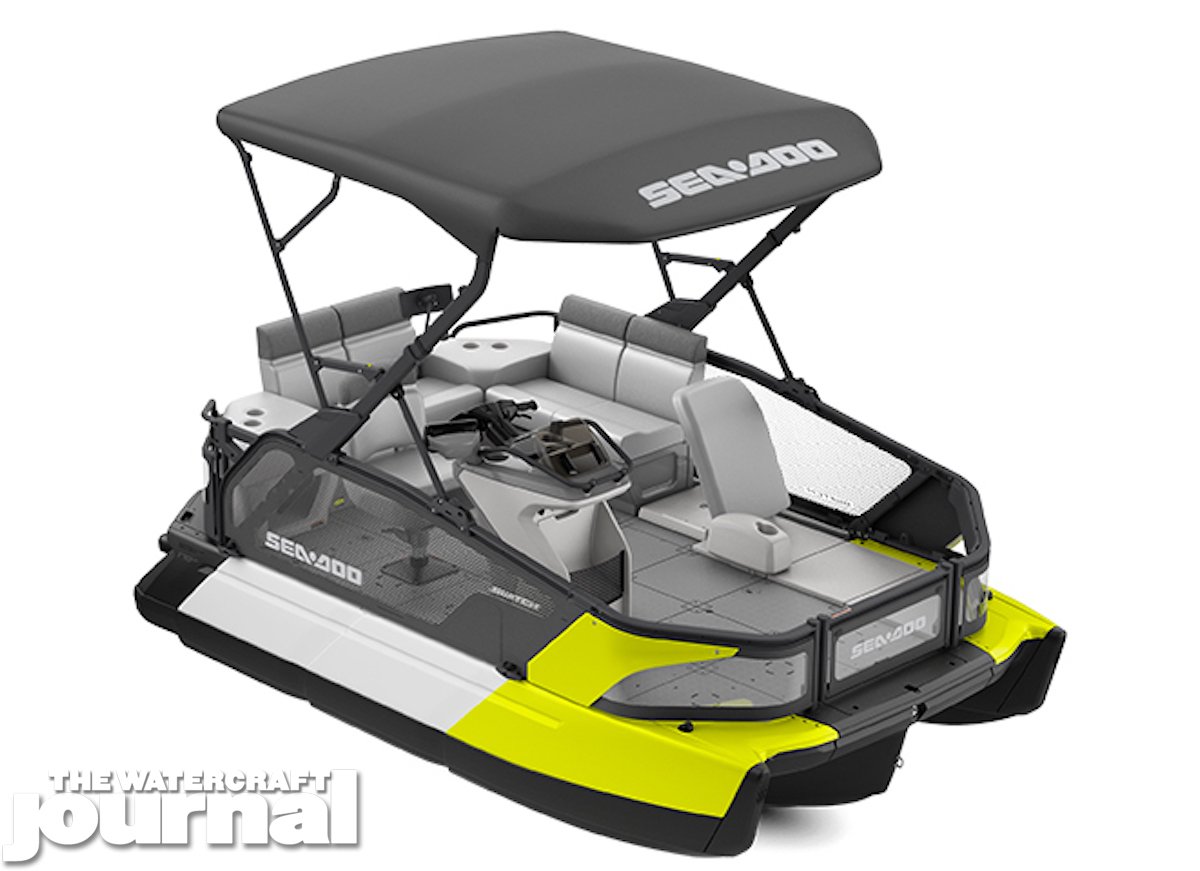
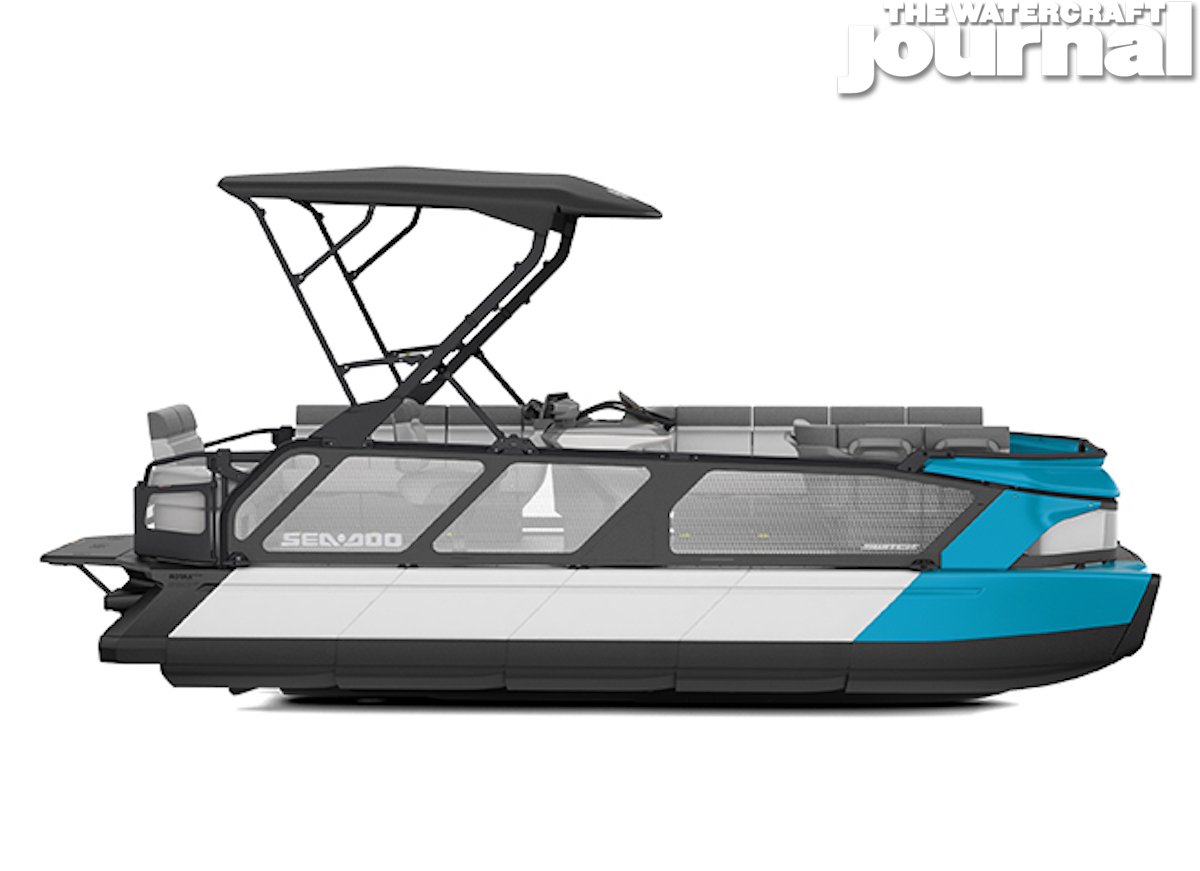
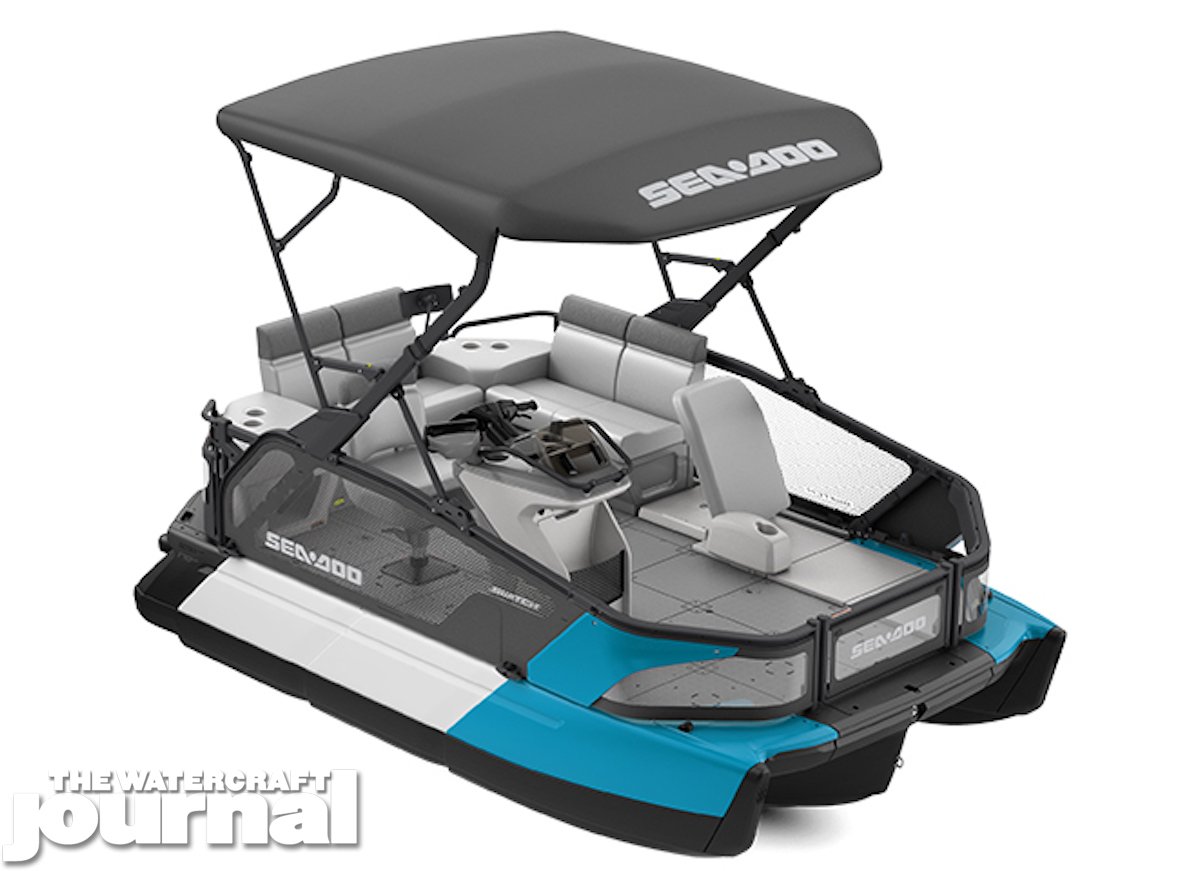
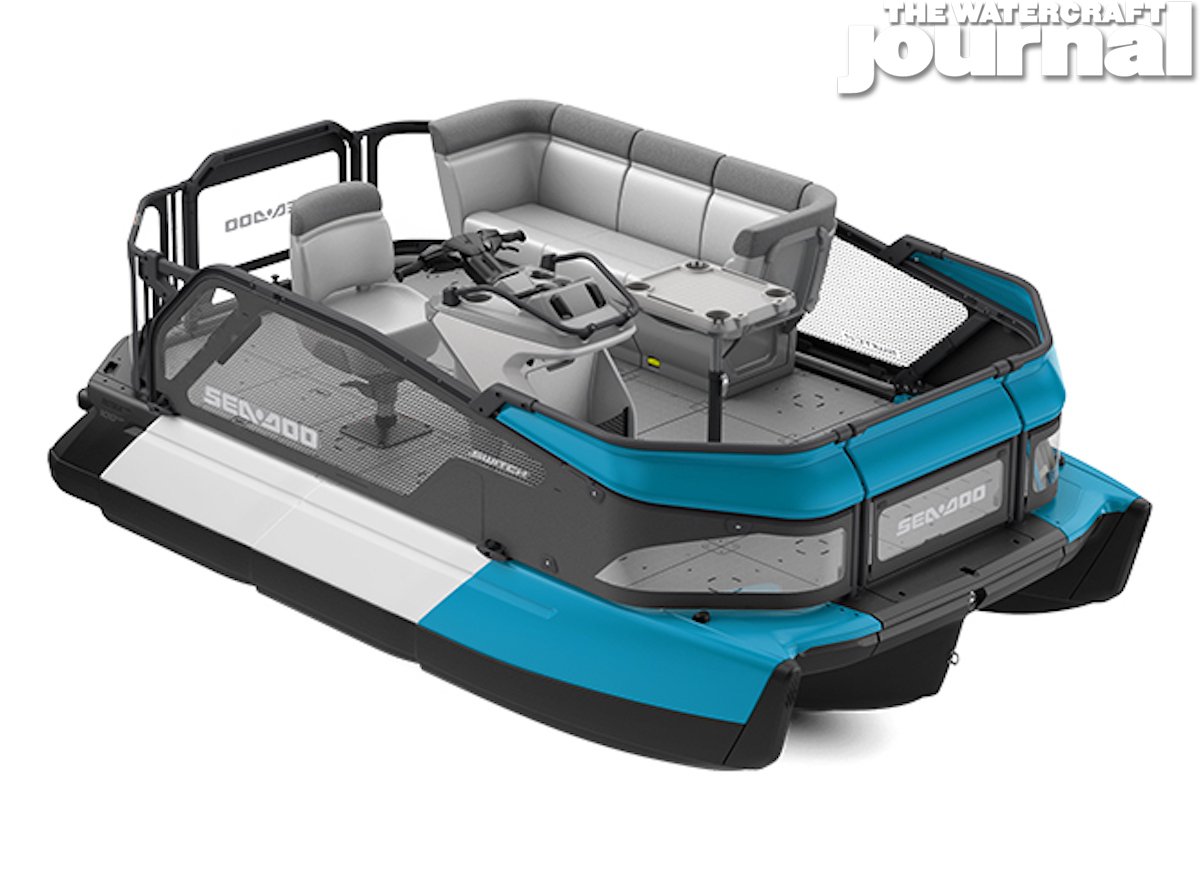
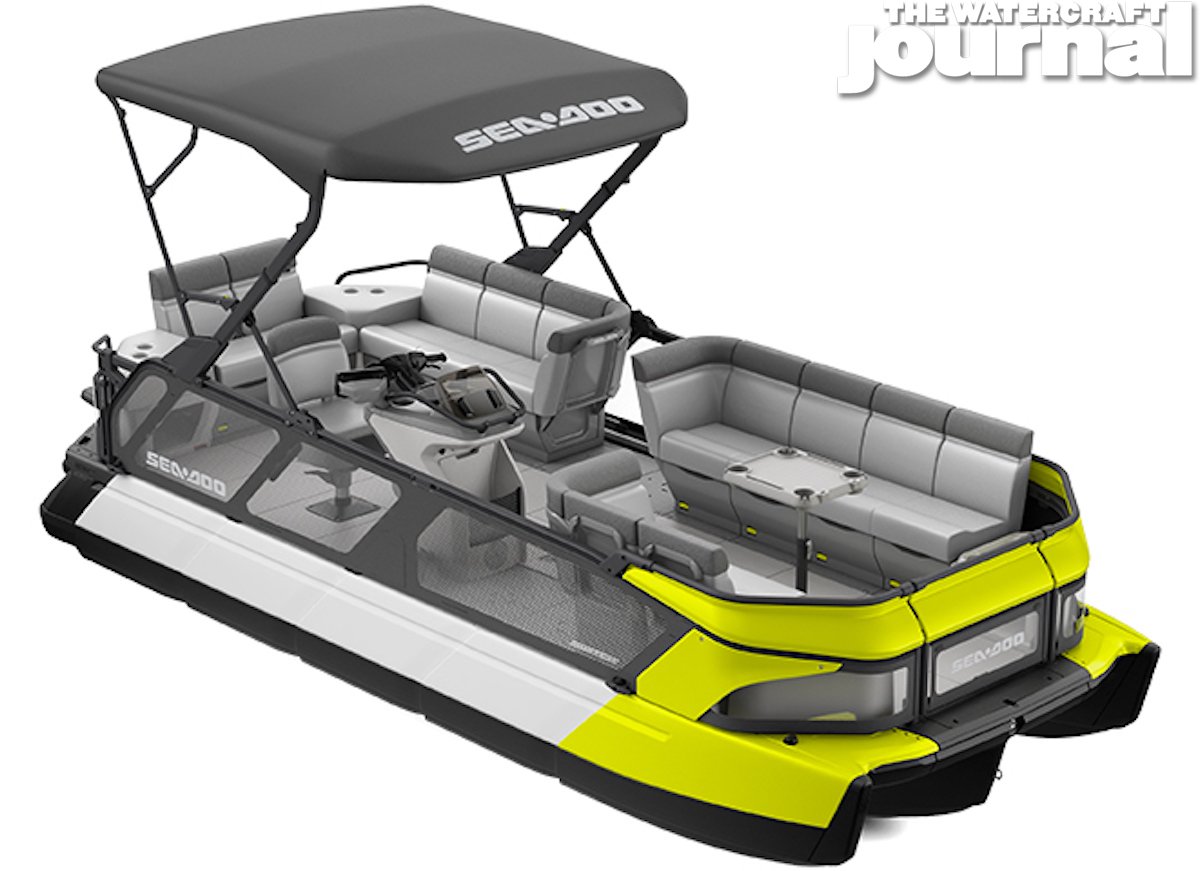
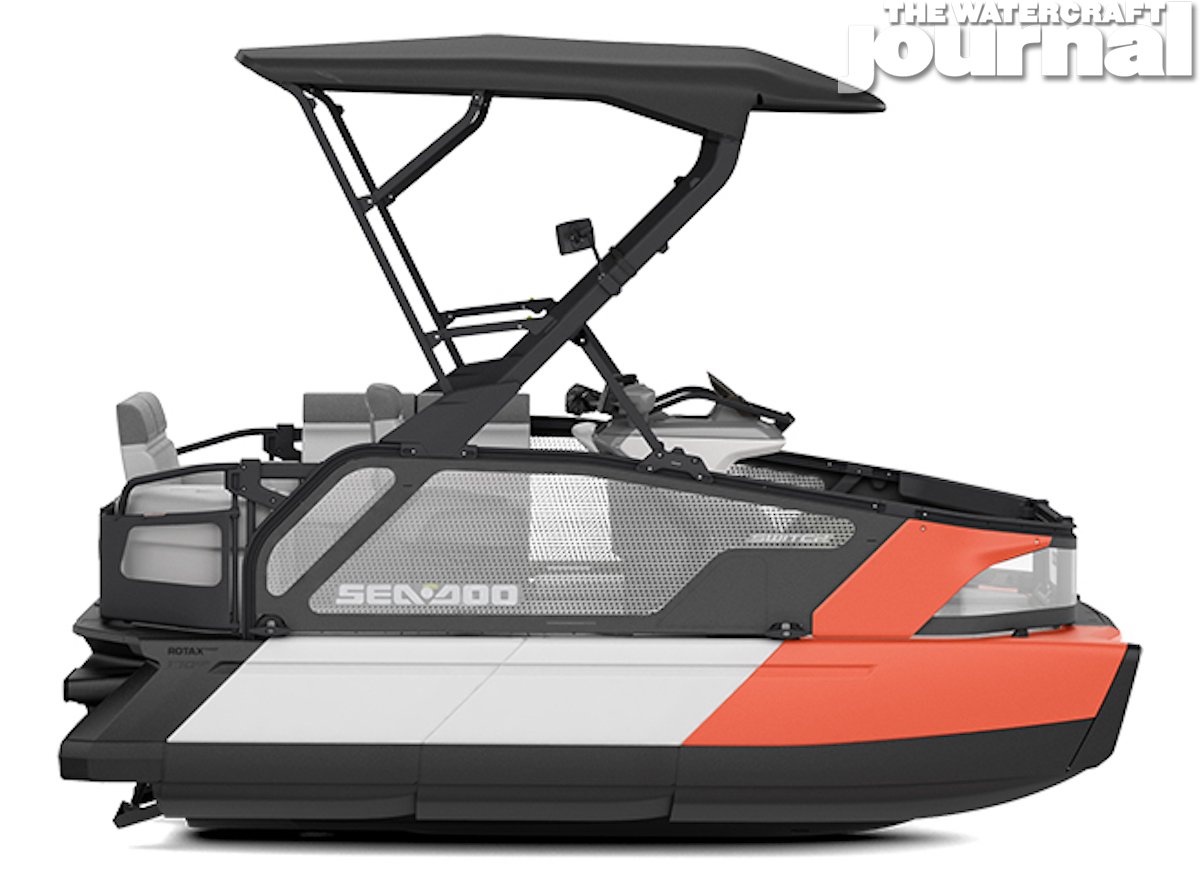
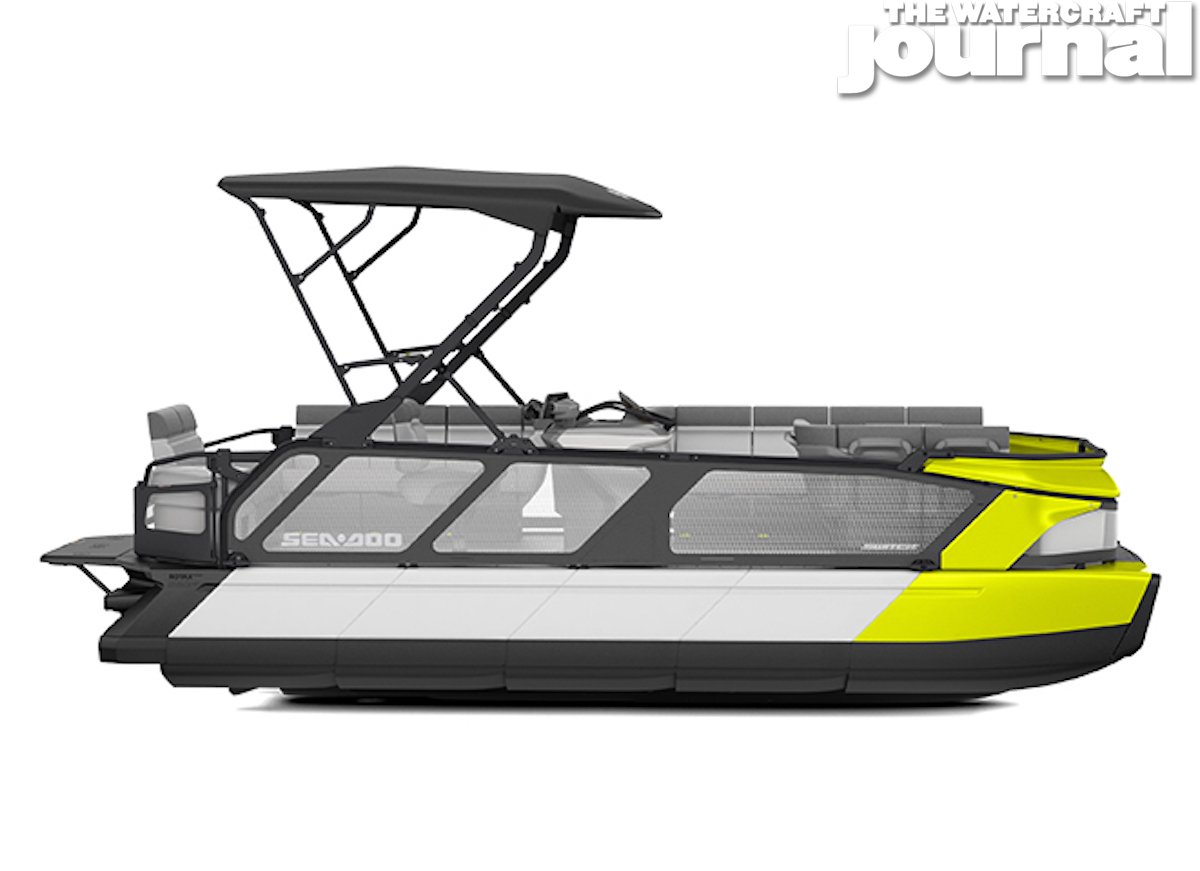
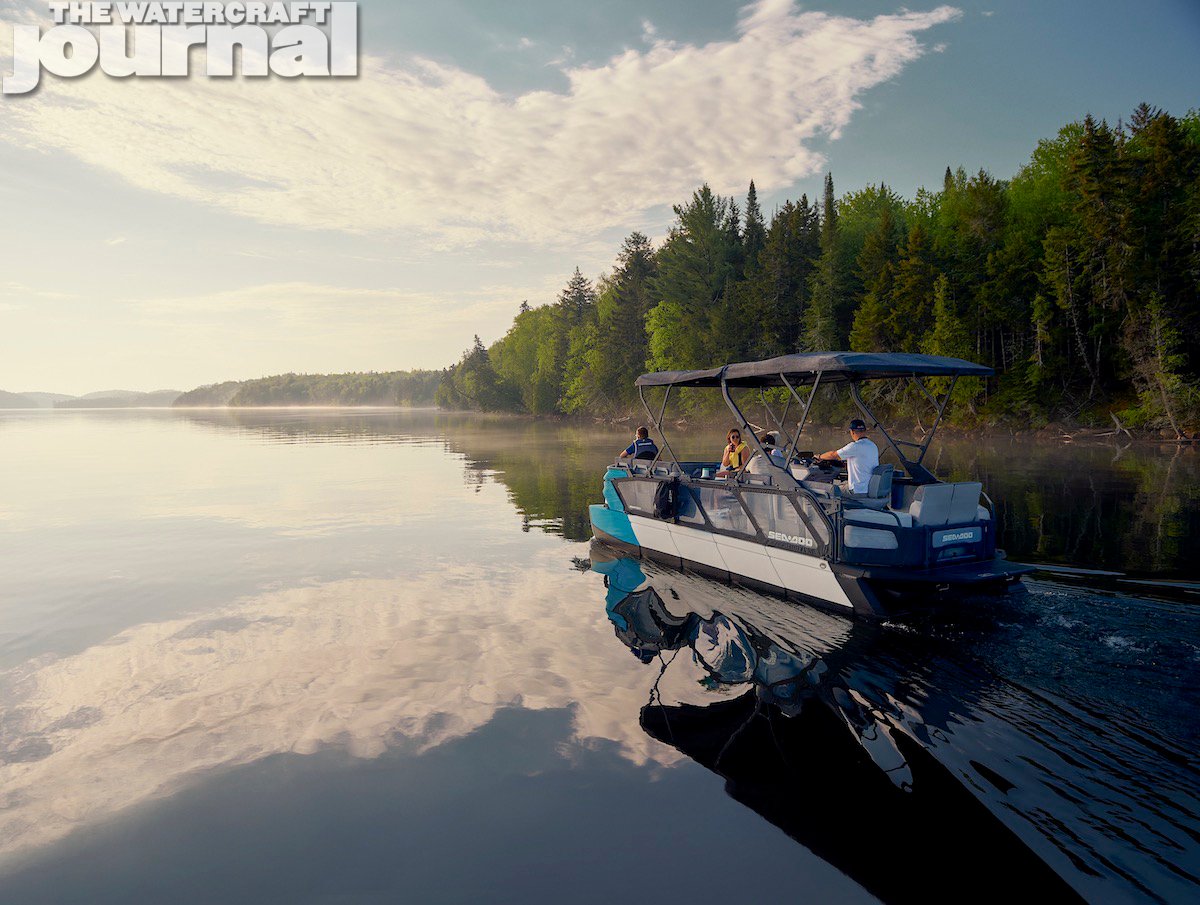
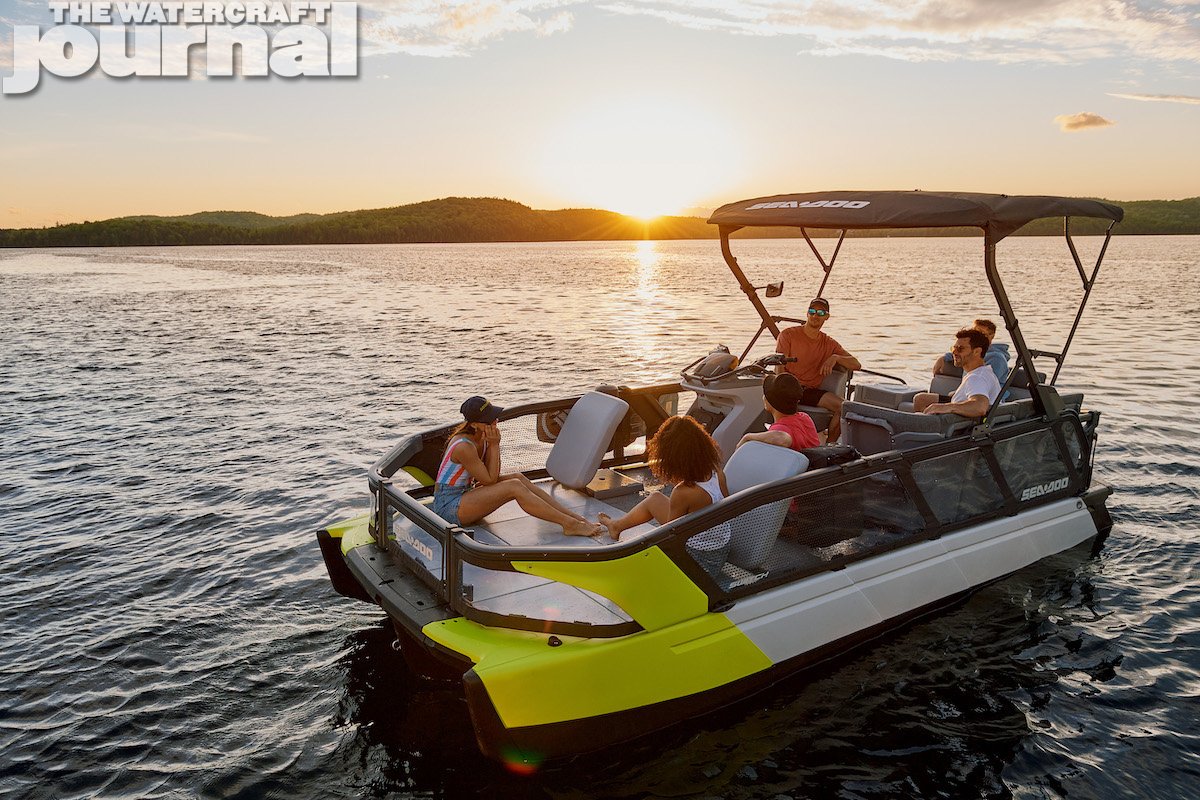
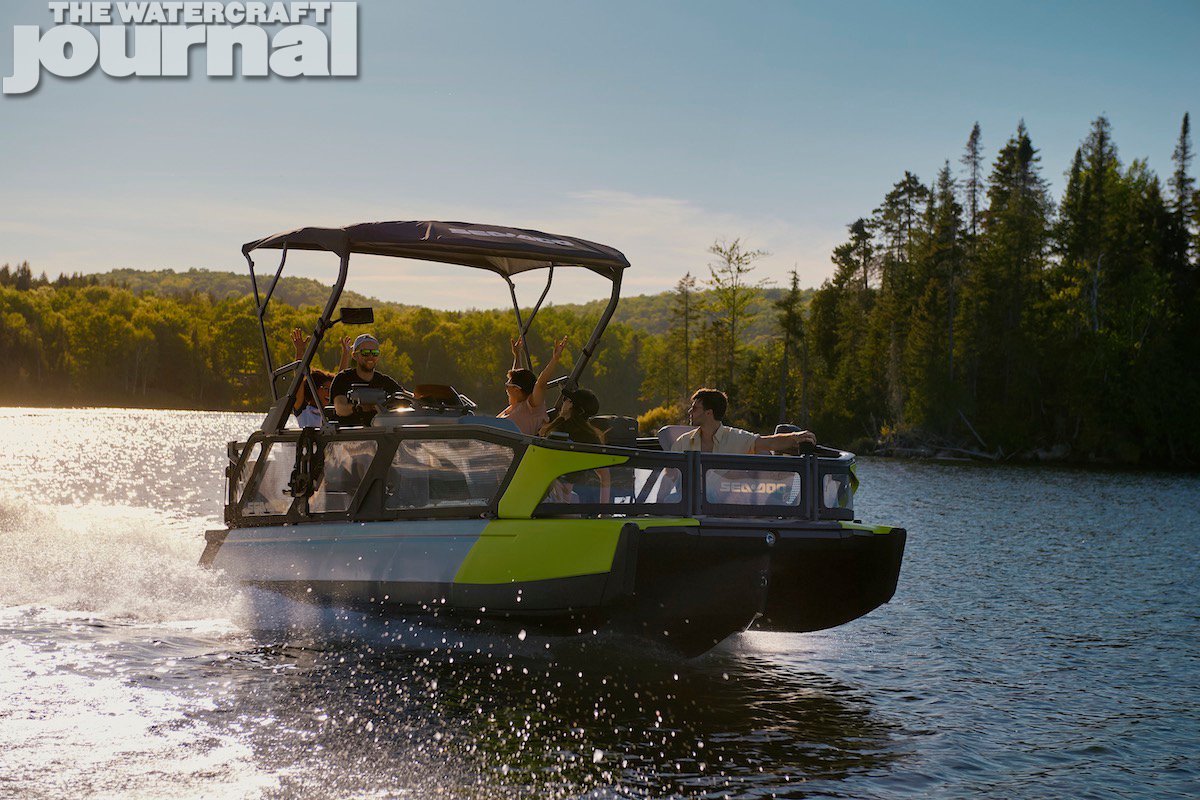
So we’re done right? That wraps it up? Nooope. Sea-Doo just rolled out its whole new segment of Switch Series of Sea-Doo pontoons. These jet-driven tri-hull pontoons offer platforms ranging from 13-footto 16, 18, 19 and 21-feet in length. Made using BRP’s Polytec2 material, the center hull encases the 1630cc ACE engine, producing either 100, 170 or 230-horsepower. At speed these vessel ride on the center keel, the outside pontoons acting like outriggers.
While this is super-cool in its own right, the ultra-adaptable modular deck allows for customized seating and accessory integration. Literally comparing it to Lego bricks, BRP demonstrated how the deck can be fitted with a variety of benches, tables, captains chairs and every LinQ accessory in the catalog – each securing firmly to the deck using the new 16-inch Modular LinQ Tiles. You literally can design and construct your own custom configuration – truly making your Switch pontoon your own.
Three tiers of the Switch are available: the base Switch (MSRP $17,999) comes in at either 13, 16 or 18-feet in length, and produces 100-horsepower. The Switch Sport (MSRP $23,999) comes in at either 13, 18 or 21-feet in length, and can be optioned with either 170 or 230-horsepower, and comes equipped with a quick-attach inflatable holder for tube storage, rearview mirror and Sea-Doo exclusive Ski Mode; available in either Caribbean Blue, Neon Yellow, Coral Blast. Lastly, the Switch Cruise package “takes the party up several notches” with included additions like a collapsible Bimini top, swim platform, sound system, navigation and more seating and tables.
The Cruise (MSRP $26,999) is available in either 18 or 21-feet lengths, as well as a choice of powertrains: 100-horsepower (18-feet), 170-horsepower (18 and 21-feet), and 230-horsepower (21-feet); and is also available in Caribbean Blue, Neon Yellow, Coral Blast. It’s also important to note that every Switch pontoon is equipped with a Sea-Doo-inspired handlebar setup, which includes BRP’s iBRP brake-and-reverse system, iControl and innovative iDF pump-clearing system. Oh yeah, and every Switch comes with its own trailer if you were needing that extra nudge off of the fence.
All of that is to say that Sea-Doo was not planning on resting on its laurels any time soon. Rapidly expanding its Fish Pro line into a series of three machines, integrating advanced infotainment systems (and the GO! phone app) into a wider selection of runabouts and of course, flipping the recreation pontoon boat market on its ear seems to be “all in a day’s work” for Sea-Doo.
Please see the complete photo gallery below. All new product videos are beneath:
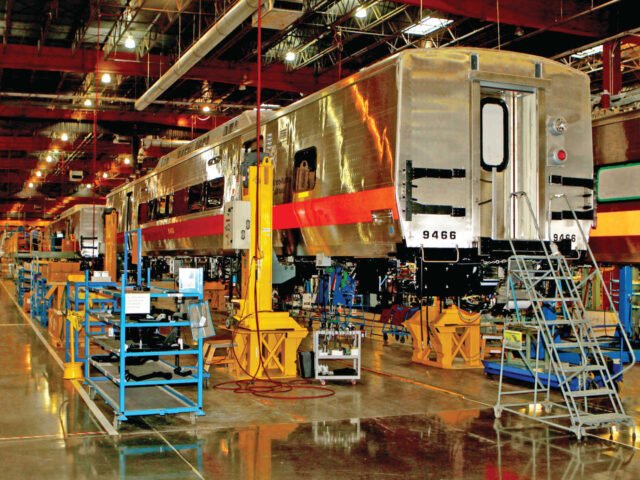
As originally reported by KLIN News Talk, Kawasaki Motors Manufacturing has announced that they will spend an estimated $200 million to expand production for their consumer products division. This capital investment will allow them to expand the assembly, paint, and welding lines along with the general assembly of Kawasaki consumer products.
Due to the current growing market after the effects of COVID-19, and to stay competitive in their market, Kawasaki plans to use this capital to not only automate certain aspects of production, they also plan to add over 550 full-time employees that will support this expansion. Along with the expansion of the consumer products division this expansion will also benefit the “Railcar 211 project.”
For those that are unaware, Kawasaki Motors Manufacturing Corp. USA not only manufactures JetSki’s ATVs, UTV’s, and motorcycles, but also manufactures subway cars for most of the United States’ Eastern cities. Kawasaki also added a sizable aerospace division in 2017 to manufacture cargo doors for Boeing’s 777X.
Currently, the Kawasaki motors manufacturing facility is located in Lincoln, Nebraska and contains approximately 2,400,000 square feet and employs over 2400 employees. With these capital investments expansion for the growing markets is definitely on the horizon.
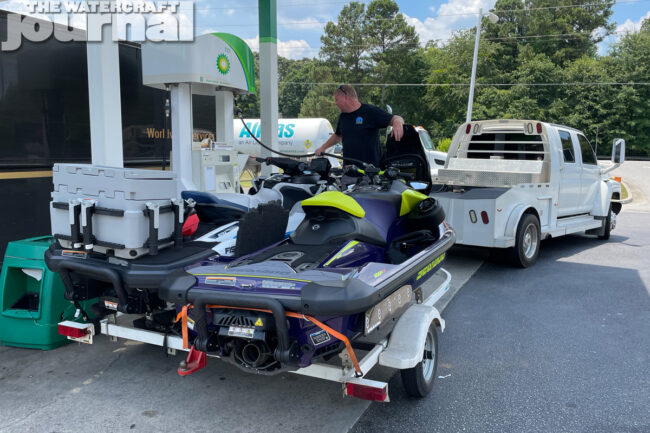
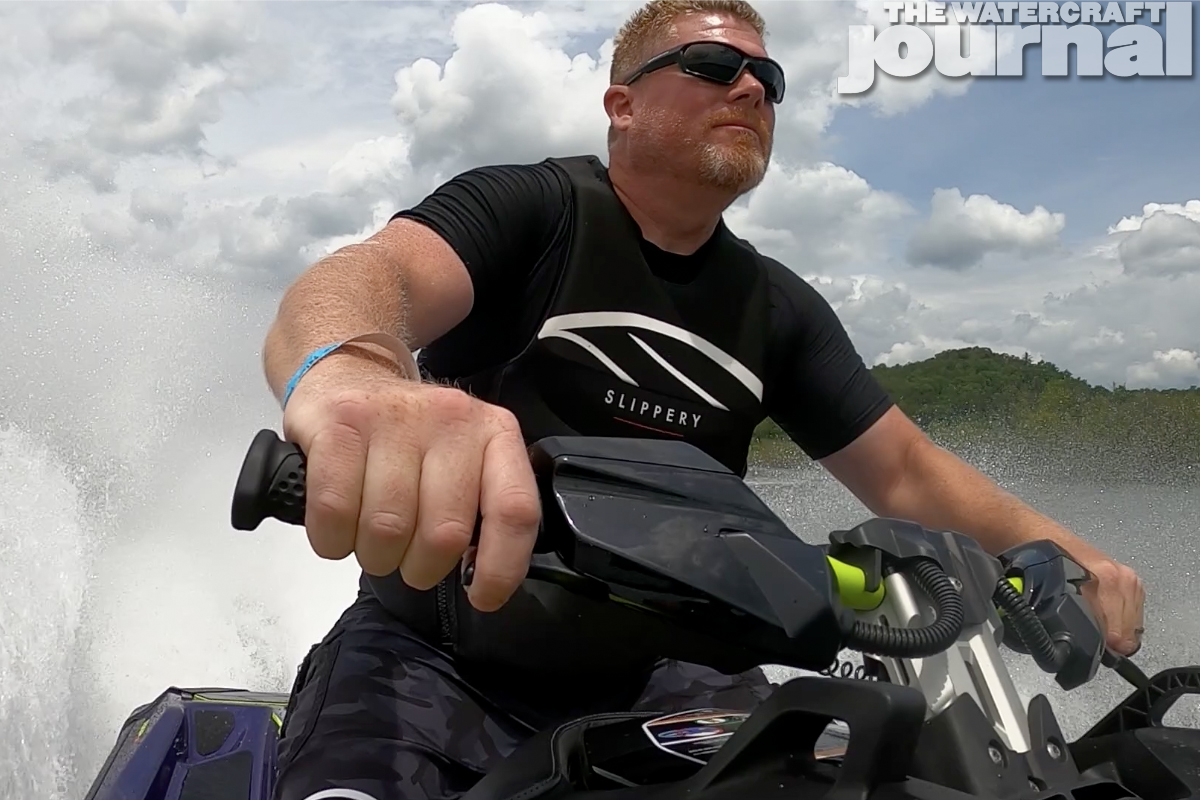
I’m not gonna lie. I was really not feeling like going to the 3rd Annual Belly Buster Ride. I mean, I wanted to go, but man, I was just wiped out. Having just made made the 11-hour drive home from the 2021 Mudbug PWC Rally less than 4-days earlier, I kinda wanted a break.
Thankfully, the “Chattanooga Fish Pro” himself Michael Brandt wouldn’t let me back out. “C’mon man, it’ll be fun,” he promised. I knew he was right but I was dragging my feet. “Drive down to the shop,” he suggested. “We’ll load your ski onto my trailer and I’ll drive the rest of the way. You can sleep. I don’t care.”
Now feeling guilty, Mike had me on the ropes. So I packed up the 2021 Sea-Doo RXP-X 300 again and headed south to Chattanooga, Tennessee. Besides being an avid fisherman aboard his 2021 Sea-Doo Fish Pro, Michael is also a talented metal fabricator and owner of Garage Bound, LLC. Whether it’s basic metal repair, custom welding or fabricating one-off off-road chassis for 1940’s Cadillacs (no, I’m not kidding), Michael pretty much does it all.
With a house butting up to a quiet shady finger of the Tennessee River, Michael started documenting his fishing adventures from his Sea-Doo to Instagram. Soon his “Chattanooga Fish Pro” account was chocked full of shots of bass and catfish, and getting the attention of American PWC fishermen. Although his boxer, Tiggy is perpetually at his side (even on the Fish Pro), he would be sitting out this adventure.
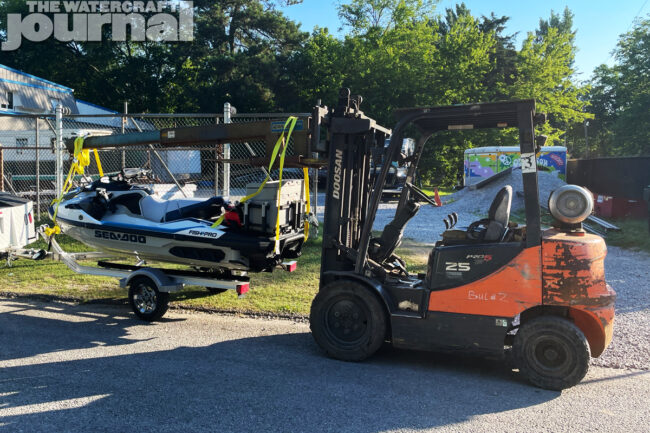
Using his forklift and a custom skid that Michael fabricated, we hoisted The Watercraft Journal’s 2021 Sea-Doo RXP-X 300 onto his trailer, fueled up his massive rig and began the roll into Georgia towards Lavonia.
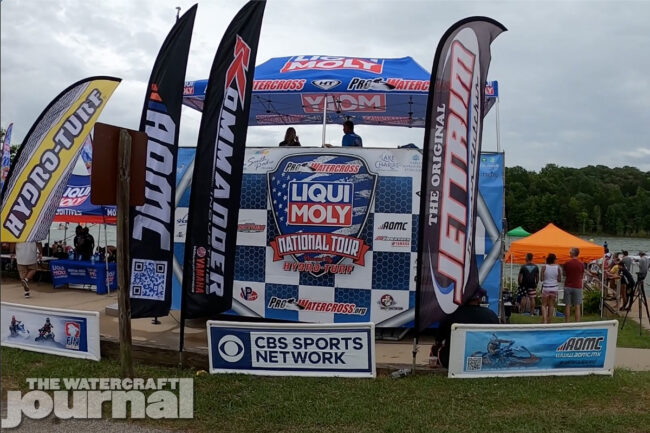
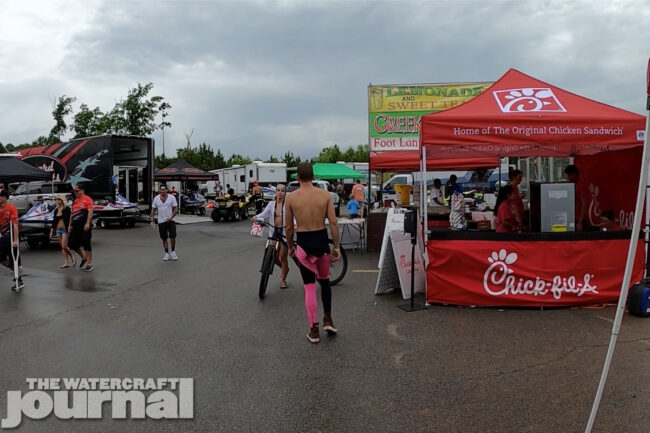
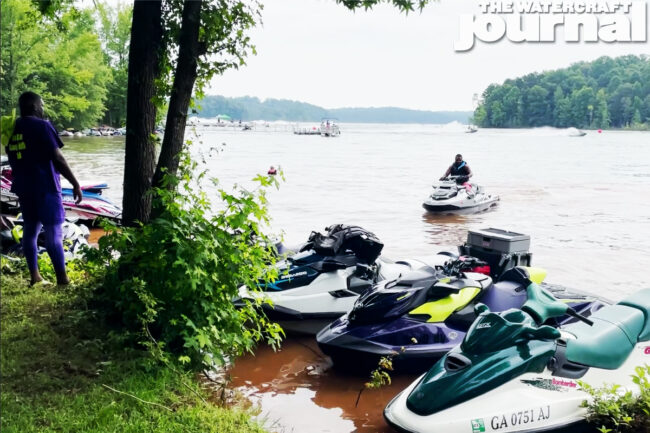
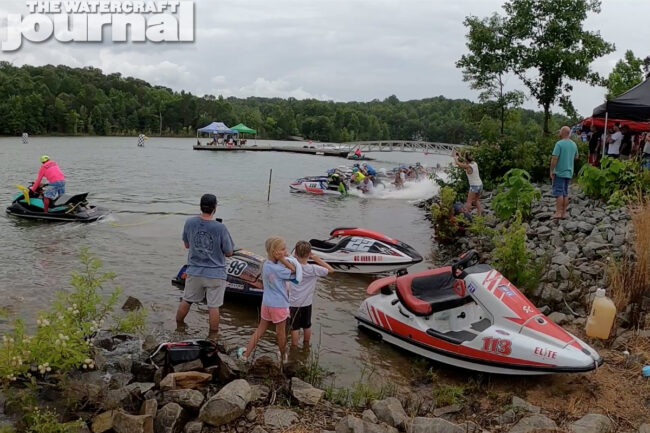
Put on by the Carolina Watercraft Club (with a lot of participation with Pro Watercross), the Belly Buster Ride is an annual charitable event that draws in recreation riders from several states around to enjoy the beauty of Lake Hartwell as well as take in some exciting PWC racing action.
Sharing the weekend with the official Lake Hartwell stop of the Pro Watercross National Tour; the Belly Buster Ride temps enthusiasts with a gorgeous location, an awesome half-day ride, and an incredible 600-pounds of BBQ pork ribs severed for dinner.
If that wasn’t enough to lure you, the Belly Buster crew hosts a huge raffle giving away thousands of dollars in prizes including a one-of-a-kind custom built Sea-Doo XP. Of course, all of this is to fuel an amazing charitable effort that during this weekend, raised over $5,400 for the Frank Trottier Foundation.
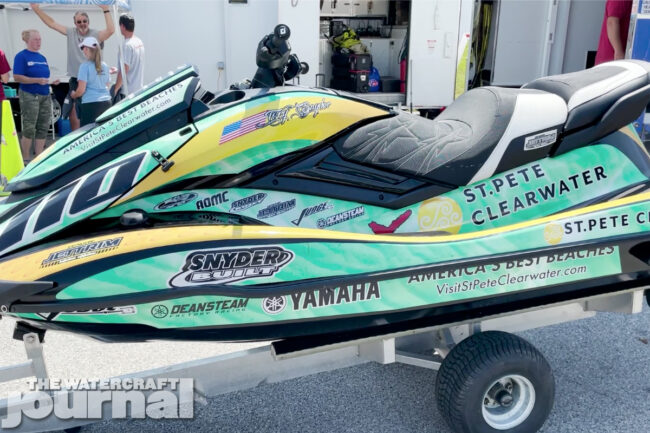
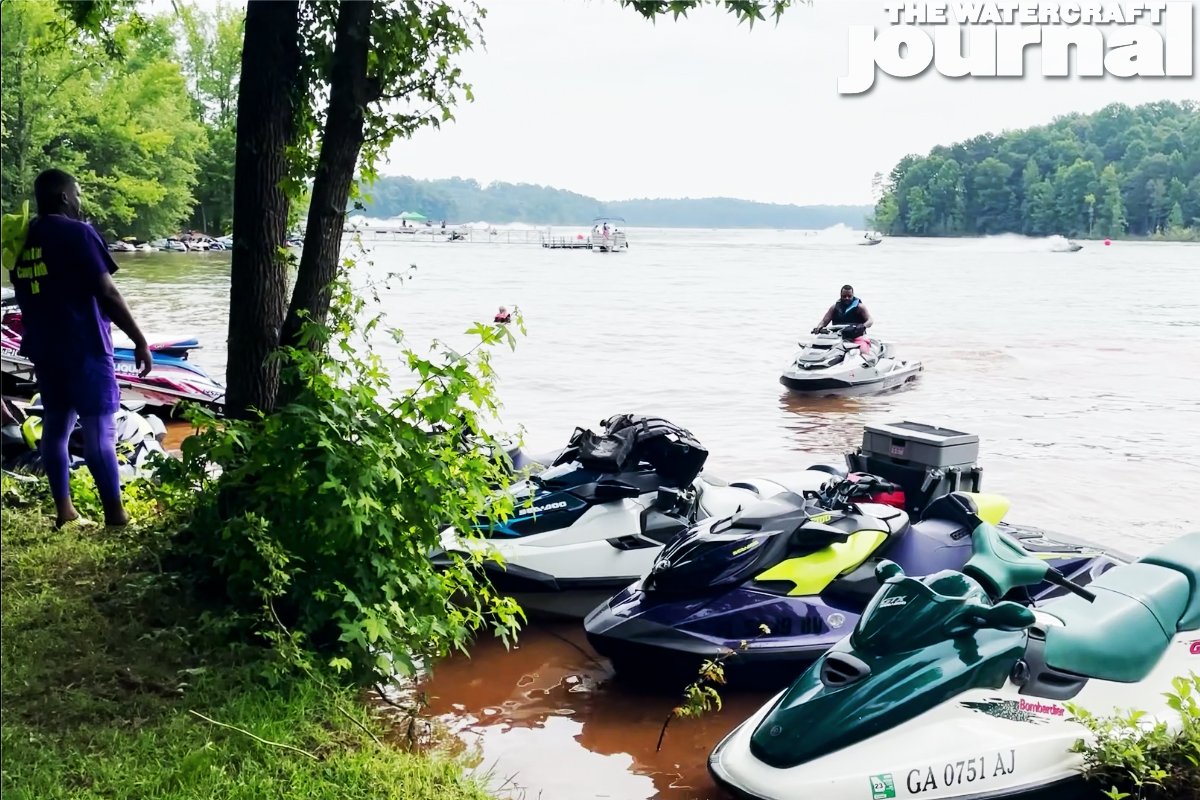
Arriving at the Tugaloo State Park, we pulled into the race venue to check in. The pits were packed with massive race trailers, rigs and team tents; Farthing Racing, Snyder Built, and Broward Motorsports just to name a few.
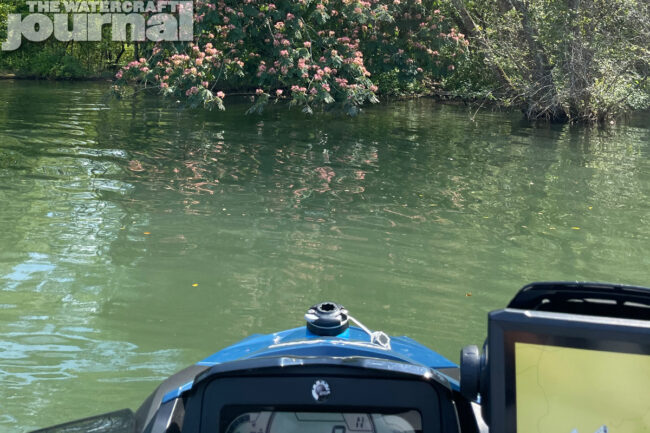
Michael, anxious to get a little water under his hull, insisted we circle back around to the access ramp and launch our skis. Only slightly familiar with Lake Hartwell, I agreed that we should probably burn a little fuel just to get our bearings and opted for a northwestern route up the winding lake.
Lake Hartwell sits right on the dividing line between Georgia and South Carolina; in fact, this stop on the Pro Watercross Tour is likely the only race to have spectators watching in-person from two states simultaneously.
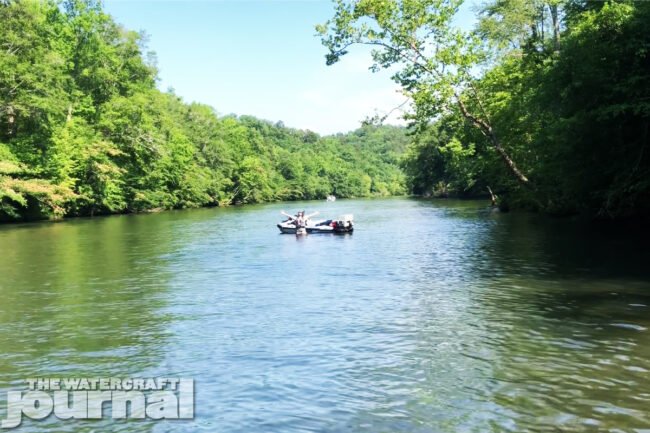
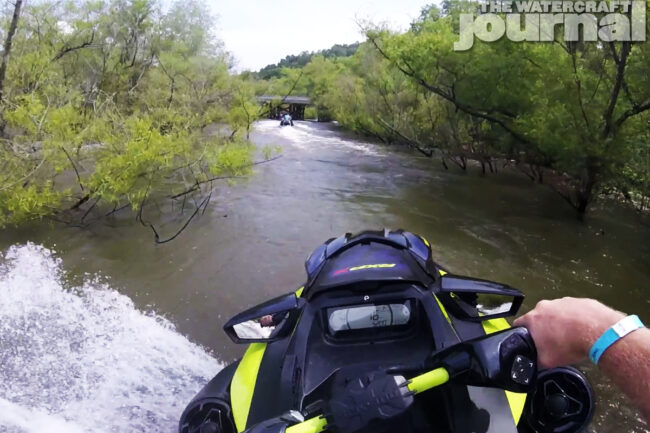
Our route took us from Gumlog, where the race course was set, above where the Tugaloo and Seneca Rivers meet, up towards the Traveler’s Rest historical stagecoach inn and plantation home built back in 1815 hidden in the nape of the Appalachians. The surrounding hills encroached as the lake narrowed to a river. We passed by thin islands sprouting walls of high grass until we reached Tugaloo Bend less than a mile below Yonah Dam.
The Tugaloo had thinned into a wide stream, and we could see trout swim in the crystal clear water below us. The current was strong and pushed us south as the creek bubbled over large rocks above. “We’ve reached the end of the line, Michael,” I yelled and he agreed. Massive oaks and leafy holly trees lined the river, blanketing us in cool shade as we journey back the route we came.
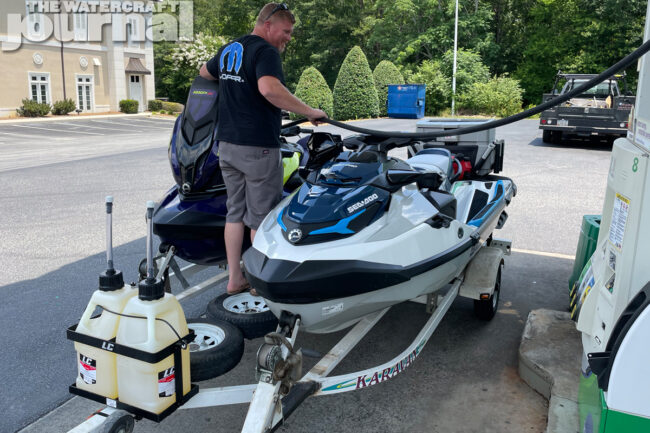
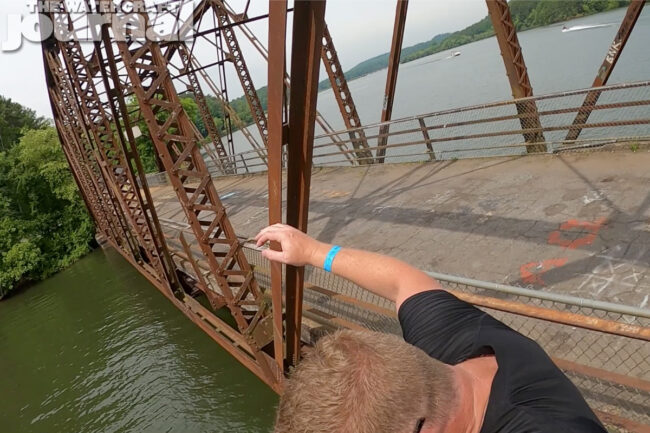
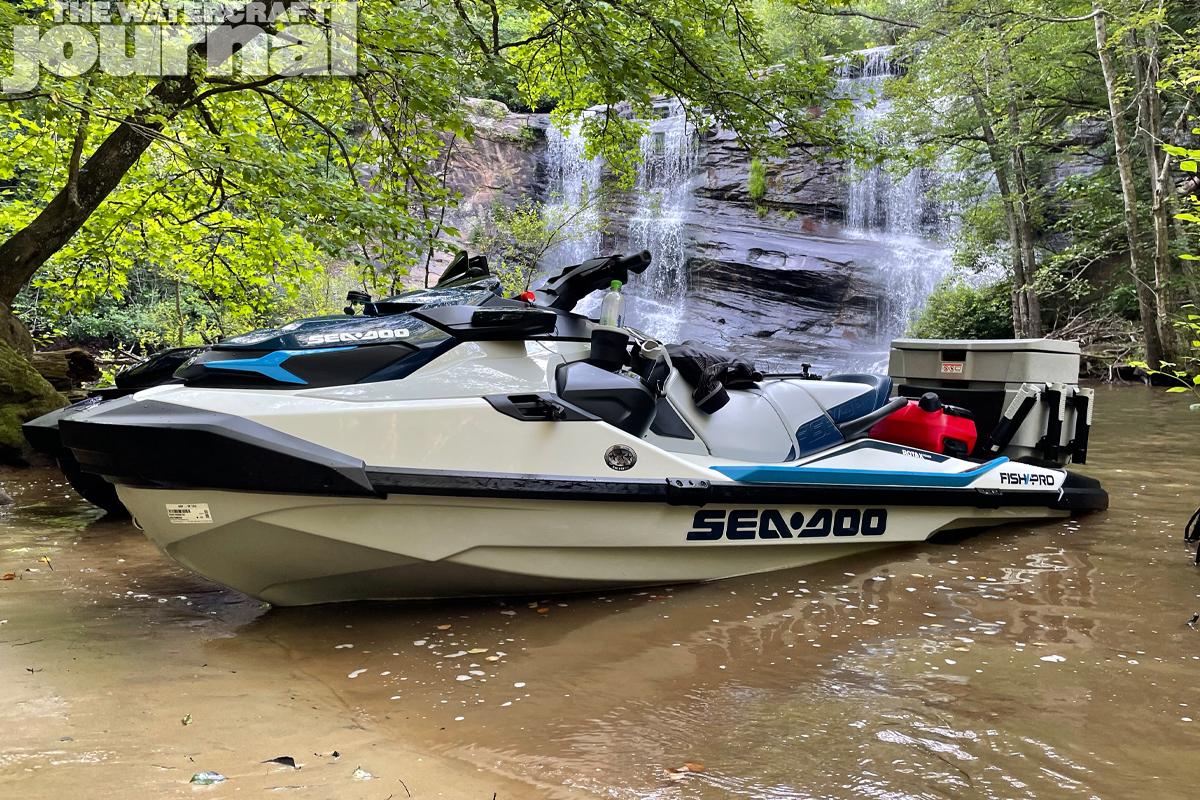
I stopped at the crumbling pylons of a long dismantled trestle running alongside Prather Bridge, once connecting Stephens County, GA and Oconee County, SC. It was mid-afternoon when we spotted the brightly colored buoys of the Pro Watercross racetrack. Michael’s naturally aspirated 170-horsepower Fish Pro was far more miserly on fuel than my supercharged RXP-X, so we opted to splash a few gallons of fuel into the purple Sea-Doo’s tank.
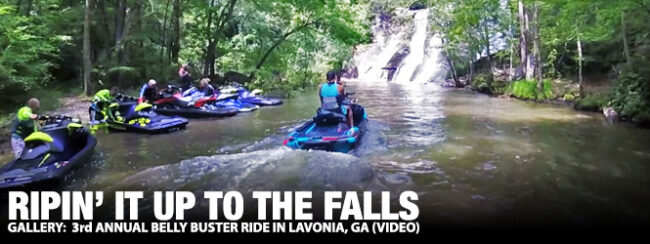
We eyed some other watercraft milling about and asked what was going on. “We’re thinking about making a quick fun run up to the waterfall, you guys wanna join?” one of the Carolina Watercraft Club members invited. “Sure,” I accepted knowing Michael would be more than happy to go out again.
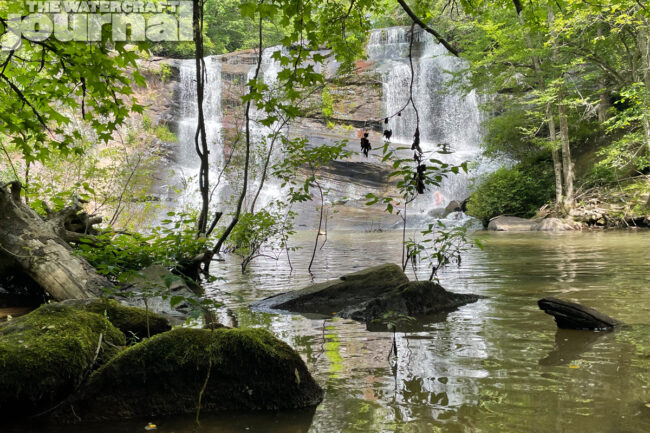
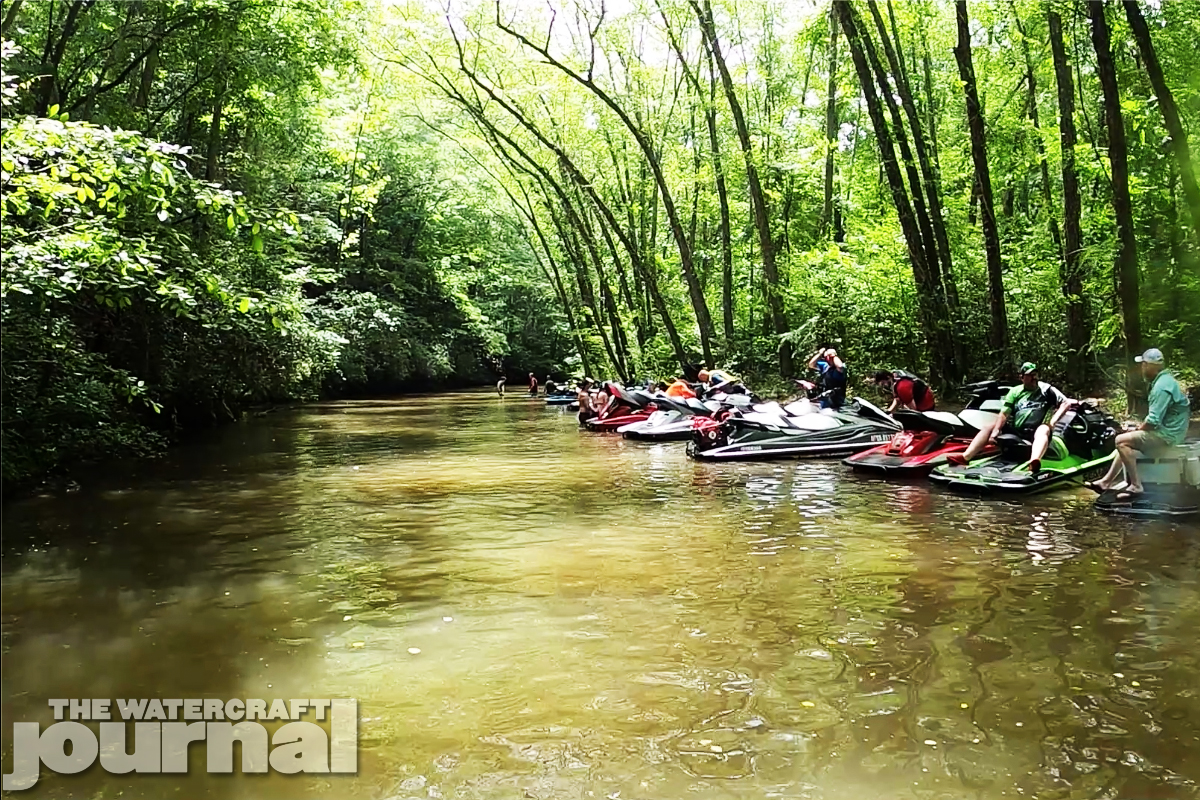
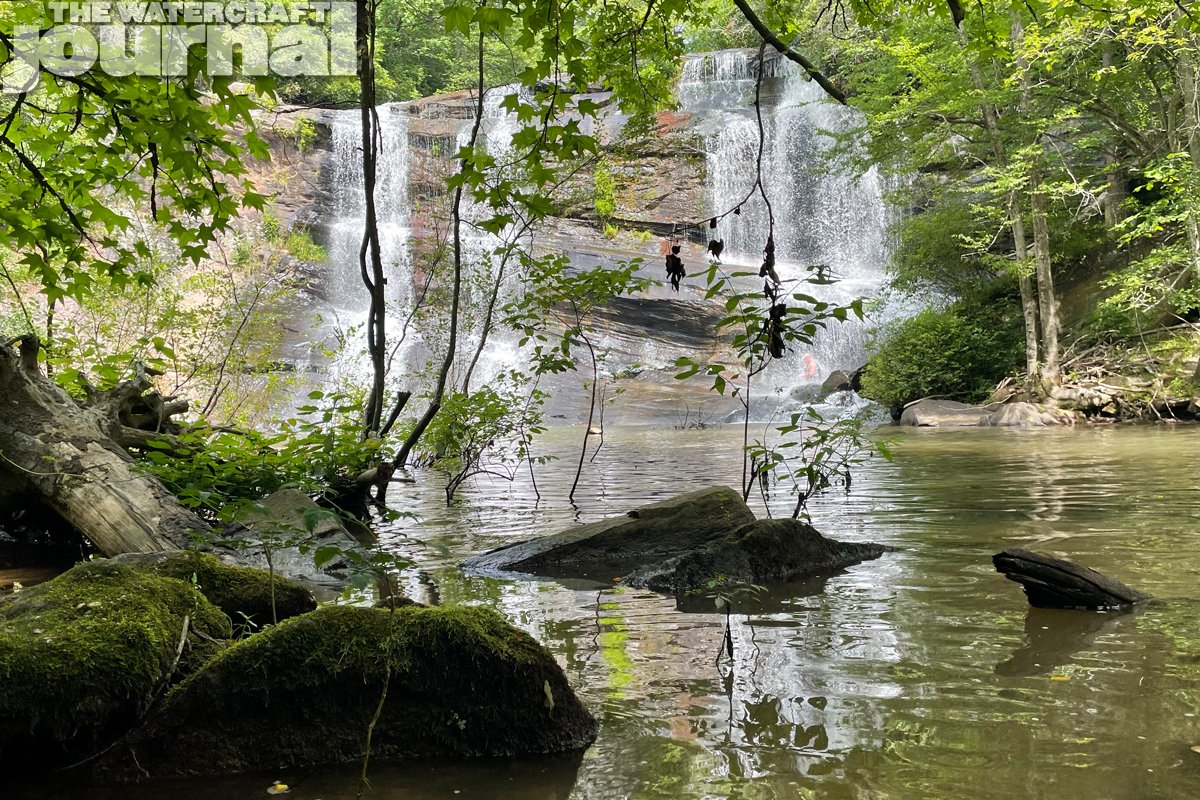
Humorously, our route took us almost exactly the way we had just come, only that prior to veering left to follow the river upstream, we peeled right into a grass-lined dead-end. Rather than turning around, our guides took us up Longnose Creek, beneath the River Road Bridge all the way up to Longnose Falls.
Once the site of an old grist mill, all that remains today is the collapsed tin roof and a grindstone. Pipe can still be seen at the top of the falls where water was diverted to operate the mill. Although I couldn’t find it, the stone chimney from the old home is said to be still standing nearby.
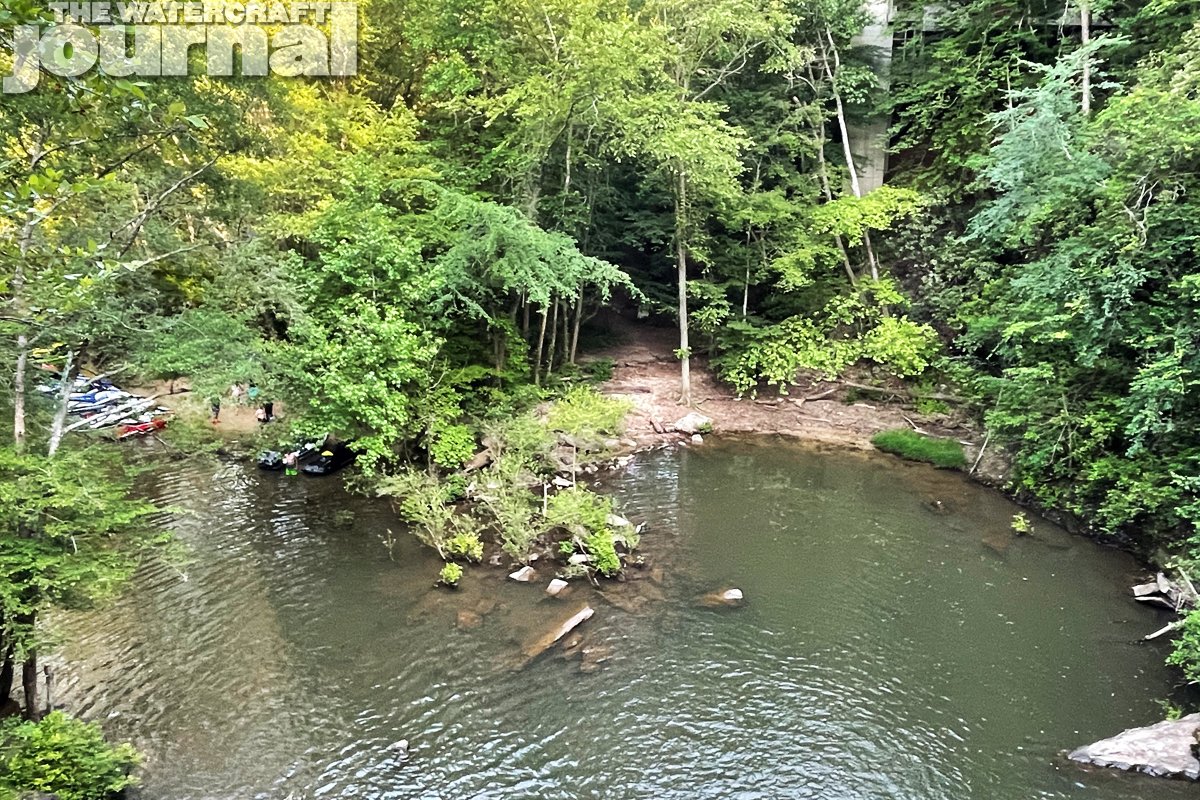
What we didn’t know was that Longnose Creek Falls sits on private property, that is until the owners met us at the top of the falls to shoo us away. After a little swimming, we loaded up our small group of skis and re-entered the Tugaloo. The sun was beginning to dip under the western mountains and the orange sky cast long shadows over the water and we needed to head back into town.
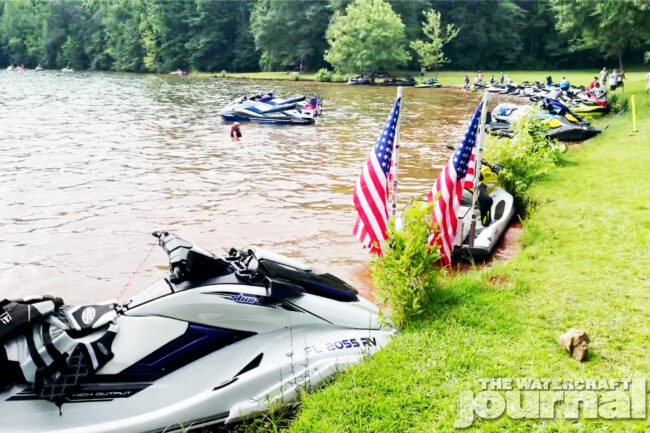
The next day meant preparing for the main group ride; so we refueled both Sea-Doos, as well as the giant Fish Pro cooler with ice and waters. The meeting spot was a grassy cove, and riders filled the shoreline. Expecting Saturday’s ride to venture south, I was surprised to hear, Hey! We’re going to go up to the waterfall! So off we went, a third time up the lake.
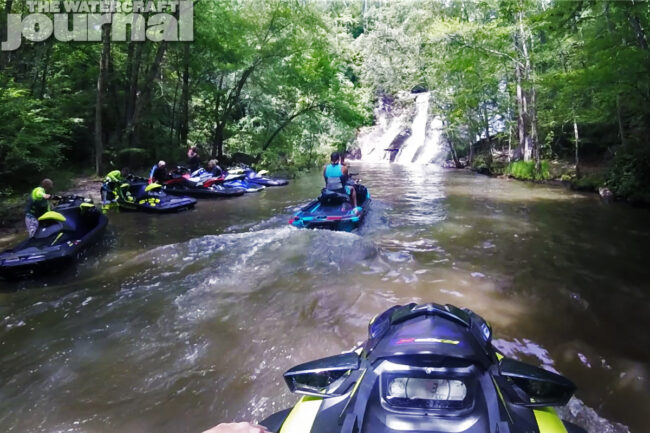
This time, our group was significantly larger – well over 35 skis, including a handful of brand-new RXP-X 300s identical to ours. Knowing the route blindfolded by now, I cut wide far outside of the wash made by the group and raced along the opposite side of the channel markers. Fuel really wouldn’t be an issue as the 18.5-gallon tank was topped off that morning and the route was pretty brief (I estimated 42 miles).
A few other supercharged Sea-Doos tried to give chase, but I wanted to get ahead of the pack to grab a few shots. Capturing the passing herd, I leapt from the broken remains of the Highway 123 bridge (now a fishing pier) and followed behind. Sure enough, we wove through the brush and tall grass up Longnose Creek toward the falls – still as impressive as the day before.
Most mingled in the shade, content to chat and socialize. Few waded out into the brisk pond at the base of the falls, fewer hiked up to the top. Having already seen the view from the top of the falls, thought I’d see the view from behind the falls and scrambled up the mossy rocks and peered from behind the backside of water.
Contented and ready to return, we all rode back to the Gumlog Launch to take in some professional jet ski racing. The Pro Watercross Tour provides venues for these athletes from Wisconsin to Florida throughout the season, and it’s incredible to see what these racers can do out on the water. (And make sure to head over to The Watercraft Journal to read our full race recap.)
With that, the Carolina Watercraft Club served up plates of BBQ pork ribs as well as raffled off some amazing prizes to those participated in the ride or who donated to the charity. Michael came home with some goodies, including an official Sea-Doo towel, which was immediately stored in his Fish Pro for future use.
With Father’s Day being that Sunday, we made off early the next morning back to Chattanooga. After swapping the RXP-X back over to my trailer, I bid goodbye to Michael and headed back home – grateful that I didn’t back out. The Belly Buster Ride isn’t just a great day on the water with awesome people, but a genuinely special event that donates its proceeds to a worthwhile charity. If you can’t go but want to help, please visit the Carolina Watercraft Club on Facebook to learn how to participate.
Additional images and footage by Michael Brandt of Chattanooga Fish Pro
After many months of waiting, parts are finally becoming available for today’s watercraft. For us, this meant getting the GreenHulk Stage 1 kit installed on our 2021 Sea-Doo RXP-X. With plenty of manufacturers offering performance kits, we decided to introduce our own. Even though the kit is strictly made of RIVA Racing parts, we still pieced together a kit that we felt was a perfect starting point for our Sea-Doo.
With this in mind, we also needed to coincide the modifications with what is currently done to our 2021 Yamaha GP1800R SVHO; with upcoming shootout videos between the two, both skis have to be equally modified for a fair comparison.
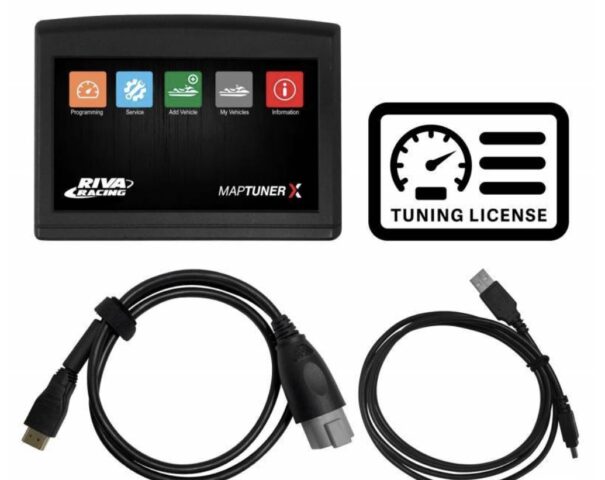
The kit includes a RIVA Racing intake, catch can, stainless steel wear ring, MaptunerX Sea-Doo bundle, and Solas 13/18 impeller. These mods are the perfect starting point in our eyes; the intake, tune, and impeller offers a substantial increase in performance while the catch can and stainless steel wear ring add to the watercraft’s reliability. The intake utilizes a larger diameter piping than the factory intake, a velocity stack, and a freer flowing air filter; this combination as a whole flows more air with less restriction than the factory setup.
The MaptunerX “Stage 2 8500” tune optimizes the fueling and timing to support the intake kit and the Solas 13/18 impeller helps put the extra power to use through the jet pump. While this is all that is necessary for an increase in performance, we wanted it to be more reliable than straight from the factory; implementing the catch can and stainless steel wear ring allowed us to achieve this goal. Sea-Doo 300 engines experience large amounts of blow-by; “blow-by” refers to air and fuel being pushed passed the piston rings and pressurizing the crankcase.
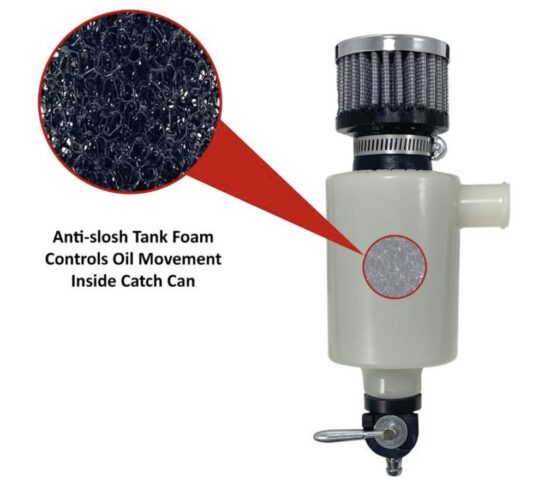
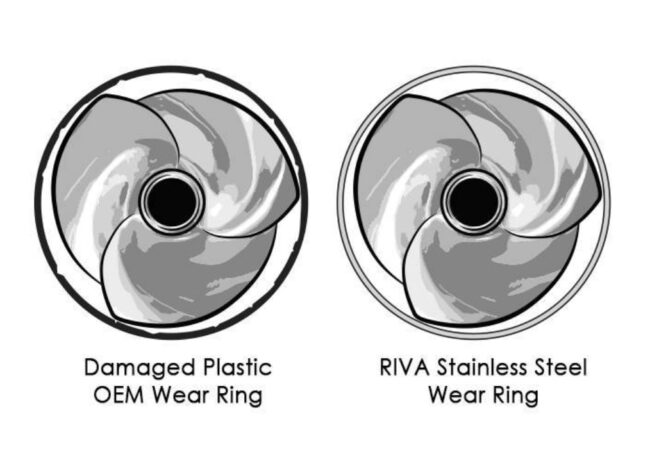
From the factory, the pressure is relieved through the intake and recirculates the crankcase vapors, and oil in some cases, back into the combustion chamber. The catch can acts as a holding tank for any oil or vapors being blown out of the TOPS valve, increasing the longevity and performance of the watercraft. The stainless steel wear ring will replace the factory plastic wear ring that is known for premature wear.
The kit includes only a handful of modifications but you’ll want to set aside at least a day out of your weekend to get these installed; the installation process is quite tedious but the fit, finish, and performance achieved is unrivaled! You’ll want to visit the GreenHulk Garage YouTube channel for a detailed installation video! The kit is exclusively sold at the GreenHulkStore.com and you can save 10% with the coupon code “Greenhulk” at checkout!
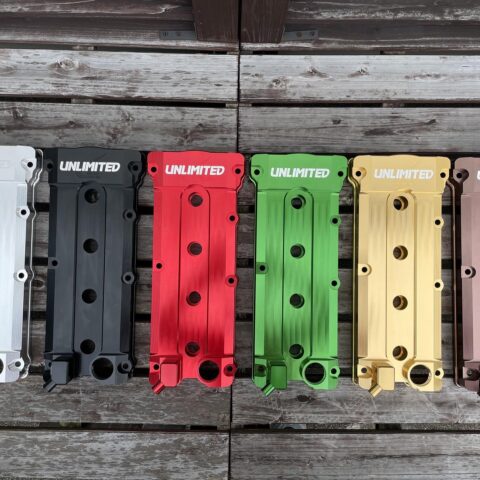
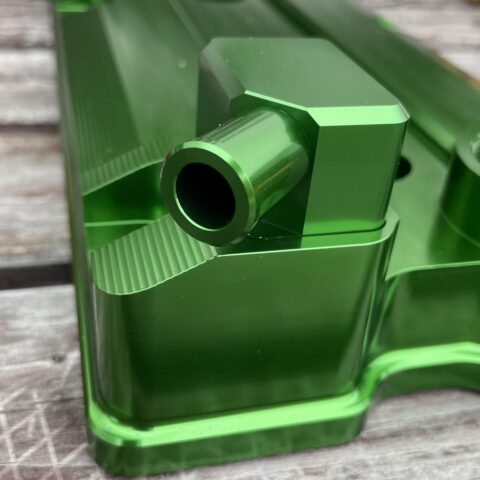
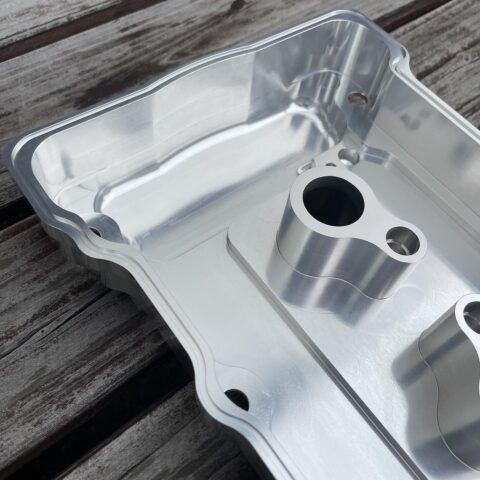
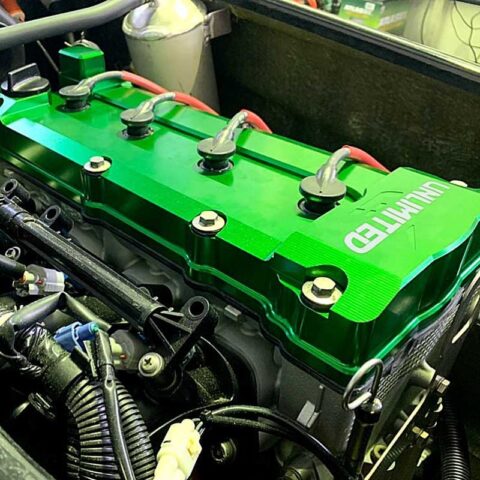
Unlimited PWC parts now offer billet aluminum valve covers for 4-stroke 1,498cc Kawasaki applications. These new billet covers are offered in a variety of anodized colors such as black, red, green, gold, and bronze color options. These new covers are high-quality performance dress-up products as described by Unlimited PWC. Though these do not claim to provide any performance gains, we all know shiny parts make engines faster. (wink, wink)
These new billet covers are in addition to their line of specially-machined and anodized parts for Kawasaki applications. They offer a wide variety of billet machined aluminum parts such as throttle levers, steering stem mounts, exhaust covers and even flush port connections. With almost unlimited options, the rider can customize their ski the way they want, whether that’s looking good while on the water or putting higher strength parts that are more durable than what OEM provides.
For the person that is wanting to make a “built” racing ski, Unlimited PWC performance parts are a leader in aftermarket parts specifically for Kawasaki watercraft applications. For more information on where to purchase parts please visit them at at their home page or on social media.
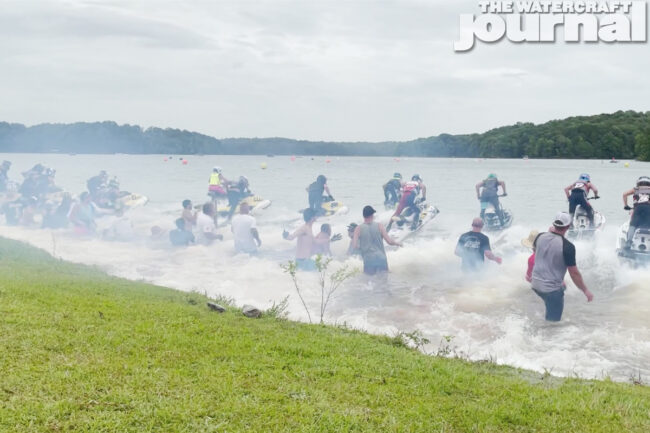
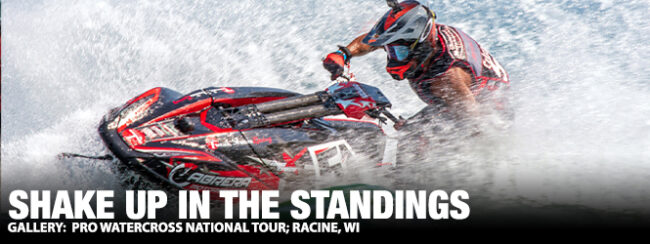
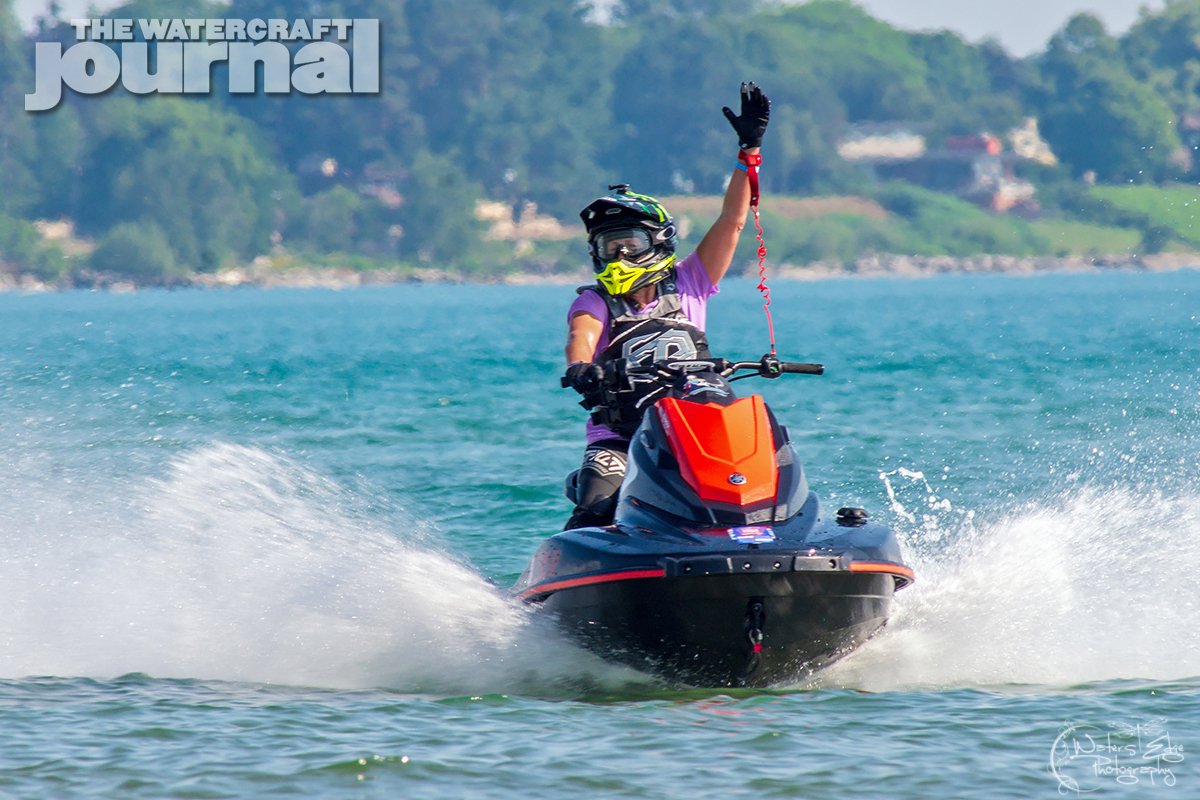
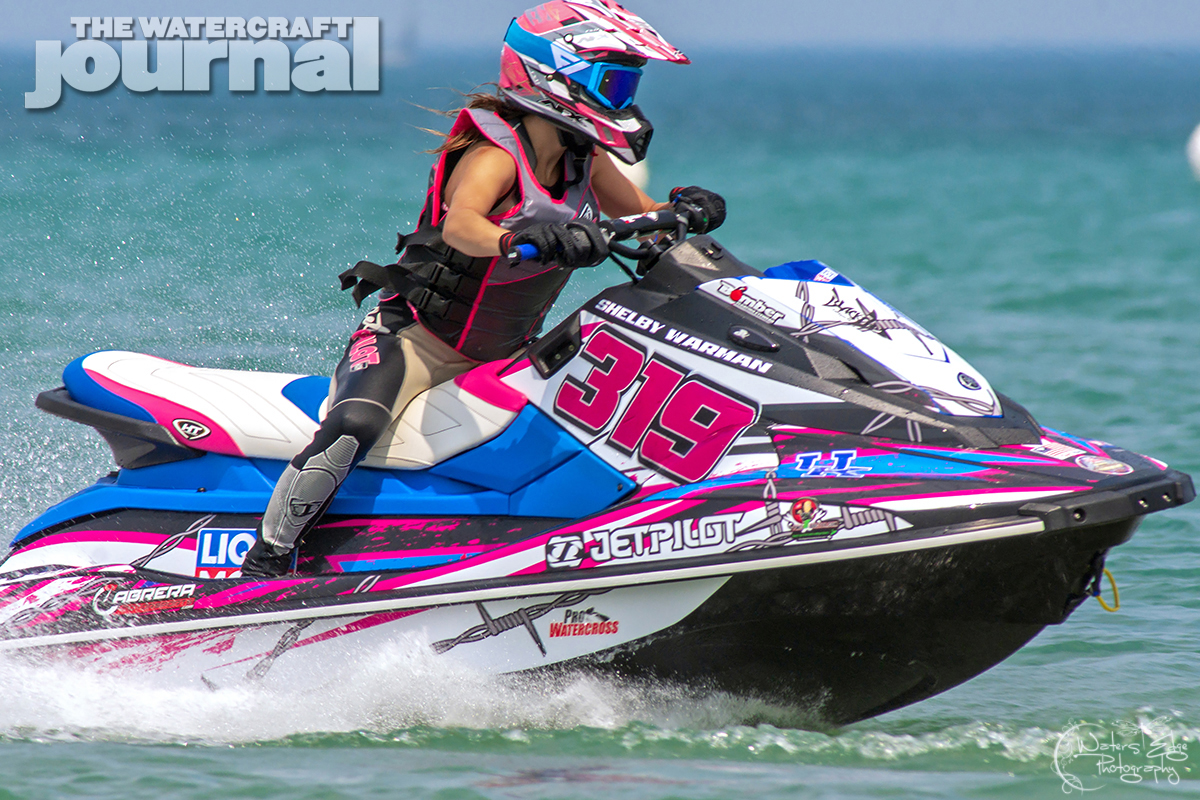
The 2021 Pro Watercross National Tour is technically over; the next race on August 28-29 in Lake Charles, LA, is billed as the Championship round, the culmination of the season’s six tour stops. With double points at stake, and event champions to be named, and season-wide tour-point standing champions to be crowned, the anticipation is bound to ramp up between now and late August.
Racine, the furthest north of the Pro Watercross tour stops, is a great race site, and normally a fairly well-attended, popular stop on the tour. This year, however, despite a decent turnout, bolstered by a good showing from local and regional racers, there were some missing faces – many of whom are tour champion contenders, if not points-leaders in their classes.
Despite the notable absences, though, the Racine weekend provided plenty of race intensity, some condition switch-ups that kept things interesting for spectators and racers alike, and some strong showings from some of the newer names to the game.
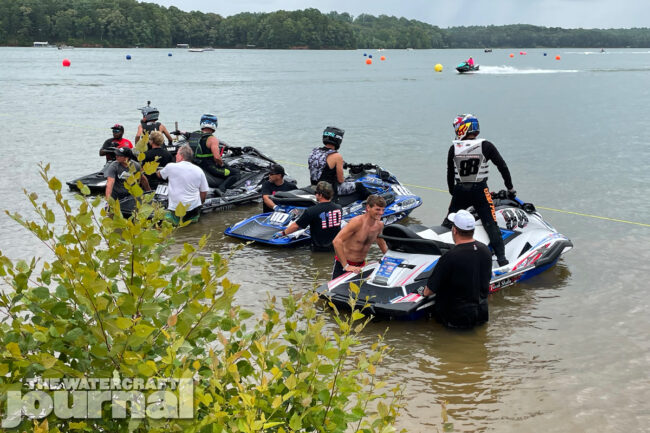
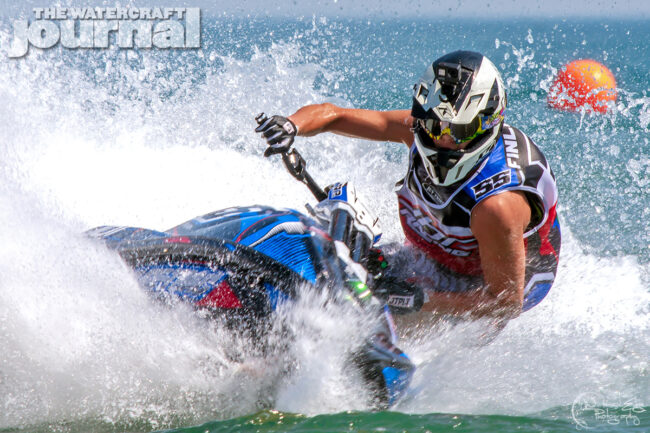
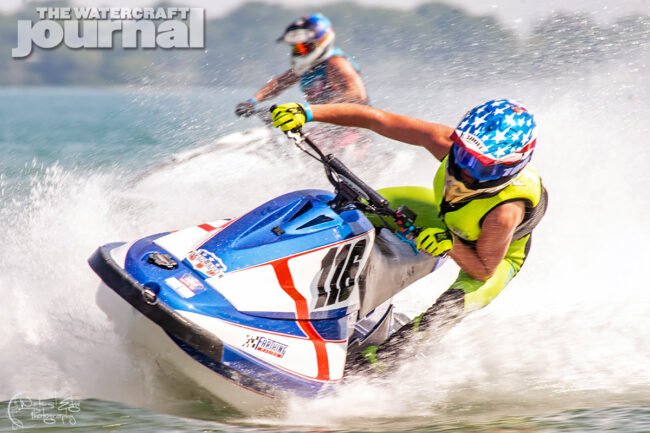
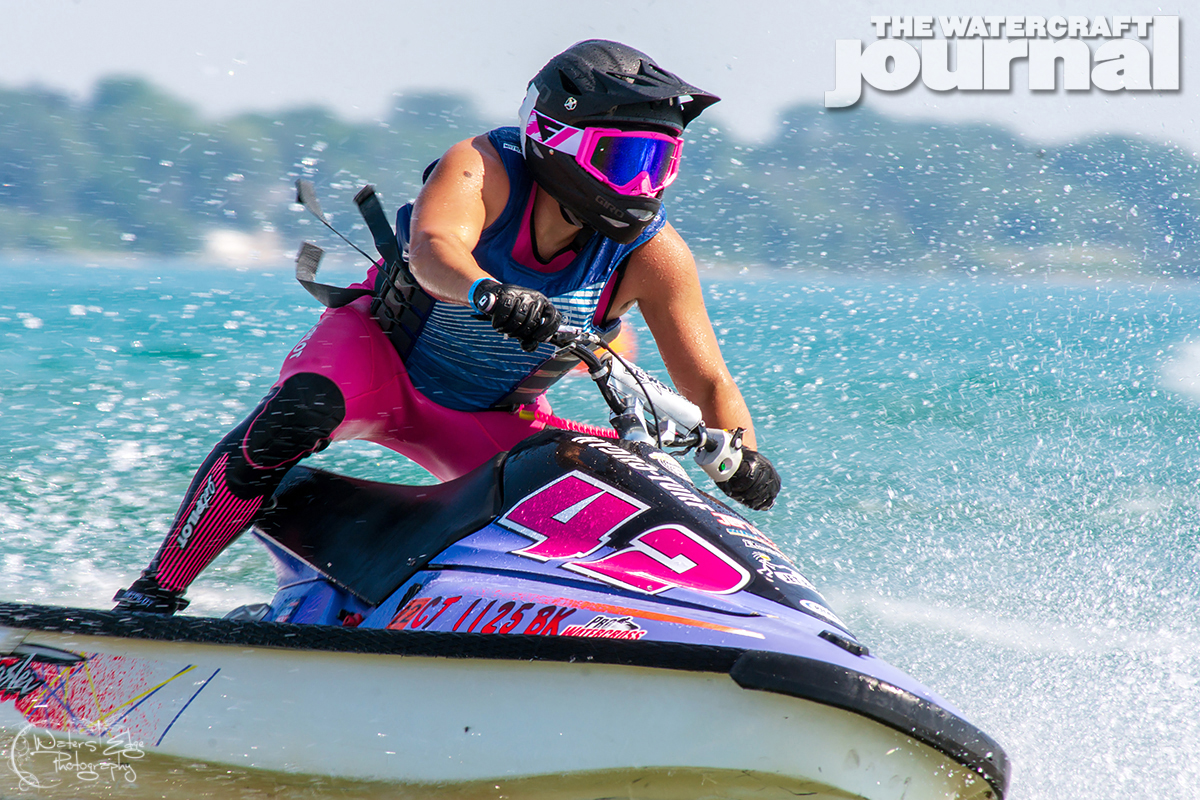
The Pro-Am Ski GP class staked down the largest lineup of the weekend, with nine racers set behind the band, despite the absence of three of the four points-holders in the class. Headed into Round six, Deven Farthing led the pack with 208 points, a lead he held onto with a third-place overall finish at Racine (2, 6, 2) to bring his tour points to 319. However, following the Hartwell race, Matthew Richuk as close on Farthing’s heals with 199 point, followed by Jimmy Wilson with 187.
Neither Richuk or Wilson attended the Racine tour stop, and Camden Powell, who now holds 206 points following his 6, 7, 3 weekend at Racine. Richuk held onto their place in the tour points chase, and much of the attention that was focused on the competition between Richuk and tour veteran Jimmy Wilson at Hartwell shifted to the battle at Racine between Mike Klippenstien (3, 2, 4) and his young protege, Ryder Wildeboer (1, 1, 1) With Double points on the line in Lake Charles, the Pro-AM Ski GP 2021 Champion is far from settled.
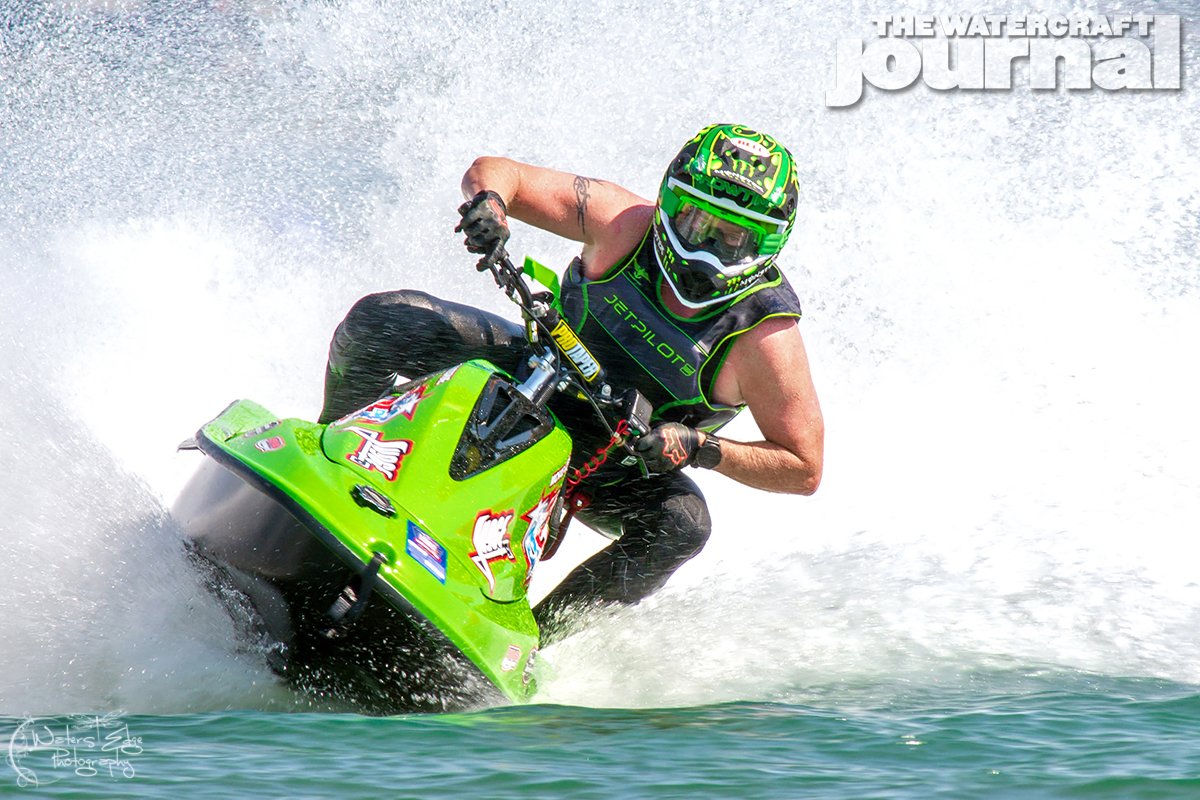
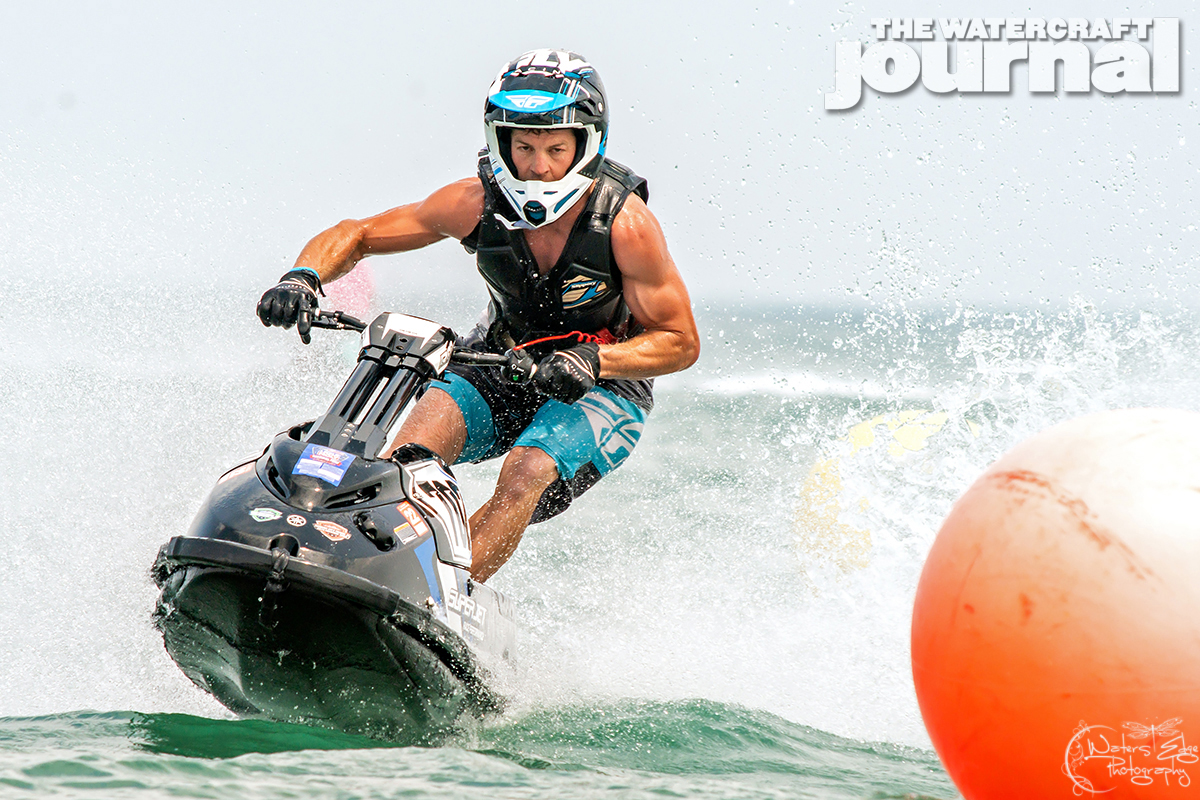
Pro-Am Runabout Box Stock was another class that put up some tough racing, with some great racing by both Arnold Martinez, who took the overall top podium spot for the weekend, and Brad Bohat, who landed on the second podium step even after two first-place finishes with a rough Moto 2.
However, all three of the top tour points holders were absent at Racine, with Troy and Tory Snyder, as well as Seth Nama, missing from the lineup. Season-long tour point standings heading into the National Championship, however, remain unchanged from the post-Hartwell trio of Tory Snyder (300), Troy Snyder (260) and Seth Nama (140) due to both Bohat and Martinez having missed out on most of the 2021 tour stops.
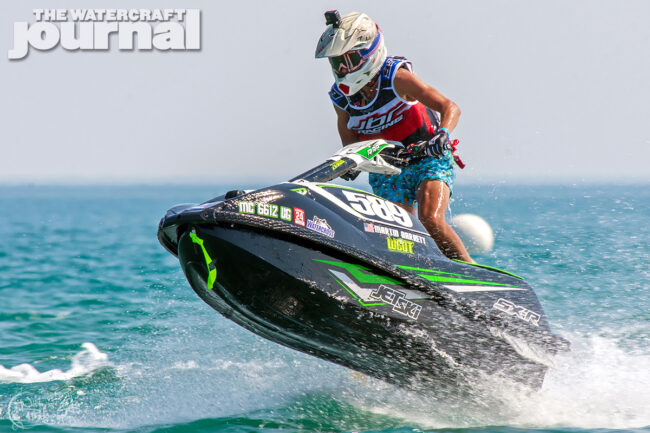
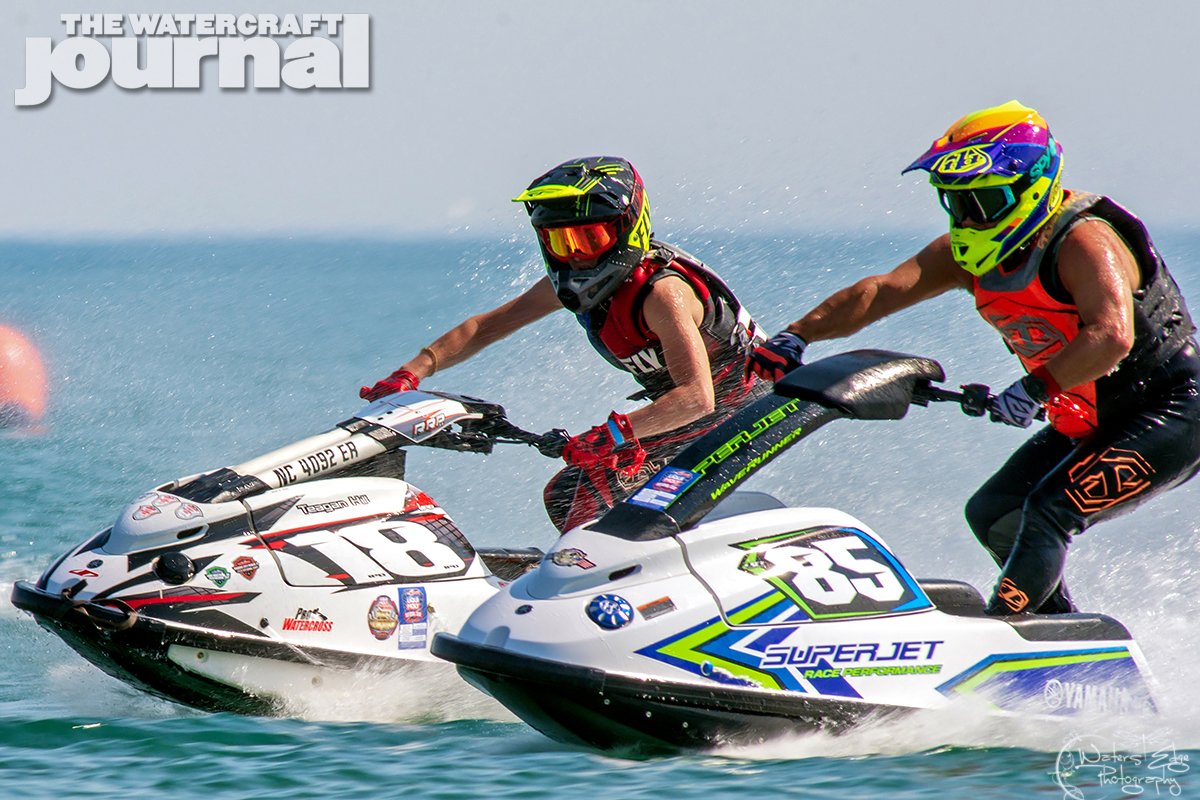
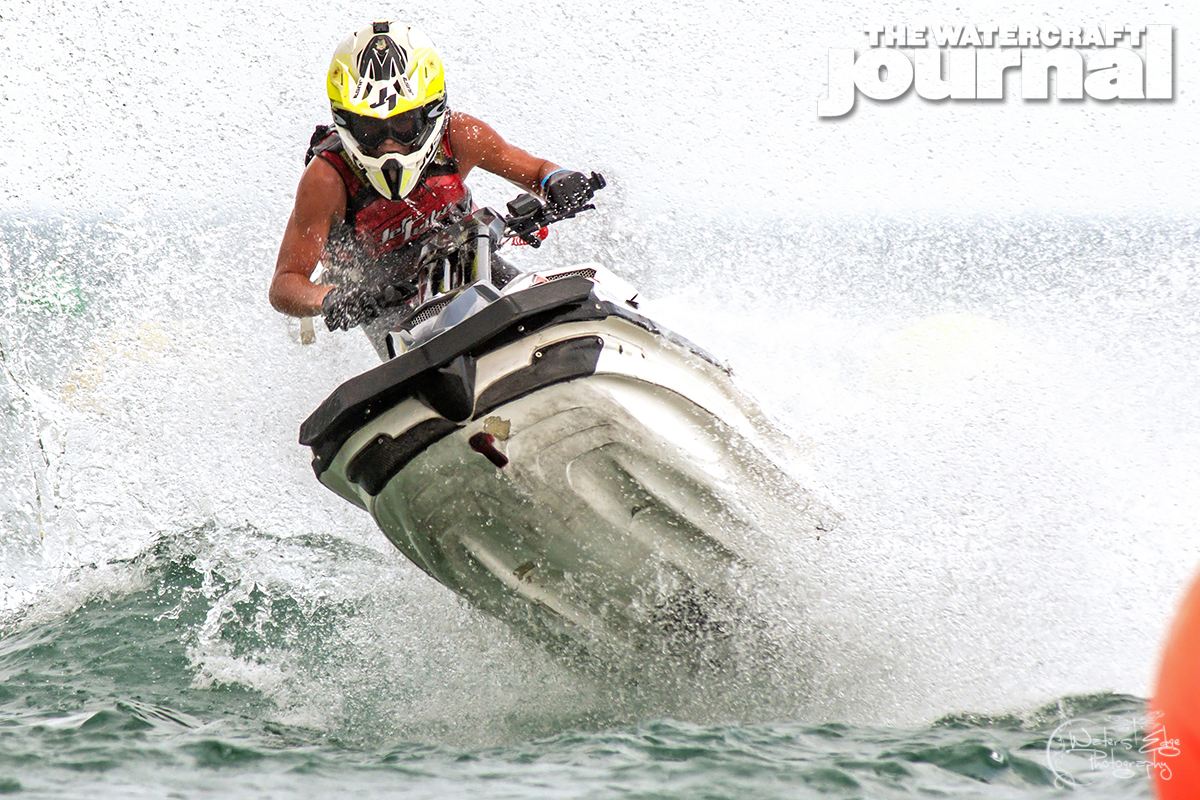
In Pro-Am Ski Stock, all three of the weekend’s motos posted up matching results, with Ryder Wildeboer (1, 1, 1) taking the weekend’s top spot, Jeb Zarzour (2, 2, 2) taking second, and Alex Anderson (3, 3, 3) taking the third spot. Headed into the National Championship, sporadic and low turnout for the class leaves Tour Points leader Zarzour with only 113, followed by Wildeboer and Richuk tied at 60 points.
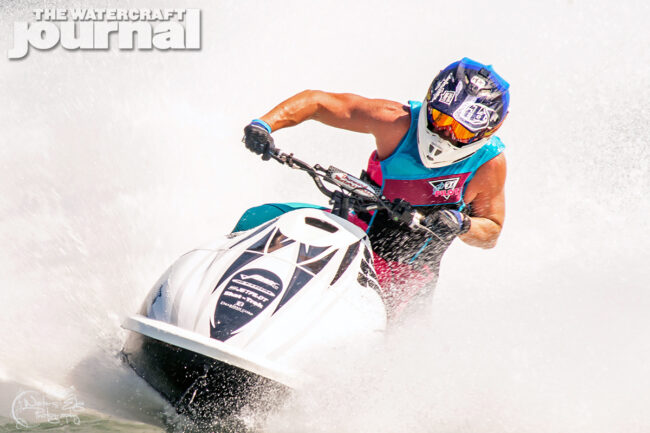
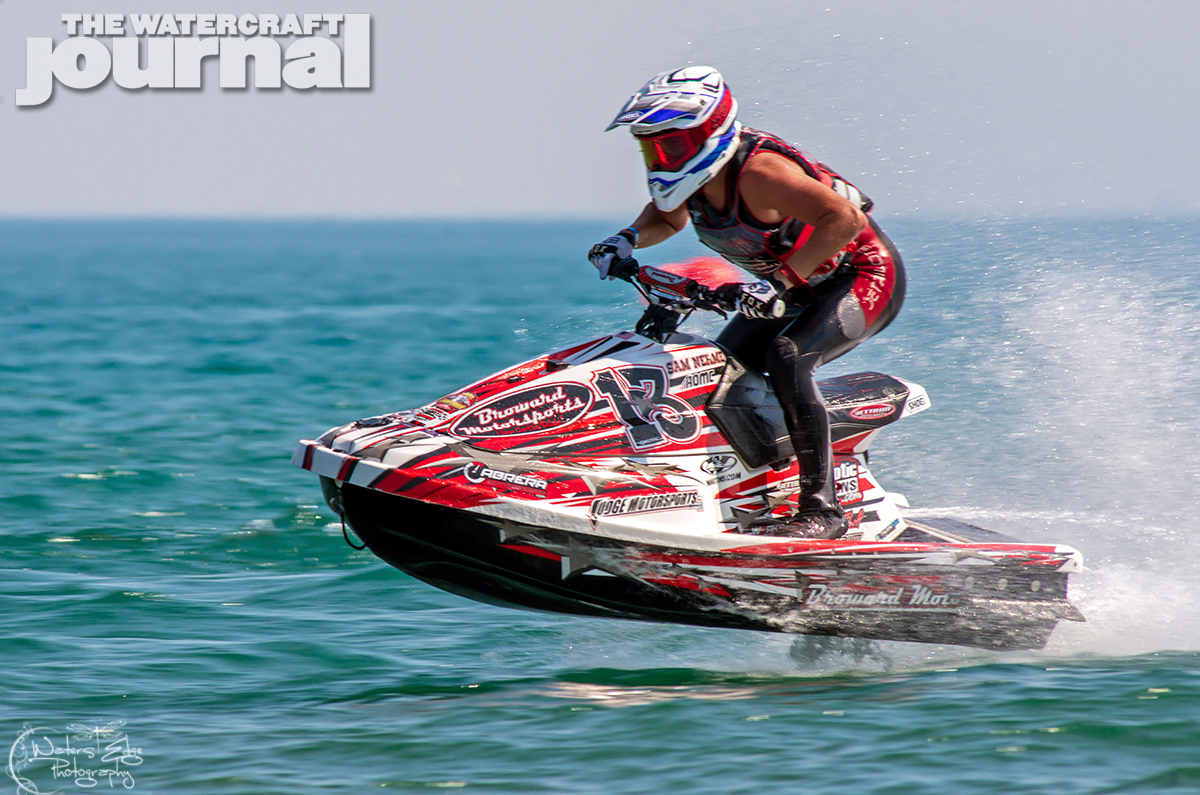
Sport Stock was again one of the most attention-grabbing classes, and none of the top tour point holders were missing from the lineup. The weekend’s racing ended with Jake Zier (5, 1, 1) taking the top podium spot, Sammy Nehme (1, 2, 4) taking second), and Talan Farthing (3, 4, 2) sneaking past his brother, Deven (4, 3, 3), to take the third podium spot. Tour points in the class stand at Deven Farthing, 319; Sammy Nehme, 215; Talan Farthing, 203.
For complete results from Racine, and up-to-date tour points standings, visit prowatercross.org. Visit www.watersedgephoto.online for additional race images from Racine and prior tour stops.


 He has a lot of stories, including one with pictures of seeing boats on fire. He had grabbed a ride back to the marina where his PWC was docked and saw smoke billowing.